🧢 Beautiful ✨ Detailed πŸ’ Adorable

Fox Hat Pattern

Fox Hat Pattern
4.6β˜… Rating
2-4 Hours Time Needed
3.4K Made This
βœ‚οΈ

Intermediate Level

Ideal for those with basic crochet experience, featuring slightly more advanced stitches and techniques to expand your skills.

⏱️

Bite-Sized Project

Finishes in 2-4 hoursβ€”perfect for an afternoon of creative relaxation.

🧣

Snug Essential

Everyday comfort with practical charm, designed for both functionality and style through changing seasons.

About This Fox Hat Pattern

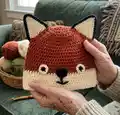
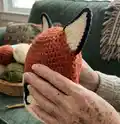
This Fox Hat Pattern creates a cozy, child-sized beanie with adorable fox ears and embroidered facial details. You will work in half double crochet rounds for a textured, stretchy fabric that fits snugly. The pattern includes multiple sizes from 6/12 months up to 6/8 years and uses Caron Simply Soft for a soft, durable finish. Ears, eyes and nose are crocheted separately and sewn on for a tidy, polished look.

Fox Hat Pattern crochet pattern - detailed view of completed project

Clear round-by-round instructions guide you through increases and shaping to get the perfect fit. Simple sewing and embroidery finishes are included so you can replicate the pictured placement easily.

Why You'll Love This Fox Hat Pattern

I absolutely love this pattern because it turns a simple hat into a playful character with very little extra work. The ear construction is clever and layered for a neat, professional look that really stands out. I enjoy that the pattern includes multiple child sizes so you can make matching hats for siblings or gifts. The finishing stitches for the face let you personalize expression and charm, and using Caron Simply Soft gives such a cozy, squishy texture I always reach for it.

Fox Hat Pattern step 1 - construction progress Fox Hat Pattern step 2 - assembly progress Fox Hat Pattern step 3 - details and accessories Fox Hat Pattern step 4 - final assembly and finishing

Switch Things Up

I love to change the color palette to create different moods; try pastel tones for a softer baby version or deep oranges and browns for a classic fox look.

For a chunkier, cozier hat I switch to a bulky weight yarn and a larger hook which makes a quick, squishy version perfect for chilly days.

I sometimes add earflaps and braids to make the hat extra snug for toddlers and to give the hat a playful winter-look.

Try embroidering different facial expressions using short straight stitches to make each hat feel unique and full of personality.

Swap the black nose for a small crocheted heart or button (sewn on securely) to make a lovey gift for a new baby.

Want a mini version? Use a finer yarn and smaller hook to make keychain-sized fox hats or doll accessories.

I also like to add a soft fleece lining cut from leftover fabric for extra warmth and a neat interior finish.

Place the ears slightly closer together for a younger-child look or wider apart for a more whimsical, cartoon fox appearance.

Adjust the number of increase rounds to fit a custom head circumference; measure as you go and add or omit increase rounds for a perfect fit.

Try decorative edging with a reverse single crochet or picot around the brim for a more finished, decorative edge that frames the fox face.

Common Mistakes & How to Fix Them

βœ— Forgetting that Ch 2 at the beginning of rounds does not count as a hdc; remember to count actual hdc stitches only when checking stitch counts. βœ— Skipping the join with A at the specified row can leave a visible color gap; change color and join A exactly at the end of the last MC round to avoid uneven striping. βœ— Not checking your gauge will change the finished size significantly; measure 13 hdc and 11 rows = 4" (10 cm) with the larger hook and adjust hook size if necessary. βœ— Working with inconsistent tension during increases creates a lopsided crown; slow down and count stitches after each increase round to keep the crown even. βœ— Sewing ears in the wrong orientation makes them sit unevenly; pin both ears in place and compare spacing visually to match the picture before stitching.

Fox Hat Pattern

Make a charming fox hat for babies and kids with this full crochet pattern. You will enjoy the playful ear details and easy shaping that give this hat its adorable fox look. The pattern includes multiple child sizes and clear instructions for joining ear pieces and adding facial features. Perfect for gifting or keeping little ones cozy in handmade style.

Intermediate 2-4 Hours

Materials Needed for Fox Hat Pattern

β€” Main Fabric

  • 01
    Caron Simply Soft (6 oz/170.1 g; 315 yds/288 m) - Main Color (MC) Pumpkin (9765) - 1 ball
  • 02
    Caron Simply Soft - Contrast A Off White (9702) - 1 ball
  • 03
    Caron Simply Soft - Contrast B Black (9727) - 1 ball

β€” Tools Required

  • 01
    Crochet hook U.S. G/6 (4 mm)
  • 02
    Crochet hook U.S. H/8 (5 mm)
  • 03
    Smaller hook (use 4 mm where pattern indicates smaller hook)
  • 04
    Larger hook (use 5 mm where pattern indicates larger hook)
  • 05
    Scissors
  • 06
    Yarn/tapestry needle for sewing and embroidery
  • 07
    Stitch markers
  • 08
    Measuring tape

Progress Tracker

0% Complete

β€” Hat :

Infos :

Sizes: To fit head circumference 6/12 mos 17" [43 cm], 18/24 mos 18" [45.5 cm], 4 yrs 19" [48 cm], 6/8 yrs 19" [49.5 cm]. Gauge: 13 hdc and 11 rows = 4" [10 cm] with larger hook. Instructions are written for smallest size; numbers for each size are shown in color throughout the pattern. Note: Ch 2 at beg of rnds does not count as hdc.

Round 1 :

With larger hook and MC, ch 4. Join with sl st to first ch to form a ring. Ch 2. 8 hdc in ring. Join with sl st to first hdc. (8 hdc)

Round 2 :

Ch 2. 2 hdc in first hdc. *2 hdc in next hdc. Rep from * around. Join with sl st to first hdc. (16 hdc)

Round 3 :

Ch 2. 2 hdc in first hdc. *1 hdc in next hdc. 2 hdc in next hdc. Rep from * to last hdc. 1 hdc in last hdc. Join with sl st to first hdc. (24 hdc)

Round 4 :

Ch 2. 2 hdc in first hdc. *1 hdc in each of next 2 hdc. 2 hdc in next hdc. Rep from * to last 2 hdc. 1 hdc in each of last 2 hdc. Join with sl st to first hdc. (32 hdc)

Round 5 :

Ch 2. 2 hdc in first hdc. *1 hdc in each of next 3 hdc. 2 hdc in next hdc. Rep from * to last 3 hdc. 1 hdc in each of last 3 hdc. Join with sl st to first hdc. (40 hdc)

Round 6 :

Ch 2. 2 hdc in first hdc. *1 hdc in each of next 4 hdc. 2 hdc in next hdc. Rep from * to last 4 hdc. 1 hdc in each of last 4 hdc. Join with sl st to first hdc. (48 hdc)

Round 7 :

Size 6/12 mos only: Ch 2. 2 hdc in first hdc. *1 hdc in each of next 11 hdc. 2 hdc in next hdc. Rep from * to last 11 hdc. 1 hdc in each of last 11 hdc. Join with sl st to first hdc. (52 hdc)

Round 7 :

Sizes 18/24 mos, 4 yrs and 6/8 yrs only: Ch 2. 2 hdc in first hdc. *1 hdc in each of next 5 hdc. 2 hdc in next hdc. Rep from * to last 5 hdc. 1 hdc in each of last 5 hdc. Join with sl st to first hdc. (56 hdc)

Round 8 :

Sizes 4 yrs and 6/8 yrs only: Ch 2. 2 hdc in first hdc. [1 hdc in each of next 27 (13) hdc. 2 hdc in next hdc] 1 (3) time(s). 1 hdc in each hdc to end of rnd. Join with sl st to first hdc. (58 (60) hdc)

Round 9 :

All sizes: Ch 2. 1 hdc in each hdc around. Join with sl st to first hdc. Rep last rnd until Hat from beg measures 5 (5-5-6)" [12.5 (14-14-15) cm], joining A at end of last rnd. Break MC.

Round 10 :

With A, rep last rnd until Hat from beg measures 7 (7-8-8)" [18 (19-20.5-21.5) cm]. Fasten off.

β€” Ears :

Inner Ear :

With smaller hook and A, ch 2.

1st row :

(RS). 5 sc in 2nd ch from hook. Turn.

2nd row :

Ch 1. 1 sc in each of first 2 sc. 3 sc in next sc. 1 sc in each of next 2 sc. Turn. (7 sc)

3rd row :

Ch 1. 1 sc in each of first 3 sc. (1 sc. 1 hdc. 1 dc. 1 hdc. 1 sc) in next sc. 1 sc in each of next 3 sc. Turn.

4th row :

Ch 1. 1 sc in each of next 5 sts. (1 sc. 1 hdc. 1 dc. 1 hdc. 1 sc) in next sc. 1 sc in each of next 5 sc. Turn.

5th row :

Ch 1. 1 sc in each of next 7 sts. (1 sc. 1 hdc. 1 dc. 1 hdc. 1 sc) in next sc. 1 sc in each of next 7 sc. Turn.

6th row :

Ch 1. 1 sc in each of next 9 sts. (1 sc. 1 hdc. 1 dc. 1 hdc. 1 sc) in next sc. 1 sc in each of next 9 sc. Fasten off.

Outer Ear :

With smaller hook and MC, make as given for Inner Ear.

Join Ears :

With WS of Inner Ear and Outer Ear facing each other, and RS of Inner Ear facing, using smaller hook join B with sl st to first sc.

1st row :

Ch 1. Working through both thicknesses, 2 sc in first sc. 1 sc in each of next 10 sts. 3 sc in next sc. 1 sc in each of next 10 sts. 2 sc in last sc. (28 sc)

2nd row :

Ch 1. 1 sc in same sc as ch. 1 sc in each of next 7 sc. 1 sc, 1 hdc, 1 dc, 1 tr, 1 dc, 1 hdc, 1 sc in next sc. 1 sc in each of next 7 sc. Join with sl st to first sc. Fasten off.

β€” Eyes :

1st rnd :

With smaller hook and B, ch 2. 6 sc in 2nd ch from hook. Join A with sl st to first sc. Break B.

2nd rnd :

With A, ch 1. 2 sc in each sc around. Join with sl st to first sc. Fasten off.

β€” Nose :

1st rnd :

With smaller hook and B, ch 2. (3 sc, 1 hdc, 1 dc, 1 tr, 1 dc, 1 hdc) all in 2nd ch from hook. Join with sl st to first sc. Fasten off.

β€” Finishing :

Info :

Sew Eyes, Ears and Nose to Hat as shown in picture. With 2 strands of B, embroider mouth with straight stitch as shown in picture.

Assembly Instructions

  • Sew Eyes to Hat using the photo as a guide for placement; position the eyes symmetrically on the cream contrast band and stitch securely through the back of each eye piece.
  • Place each assembled Ear on top edges of the Hat where shown in picture, pinning both ears to check spacing before sewing, then stitch around the base through both ear and hat fabric to secure.
  • Sew the Nose to the center point between the eyes, aligning the top of the nose with the crown line and securing with small tight stitches so it lies flat.
  • Using 2 strands of Contrast B (black), embroider the mouth with a straight stitch as pictured; try the mouth placement on the hat with pins first then stitch through the hat lining for stability.
  • Weave in all ends neatly at the wrong side of the hat and block lightly as needed to even out stitches and help the ears hold their shape.

Important Notes

  • πŸ’‘Ch 2 at the beginning of rounds does not count as a hdc; count only completed hdc stitches when checking totals.
  • πŸ’‘Check gauge before starting: 13 hdc and 11 rows = 4" (10 cm) with larger hook and adjust hook size if necessary.
  • πŸ’‘When joining ear pieces, work through both thicknesses and fasten off securely to keep ear seams tidy and durable.
  • πŸ’‘Pin all facial pieces in position and compare to the reference photo before sewing to ensure correct placement and symmetry.

This Fox Hat Pattern is a delightful project that transforms soft Caron Simply Soft yarn into a playful fox beanie perfect for little ones. The layered ear construction and neatly embroidered face make this hat both durable and irresistibly cute. Make one for every season and share handmade smiles! 🧢🦊

You ask,

we answer.

FAQs

What size will the finished piece be?

The finished hat fits the stated head circumferences: 6/12 months 17" [43 cm], 18/24 months 18" [45.5 cm], 4 years 19" [48 cm], 6/8 years 19" [49.5 cm].

Can I use different yarn weights for this pattern?

Yes, you can use different yarn weights but this will change the finished size; check your gauge and adjust hook sizes to match the pattern gauge of 13 hdc and 11 rows = 4" (10 cm).

Do I need prior crochet experience for this pattern?

This pattern is rated intermediate and assumes familiarity with half double crochet, increases, and basic shaping, as well as ability to sew pieces together.

How long does this project typically take to complete?

Most crocheters finish this hat in 2-4 hours, depending on experience and whether you make additional finishing details like embroidery or multiple sizes.