🧶 Beautiful ✨ Detailed 💝 Adorable

Forest Friends Amigurumi Pattern

Forest Friends Amigurumi Pattern
4.3★ Rating
5-7 Hours Time Needed
2.3K Made This
✂️

Intermediate Level

Ideal for those with basic crochet experience, featuring slightly more advanced stitches and techniques to expand your skills.

⏱️

Weekend Treat

Takes 5-7 hours, making it an enjoyable project to finish over a couple of days.

🧸

Cute Companion

An adorable friend to cherish, handcrafted with love to bring comfort and joy for years to come.

About This Forest Friends Amigurumi Pattern

This pattern teaches you how to crochet four stackable donut-shaped amigurumi characters: a birdie, a bunny, a bear and a tree. Each piece is worked in continuous rounds with clear, round-by-round instructions and small accessory parts like ears, beaks, leaves and a pom-pom tail. The pattern uses worsted weight yarn and straightforward shaping techniques so you can make a coordinated set in lovely colors.

Forest Friends Amigurumi Pattern crochet pattern - detailed view of completed project

You will find materials lists, recommended tools, and placement notes for safety eyes included for each character. Detailed finishing instructions explain how to sew the donut pieces together and stuff as you go for a neat, even finish.

Why You'll Love This Forest Friends Amigurumi Pattern

I absolutely love this pattern because it transforms simple donut shapes into personality-packed little friends with only a few accessory pieces. I enjoyed designing the stacking concept because it makes a toy that is both decorative and playful. I love how quick each donut works up using basic stitches and a continuous spiral method, so you see progress fast. I also appreciate that small color changes and tiny details like leaves or a pom-pom really change the character and make each piece unique.

Forest Friends Amigurumi Pattern step 1 - construction progress Forest Friends Amigurumi Pattern step 2 - assembly progress Forest Friends Amigurumi Pattern step 3 - details and accessories Forest Friends Amigurumi Pattern step 4 - final assembly and finishing

Switch Things Up

I love how easy it is to customise these donuts with color changes—try pastel shades for a nursery set or bright contrasting colors for a playful stack.

If you want a bigger version, I switch to a bulkier yarn and a larger hook to create chunky, squeezable friends; for tiny keychains use thinner yarn and a smaller hook.

I often add embroidered smiles, freckles or blushing cheeks with embroidery floss to change the expression and personality of each friend.

Swap safety eyes for embroidered eyes if the toys are for very young children to make them completely soft and baby-safe.

Turn the tree into a holiday character by adding tiny stitched ornaments or a small crocheted star on top for seasonal decorations.

You can make outfit accessories like a tiny scarf or hat by crocheting simple rounds or chains and sewing them on for extra charm.

Try adding a small bell or sewn-in rattle inside one donut to create an auditory surprise for babies and toddlers.

I sometimes use variegated or speckled yarn for the base of the donut to add subtle texture without extra color changes.

For a forest collection, create multiple color variations and arrange them as a mobile or garland by stringing them through the center hole.

Use felt appliques for noses, leaves or cheeks for quicker detailing if you prefer not to embroider.

I recommend experimenting with different eye sizes and nose types—the small differences in placement and size can drastically change the character's look.

Mix and match accessories from each character (ears, leaves, beaks) to invent new friends and make a whole creative family of stackable amigurumi.

Common Mistakes & How to Fix Them

✗ Skipping a stitch marker when working in a spiral causes you to lose track of the round; always mark the last stitch of each round to stay oriented. ✗ Overstuffing the donut before closing will distort the shape and make sewing difficult; stuff gradually as you sew, filling a little at a time to maintain even shape. ✗ Forgetting to attach safety eyes before closing the donut can be tricky to correct later; always place and secure eyes and facial details before sewing the donut fully shut. ✗ Pulling your yarn too tightly when making increases or decreases creates puckering in the rounds; maintain consistent, moderate tension and practice the decreases until they look seamless.

Forest Friends Amigurumi Pattern

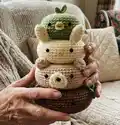
Make a stackable set of adorable forest friends — a birdie, bunny, bear, and tree — crocheted as donut-shaped amigurumi. This pattern gives you complete round-by-round instructions, tips for assembly, and small accessory patterns like ears, beaks, leaves and a pom-pom tail. Perfect for making a charming handmade gift or a sweet set of nursery decorations you can stack and play with.

Intermediate 5-7 Hours

Materials Needed for Forest Friends Amigurumi Pattern

— Main Fabric

  • 01
    Vanna's Choice yarn (weight 4 / worsted), sweet pea (birdie)
  • 02
    Vanna's Choice yarn (weight 4 / worsted), duckie (birdie beak)
  • 03
    Vanna's Choice yarn (weight 4 / worsted), lamb (bunny and snout accents)
  • 04
    Vanna's Choice yarn (weight 4 / worsted), pink (bunny nose)
  • 05
    Vanna's Choice yarn (weight 4 / worsted), beige (bear body)
  • 06
    Vanna's Choice yarn (weight 4 / worsted), chocolate (tree body)
  • 07
    Vanna's Choice yarn (weight 4 / worsted), kelly green (tree leaves)
  • 08
    Yarn colours of your choice (worsted/#4) for coordinating sets and accents

— Tools Required

  • 01
    Crochet hook size 4.25 mm (recommended)
  • 02
    Crochet hook of the appropriate size for the yarn chosen
  • 03
    Safety eyes 7.5 mm (birdie)
  • 04
    Safety eyes 8 mm (bunny)
  • 05
    Safety eyes 9 mm (bear)
  • 06
    Safety eyes 10.5 mm (tree)
  • 07
    Safety nose 12 mm (bear snout)
  • 08
    Stuffing (fiberfill, polyfill, etc.)
  • 09
    Tapestry needle for sewing and weaving ends
  • 10
    Scissors
  • 11
    Stitch markers

Progress Tracker

0% Complete

— General Materials & Notes :

Infos :

Materials: yarn colours of your choice. crochet hook of the appropriate size for the yarn chosen. safety eyes. stuffing (fiberfill, polyfill, etc.). tapestry needle.

Infos :

Recommended Materials: Vanna's Choice yarn (weight 4). 4.25 mm crochet hook.

Infos :

Finished Size: Birdie is 4 inches in diameter. Bunny is 5 inches in diameter. Bear is 6 inches in diameter. Tree is 7 inches in diameter. All are approximately 2 inches tall based on "recommended materials". Sizes may vary depending on the yarn and size of crochet hook used.

Infos :

Abbreviations: R = round. st = stitch. ch = chain stitch. sc = single crochet. dc = double crochet. slst = slip stitch. inc = increase (single crochet twice in the same stitch). dec = decrease (single crochet two stitches together). * = repeat instructions between * and *.

— Tips :

Info :

Most pieces begin with a "ring". I always use the "magic ring" method as I think this achieves the nicest look.

Info :

When decreasing, I prefer to skip a stitch rather than single crocheting two stitches together – this type of decrease appears more seamless.

Info :

Amigurumi pieces are created by working in one continuous spiral. Mark the last stitch of each round to keep track of where you are.

— Starting Your Donut :

Info :

Ensure that your chain is not twisted when starting the donut.

— Closing Your Donut :

Info :

Fold your work so that the bottom circle aligns with the top circle.

Info :

Start sewing them together. Go through one stitch at bottom and one stitch at the top.

Info :

Sew approximately 10% of the way then start stuffing. From this point forward, sew and stuff the donut as you go.

Info :

Attach safety eyes and face before sewing the donut shut completely.

— Birdie :

Info :

Materials: 7.5 mm safety eyes (placed between R8 and R9). Vanna's Choice yarn: "sweet pea" and "duckie" (beak). In all pieces, fasten off at the end and leave tail for sewing.

Round R1 :

ch 20

Round R2 :

sc 20

Round R3 :

* sc 1, inc 1 * - repeat 10 times (30 st)

Round R4 :

sc 30

Round R5 :

* sc 2, inc 1 * - repeat 10 times (40 st)

Round R6-R15 :

sc 40

Round R16 :

* sc 2, dec 1 * - repeat 10 times (30 st)

Round R17 :

sc 30

Round R18 :

* sc 1, dec 1 * - repeat 10 times (20 st)

Round R19 :

sc 20

Item Name (Birdie Beak) :

Create a magic loop with 10 sc

Item Name (Birdie Wings) :

make two: ch 5. starting at 2nd chain from hook: sc, dc, dc, sc. on the other side of the chain: sc, dc, dc, sc

Item Name (Birdie Hair) :

ch 4, starting at 2nd chain from hook: slst 3. ch 3, starting at 2nd chain from hook: slst 3

Item Name (Birdie Tail) :

ch 5, starting at 2nd loop from hook: slst 4. ch 5, starting at 2nd loop from hook: slst 5. ch 5, starting at 2nd loop from hook: slst 5

— Bunny :

Info :

Materials: 8 mm safety eyes (placed between R10 and R11). Vanna's Choice yarn: "lamb" and "pink" nose. In all pieces, fasten off at the end and leave tail for sewing.

Round R1 :

ch 30

Round R2 :

sc 30

Round R3 :

* sc 2, inc 1 * - repeat 10 times (40 st)

Round R4 :

sc 40

Round R5 :

* sc 3, inc 1 * - repeat 10 times (50 st)

Round R6-R17 :

sc 50

Round R18 :

* sc 3, dec 1 * - repeat 10 times (40 st)

Round R19 :

sc 40

Round R20 :

* sc 2, dec 1 * - repeat 10 times (30 st)

Round R21 :

sc 30

Item Name (Bunny Ears) :

make two: R1 5 sc (magic loop). R2 sc 5. R3 inc 5 (10 st). R4 sc 10. R5 * sc 3, dec 1 * - repeat 2 times (8 st). R6 sc 8. R7 * sc 2, dec 1 * - repeat 2 times (6 st)

Info :

Bunny Tail: Instructions on how to make a pom pom for the bunny's tail can be found on page 9.

— Bear :

Info :

Materials: 9 mm safety eyes (placed between R10 and R11). 12 mm safety nose (placed one row below the eyes). Vanna's Choice yarn: "beige" and "lamb" (snout). In all pieces, fasten off at the end and leave tail for sewing.

Round R1 :

ch 40

Round R2 :

sc 40

Round R3 :

* sc 3, inc 1 * - repeat 10 times (50 st)

Round R4 :

sc 50

Round R5 :

* sc 4, inc 1 * - repeat 10 times (60 st)

Round R6-R19 :

sc 60

Round R20 :

* sc 4, dec 1 * - repeat 10 times (50 st)

Round R21 :

sc 50

Round R22 :

* sc 3, dec 1 * - repeat 10 times (40 st)

Round R23 :

sc 40

Item Name (Bear Ears) :

make two. Note in R3 and R4, we switch colours to make the inner ear a different colour. R1 5 sc (magic loop). R2 inc 5 (10 st). R3 sc 10 (make stitches 6 and 7 inner ear colour). R4 sc 10 (make stitches 6, 7 and 8 inner ear colour).

Item Name (Bear Snout) :

R1 6 sc (magic loop). R2 inc 6 (12 st). R3 sc, sc, sc 3 in next sc, sc, sc, sc, sc 3 in next sc, sc, slst

Item Name (Bear Tail) :

R1 5 sc (magic loop). R2 inc 5 (10 st). R3 sc 10. R4 * sc 3, dec 1 * - repeat 2 times (8 st)
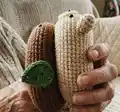
— Tree :

Info :

Materials: 10.5 mm safety eyes (placed between R12 and R13). Vanna's Choice yarn: "chocolate" and "kelly green" (leaves). In all pieces, fasten off at the end and leave tail for sewing.

Round R1 :

ch 50

Round R2 :

sc 50

Round R3 :

* sc 4, inc 1 * - repeat 10 times (60 st)

Round R4 :

sc 60

Round R5 :

* sc 5, inc 1 * - repeat 10 times (70 st)

Round R6-R21 :

sc 70

Round R22 :

* sc 5, dec 1 * - repeat 10 times (60 st)

Round R23 :

sc 60

Round R24 :

* sc 4, dec 1 * - repeat 10 times (50 st)

Round R25 :

sc 50

Item Name (Tree Leaves) :

make two: ch 6. on first side of the chain, starting at the 2nd loop from hook: slst, sc, dc, dc, sc. on other side of the chain: sc, dc, dc, sc, sc, slst

— Pom Pom for Tail :

Step 1 :

Wrap yarn around a piece of sturdy paper or cardboard that is 2" wide approximately 12 times.

Step 2 :

Remove the wrapped yarn and tie another piece of yarn around it.

Step 3 :

Pull tight and make a few more knots.

Step 4 :

Cut through all the loops.

Step 5 :

It doesn't look perfect yet!

Step 6 :

Trim the pom pom until it is nice and round.

Step 7 :

Leave tails for sewing onto the bunny's bottom.

Assembly Instructions

  • Fold your donut piece so the bottom circle aligns with the top circle, then begin sewing through one stitch at the bottom and one stitch at the top to join the two circles.
  • Sew approximately 10% of the way around the donut and then start stuffing; continue to sew and stuff incrementally to keep the shape even.
  • Attach safety eyes and any facial details before sewing the donut shut completely so placement is easy and secure.
  • When attaching small parts (ears, beak, snout, leaves), position them and pin or mark placement first, then sew securely with matching yarn tail and a tapestry needle.
  • For the bunny tail, make a pom pom according to the steps on page 9 and leave yarn tails to sew the pom pom onto the bottom center of the bunny.

Important Notes

  • 💡Use stitch markers to mark the last stitch of each round when working in a continuous spiral to maintain orientation and avoid accidental increases.
  • 💡Stuff gradually as you join the top and bottom circles; overstuffing early can create lumps and make it difficult to finish neatly.
  • 💡Place and secure safety eyes and facial features before the final closing seam so you can adjust positioning easily.
  • 💡Work with consistent tension throughout each piece for uniform rounds and smooth shaping.
  • 💡When decreasing, try skipping a stitch as an alternative decrease method if you want a cleaner, less visible decrease.

This Forest Friends set brings a little woodland charm to your home with stackable crocheted donuts that double as toys or decor. Each character is quick to make and full of personality — perfect for gifting or decorating a nursery. Try different colorways to make an entire family of forest friends and stack them high for a whimsical display. 🧶🌲😊

You ask,

we answer.

FAQs

What size will the finished piece be?

The finished donuts measure approximately 4" (birdie), 5" (bunny), 6" (bear) and 7" (tree) in diameter when using the recommended worsted weight yarn and 4.25 mm hook.

Can I use different yarn weights for this pattern?

Yes, you can substitute yarn weights, but the final size will change; use an appropriate hook for your chosen yarn and expect larger or smaller finished pieces.

Do I need prior crochet experience for this pattern?

This pattern is rated intermediate, so basic knowledge of single crochet, increases, decreases, working in a spiral, and simple finishing techniques is recommended.

How long does this project typically take to complete?

Most crocheters complete the full set in about 5-7 hours, though time varies by experience, yarn choice, and how many accessories you add.