🧶 Beautiful ✨ Detailed 💝 Adorable

Forest Deer Amigurumi Pattern

Forest Deer Amigurumi Pattern
4.8★ Rating
12-15 Hours Time Needed
3.7K Made This
✂️

Intermediate Level

Ideal for those with basic crochet experience, featuring slightly more advanced stitches and techniques to expand your skills.

⏱️

Multi-Day Project

A rewarding 12+ hour journey—perfect for dedicated crafters who love detailed work.

🧸

Cute Companion

An adorable friend to cherish, handcrafted with love to bring comfort and joy for years to come.

About This Forest Deer Amigurumi Pattern

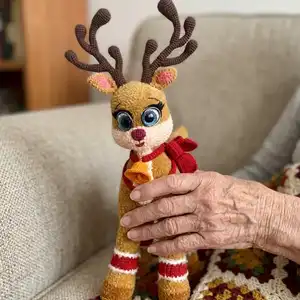
This pattern teaches you how to crochet a 42 cm (16.54 in) forest deer (54 cm with horns) using velvet and plush yarns. It includes full instructions for forelegs, hind legs, joining, body shaping, head, muzzle and eye assembly. The project includes step-by-step photos to help you place stitches, stuff parts correctly, and finish with polished details.

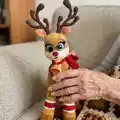
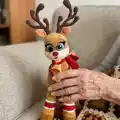
Forest Deer Amigurumi Pattern crochet pattern - detailed view of completed project

You will learn joining techniques for multiple legs, how to shape a sculpted muzzle, and how to attach composite eyes and felt eyelashes. The pattern lists all materials and tools so you can prepare before you begin.

Why You'll Love This Forest Deer Amigurumi Pattern

I absolutely love this pattern because it turns soft textured yarns into a realistic, cuddly forest deer with graceful proportions. I love how the leg-joining technique creates a sturdy body while keeping the toy poseable and balanced. The step-by-step photos made the process enjoyable for me and I think they will help you avoid common shaping mistakes. I also enjoy adding details like the felt eyelashes and a little bell — they really bring the character to life.

Forest Deer Amigurumi Pattern step 1 - construction progress Forest Deer Amigurumi Pattern step 2 - assembly progress Forest Deer Amigurumi Pattern step 3 - details and accessories Forest Deer Amigurumi Pattern step 4 - final assembly and finishing

Switch Things Up

I love how easily you can customize this deer by changing yarn colors and yarn weight to create different looks.

If you want a mini version, try a lighter yarn and a smaller hook to make a pocket-sized deer for keychains or ornaments.

For a chunkier, cuddly deer, switch to a bulky velvet yarn and a larger hook; it will become softer and bigger with fewer rounds needed.

You can embroider patterns on the back or add a saddle or scarf using contrasting yarn colors to personalise your deer.

I often experiment with eye types — safety eyes, crocheted eyes, or layered felt pupils all change the expression dramatically.

Try wire reinforcement in the horns for posability, or make the horns crocheted solid for a soft, child-friendly toy.

I sometimes add a removable scarf or tiny bell as an accessory to make the toy festive and gift-ready.

Consider using natural fibers for a more organic look, or sparkly lurex blends for a magical holiday edition.

Adjust the muzzle shaping by adding more rounds or decreasing sooner to make different face profiles — a longer muzzle gives a more deer-like look.

If you want a sleeping pose, reduce stuffing in the neck a little and bend the legs slightly before final sewing to achieve a relaxed posture.

Common Mistakes & How to Fix Them

✗ Skipping stitch markers during the legs joining will cause misalignment of legs; place markers at the designated points and count stitches before sewing to ensure even placement. ✗ Overstuffing the limbs can distort the shape and make assembly difficult; stuff gradually and lightly, shaping as you go to maintain smooth contours. ✗ Crocheting too tightly with velvet yarn can make the fabric rigid and hard to join; maintain gentle, even tension and use the recommended hook size for a soft, flexible fabric. ✗ Forgetting to position the working thread towards the back when instructed will complicate later joins; follow the photos and position the working thread exactly as shown for easier sewing and joining.

Forest Deer Amigurumi Pattern

Create a charming forest deer amigurumi with this detailed crochet pattern. You will be guided step-by-step through crocheting the legs, joining the body, shaping the head and muzzle, and assembling expressive eyes and details. Photographs accompany each stage to help you follow along, whether you are refining your shaping or learning new finishing techniques. This pattern is perfect for making a handmade gift or a cozy décor piece for your home.

Intermediate 12-15 Hours

Materials Needed for Forest Deer Amigurumi Pattern

— Main Fabric

  • 01
    LaVita Velurex velvet yarn 100 g, 140 m, 10% lurex, 90% polyester - Color 1038 (honey) - main color, 2.5 skeins
  • 02
    Dolphin Fine Himalaya velvet yarn 100 g, 175 m, 100% polyester - Color 33 (powder) - a little for muzzle and breast
  • 03
    Dolphin Fine Himalaya velvet yarn - Color 37 (brown) - 1/3 skein for hooves
  • 04
    Dolphin Fine Himalaya velvet yarn - Color 38 (burgundy) - a little for the nose
  • 05
    Dolphin baby Himalaya velvet yarn 100 g, 120 m, 100% polyester - Color 80332 (coral) - a little for the ears
  • 06
    YarnArt Jeans yarn 50 g, 160 m, 55% cotton, 45% acrylic - Color 62 (white) - a little for the eyes
  • 07
    YarnArt Jeans yarn - Color 70 (brown) - 1 skein for horns
  • 08
    YarnArt Jeans yarn - Color 90 (red) - 1 skein (accent for horns/trim)
  • 09
    Color 53 (black) - a little for the eyes detailing
  • 10
    Gazzal Baby Cotton yarn 50 g, 165 m, 40% cotton, 60% acrylic - (used for details)
  • 11
    Yarn cotton for sewing parts (Kamtex mercerized cotton) 50 g, 200 m, 100% cotton, color powder/brown
  • 12
    YarnArt Mink 50 g, 75 m, 100% polyamide - Color 330 (milky)
  • 13
    Small amount Color 3416 (orange) for the bell

— Tools Required

  • 01
    Crochet hook №2.5 (US C)
  • 02
    Crochet hook №1.75 (HS 4) for small details and eyes
  • 03
    Needles for sewing the pieces (thin needle for sewing eyes, thicker needle for ears, long needle for needle sculpting)
  • 04
    Sewing threads in black and white
  • 05
    Scissors
  • 06
    Yarn needle for sewing and weaving ends
  • 07
    Stitch markers (8 recommended for legs joining)
  • 08
    Polyester stuffing (Holofiber)
  • 09
    Black felt for eyelashes and details
  • 10
    Eyes 20 mm - 2 pcs (blue)
  • 11
    Wire (1 mm) to make a frame in the horns (approximately 320 cm / 125.98 inches)
  • 12
    Tape for wiring
  • 13
    Velcro and craft glue
  • 14
    Pins for assembly

Progress Tracker

0% Complete

— Forelegs :

Info :

Take Dolphin Fine Himalaya yarn, color 37 (brown color), crochet hook №2.5 (US C).

Round 1 :

make foundation ch8, work 2 sc into the second ch from the hook, 5 sc, work 4 sc into one stitch, turn, along other side of foundation chain crochet 5 sc, 2 sc into one stitch (18)

Round 2 :

2 inc, 5 sc, 4 inc, 5 sc, 2 inc (26)

Round 3 :

(1 sc, 1 inc)*2, 5 sc, (1 sc, 1 inc)*4, 5 sc, (1 sc, 1 inc)*2 (34)

Round 4 :

34 sl sts (34)

Round 5 :

34 sc - crochet in back loops only (34)

Info :

Pay attention, where the working thread is located (see the photo above).

Round 6 :

16 sc, 1 dec, 15 sc, 1 inc (34)

Round 7 :

15 sc, 1 dec, 16 sc, 1 inc (34)

Round 8 :

14 sc, 1 dec, 17 sc, 1 inc (34)

Info :

Next, we crochet yarn LaVita yarn Velurex, color 1038.

Round 9 :

(15 sc, 1 dec)*2 (32) - crochet in back loops only

Round 10 :

32 sc (32)

Round 11 :

(14 sc, 1 dec)*2 (30)

Round 12 :

(13 sc, 1 dec)*2 (28)

Round 13 :

(12 sc, 1 dec)*2 (26)

Round 14 :

(11 sc, 1 dec)*2 (24)

Info :

*** Return to the round 4th . Crochet reverse sc along this round. Fasten off, cut off and weave in. ***

Round 15-23 :

24 sc (24) - repeat 9 times. Stuff the toy as you go. Ensure that the working thread is positioned towards the back and center by crocheting additional loops if needed.

Round 24 :

9 sc, 7 inc, 8 sc (31) - it is recommended to position inc towards the center and at the front.

Round 25 :

31 sc (31)

Round 26 :

9 sc, 7 dec, 8 sc (24) - decs should be located towards the center and at the front.

Round 27-35 :

24 sc (24) - repeat 9 times

Round 36 :

(11 sc, 1 inc)*2 (26)

Round 37 :

(12 sc, 1 inc)*2 (28)

Round 38 :

(13 sc, 1 inc)*2 (30)

Info :

Fasten off, cut off. Stuff it. The first front leg has been completed, and the second front leg is crocheted in a similar manner.

— Hind legs :

Info :

1-23 round: we crochet similarly to the forelegs. Ensure that the working thread is positioned towards the back and center by crocheting additional loops if needed.

Round 24 :

10 sc, 3 inc, 11 sc (27)

Round 25 :

10 sc, (1 sc, 1 inc)*3, 9 sc, 1 dec (29)

Round 26 :

1 dec, 8 sc, (2 sc, 1 inc)*3, 8 sc, 1 dec (30)

Round 27 :

1 dec, 26 sc, 1 dec (28)

Round 28 :

1 dec, 26 sc (27)

Round 29-33 :

27 sc (27) - repeat 5 times

Round 34 :

1 inc, 26 sc (28)

Round 35 :

1 sc, 1 inc, 26 sc (29)

Round 36 :

2 sc, 1 inc, 26 sc (30)

Round 37-38 :

30 sc (30) - repeat 2 times

Info :

Fasten off, cut off. The initial hind leg is completed, and the second one is crocheted in a similar fashion.

— Connecting part for legs :

Info :

Take yarn LaVita yarn Velurex, color 1038, crochet hook №2.5 (US C).

Round 1 :

make foundation ch8, work 2 sc into the second ch from the hook, 5 sc , work 4 sc into one stitch, turn, crochet along other side of the foundation chain 5 sc, work 2 sc into one stitch (18)

Round 2 :

2 inc, 5 sc, 4 inc, 5 sc, 2 inc (26)

Round 3 :

(1 sc, 1 inc)*2, 5 sc, (1 sc, 1 inc)*4, 5 sc, (1 sc, 1 inc)*2 (34)

Round 4 :

(2 sc, 1 inc)*2, 5 sc, (2 sc, 1 inc)*4, 5 sc, (2 sc, 1 inc)*2 (42)

Round 5 :

(3 sc, 1 inc)*2, 5 sc, (3 sc, 1 inc)*4, 5 sc, (3 sc, 1 inc)*2 (50)

Info :

Legs joining (the stitches division) - use brown Camtex thread (or matching thread) and 8 markers to position legs uniformly close to the joining piece. The photo shows the stitch division; we will link 6 stitches on each leg.

Round 6 :

iIt is worth noting that 6 stitches from each leg, 24 stitches from the body (6 multiplied by 4), will now be situated inside the toy's body. So we crochet as follows: on the back - 4 sc, on the hind left leg - 24 sc, on the left side - 7 sc, on the left foreleg - 24 sc, on the chest - 6 sc, on the right foreleg - 24 sc, on the right side - 7 sc, on the hind right leg - 24 sc, on the back - 2 sc (122)

Round 7 :

(59 sc, 1 dec)*2 (120)

Round 8 :

(18 sc, 1 dec)*6 (114)

Round 9-20 :

114 sc (114) - repeat 12 times

Round 21 :

37 sc, ch20 and join with the stitch on the opposite side with a slip stitch, 23 sc (80)

Info :

This way we have our body «divided» into 2 sections (the 1st one - where the head will be and the 2nd one - where the back part/bottom will be).

Round 22 :

(8 sc, 1 dec)*8 (72)

Round 23 :

(7 sc, 1 dec)*8 (64)

Round 24 :

(6 sc, 1 dec)*8 (56)

Round 25 :

(5 sc, 1 dec)*8 (48)

Round 26 :

(4 sc, 1 dec)*8 (40)

Round 27 :

(3 sc, 1 dec)*8 (32)

Round 28 :

(2 sc, 1 dec)*8 (24)

Round 29 :

(1 sc, 1 dec)*8 (16)

Round 30 :

8 dec (8). Draw the thread tightly, cut off, and weave in the tail end.

Info :

Return to the round 21. We are going to crochet the neck and the head along the opening which was formed (It is 74 stitches). So, start the round 22. Stuff the toy as you go.

Round 22 :

(35 sc, 1 dec)*2 (72)

Round 23 :

(16 sc, 1 dec)*4 (68)

Round 24 :

(15 sc, 1 dec)*4 (64)

Round 25 :

(14 sc, 1 dec)*4 (60)

Round 26 :

(13 sc, 1 dec)*4 (56)

Round 27 :

(12 sc, 1 dec)*4 (52)

Round 28 :

(11 sc, 1 dec)*4 (48)

Round 29 :

(10 sc, 1 dec)*4 (44)

Round 30 :

(9 sc, 1 dec)*4 (40)

Round 31 :

(8 sc, 1 dec)*4 (36)

Round 32-38 :

36 sc (36) - repeat 7 times

— We continue to crochet the head :

Info :

Take Dolphin Fine Himalaya yarn, color 33, crochet hook №2.5 (US C).

Round 39 :

(8 sc, 1 inc)*4 (40)

Round 40 :

(4 sc, 1 inc)*8 (48)

Round 41 :

(5 sc, 1 inc)*8 (56)

Round 42 :

(6 sc, 1 inc)*8 (64)

Round 43 :

(7 sc, 1 inc)*8 (72)

Round 44 :

(8 sc, 1 inc)*8 (80)

Round 45-49 :

80 sc (80) - repeat 5 times. Make sure that the working thread is at the middle of the back.

Round 50 :

22 sc, (1 sc, 1 dec)*12, 22 sc (68)

Round 51-61 :

take yarn LaVita yarn Velurex, color 1038, 68 sc (68) - repeat 11 times

— Eyes :

Info :

At this point, we proceed with making the eyes. We set the toy aside temporarily and begin crocheting the eyes.

Info :

Take YarnArt Jeans yarn, color 62 (white), crochet hook №1.75 (HS 4).

Round 1 :

8 sc in MR (8)

Round 2 :

8 inc (16)

Round 3 :

(1 sc, 1 inc)*8 (24)

Round 4 :

(2 sc, 1 inc)*8 (32)

Round 5 :

yarn YarnArt Jeans of black color crochet into front loops of the stitches 32 sl sts (32). Fasten off, cut off.

Info :

We cut out felt pieces for eyelashes and sew the eyes between rounds 52 and 59 with 3 sc distance; position at least one division apart and melt plastic slightly if needed.

— We continue to crochet the head (finish) :

Info :

Stuff the toy as you go.

Round 62 :

(15 sc, 1 dec)*4 (64)

Round 63 :

(6 sc, 1 dec)*8 (56)

Round 64 :

(5 sc, 1 dec)*8 (48)

Round 65 :

(4 sc, 1 dec)*8 (40)

Round 66 :

(3 sc, 1 dec)*8 (32)

Round 67 :

(2 sc, 1 dec)*8 (24)

Round 68 :

(1 sc, 1 dec)*8 (16)

Round 69 :

8 dec (8). Draw the thread tightly, cut off, and weave in the tail end.

— Muzzle :

Info :

Take Dolphin Fine Himalaya yarn, color 33, crochet hook №2.5 (US C).

Round 1 :

make foundation chain ch8, work 2 sc into the second ch from the hook , work 5 sc, work 4 sc into one stitch, turn, crochet along the other side of the foundation chain 5 sc, 2 sc into one stitch (18)

Assembly Instructions

  • To sew the legs, use brown Camtex thread (or matching thread) and 8 markers; place the legs uniformly close to the joining piece and position markers at the designated points where the legs will be joined.
  • After joining the legs to the connecting piece, crochet the body rounds as instructed (round 6 onward) linking the designated stitches from each leg to form the main body tube.
  • Position the eyes between rounds 52 and 59 with a distance of 3 sc between them; attach the felt eyelashes under the eye and sew through all layers carefully without pulling too tightly.
  • Attach the muzzle to the head by sewing with matching yarn and use needle sculpting to shape the muzzle, then sew ears and horns in place; insert wire into horns frame before finishing and secure with tape and glue if needed.

Important Notes

  • 💡Use stitch markers to keep track of rounds and especially when joining multiple legs and dividing the body into sections.
  • 💡Stuff the toy gradually while shaping to avoid lumps; check photographs regularly for the correct silhouette and stuffing level.
  • 💡Position the working thread towards the back/center as shown in photos to make joining and continuing rounds easier during assembly.
  • 💡When attaching eyes and felt eyelashes, do not fasten the plastic parts too tightly; place at least one division apart and melt plastic slightly if needed to secure.
  • 💡Work with recommended hook sizes and maintain consistent tension when using velvet yarns to avoid too tight fabric which makes sewing difficult.

This Forest Deer pattern is a heartfelt project that creates a soft, sculpted companion ready for cuddles and display. 🧶 It combines textured velvet yarns with thoughtful shaping for realistic legs, muzzle, and expressive eyes. 🧵 Make one for yourself or as a special gift — it brings charm and warmth to any home.
You ask,

we answer.

FAQs

What size will the finished piece be?

The finished toy measures approximately 42 cm (16.54 inches) without horns and approximately 54 cm (21.26 inches) with horns when using the listed materials.

Can I use different yarn weights for this pattern?

Yes, you can use different yarn weights but the final size and fabric texture will change; choose an appropriate hook for the yarn and be aware that plush/velvet yarns produce the intended soft look.

Do I need prior crochet experience for this pattern?

This pattern is rated intermediate; basic amigurumi skills, reading rounds, increases/decreases, and sewing pieces together are recommended for best results.

How long does this project typically take to complete?

Most crocheters will spend about 12-15 hours spread over multiple sessions, depending on experience, speed, and how much time you spend on sewing and finishing details.