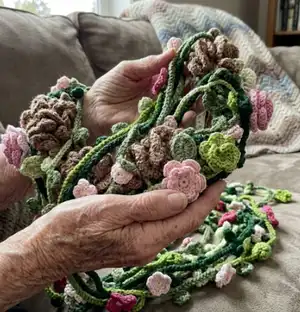
Create a whimsical Flower Garden Hood that wraps you in handmade floral charm. This pattern guides you through a sturdy, two-strand hood and a collection of large and small crochet flowers, leaves, and vines to customize your look. Perfect for makers who love freeform details and mixed yarn textures, it encourages creative color palettes and playful assembly. You'll finish with a wearable piece that feels like a garden you can carry with you.
Progress Tracker
0% Complete
— Hood :
Info :
Working with 2 strands of yarn at once, Ch 123
Info :
Note: I recommend using 2 strands at once here because you want a thick and strong hood that will be able to withstand the weight of the flowers and vines
Round R1 :
hdc in 2nd ch from hook, hdc in each ch until you reach the end, ch2 and turn work (121 hdc)
Info :
Make holes for pull string
Round R2 :
hdc2tog the first 2 sts, hdc in next 8 sts, *ch 1, skip next st, hdc in next 3 sts* rep ** 24 more times, Ch 1, sk next st, hdc in the next 8 sts, hdc2tog the last 2 sts. Ch2 and turn work (91 hdc, 26 ch 1 spaces, 2 hdc2tog)
Round R3 :
hdc2tog the first 2 sts. Hdc in each st and each ch 1 sp until you reach the last 2 sts of the row. Hdc2tog the last 2 sts. Ch 2 and turn work (115 hdc, 2 hdc2tog)
Round R4 :
hdc2tog the first 2 sts, hdc in each st until you get to the last 2 sts of row, hdc2tog the last 2 sts of row, ch2 and turn work (113 hdc, 2 hdc2tog)
Round R5 - R28 :
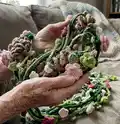
repeat row 4 by continuing to decrease with hdc2tog at the beginning and at the end of each row to form a diagonal on each side. By the time you finish row 28, your count should be 65 hdc and 2 hdc2tog and you should have what is pictured below.
Info :
Before you fasten off, fold the hood in half and seam the shorter side together to create the hood.
Info :
Make pull string Using an N hook (9.00 mm) ch st three strands at once (above right picture) to make a long chain tie to weave through the holes you made at R2. There is no set number of ch sts here, just make it as long as you wish, using the hood as a reference.
— Large flower 1 :
Info :
make 2, one for each side of hood - Flower middle [Picture A. below]
Round R1 :
Ch 3, and then slst in 3rd ch from hook to make a circle
Round R1 :
Ch. 2, 10 hdc in center of circle, Slst in beginning ch2, ch1, do not turn work.
Round R2 :
10 sc in each st, slst in beginning ch1. (Circle should be curved like a tiny bowl)
Info :
Fasten off to change color
Round R3 :
slst in BL of work. *ch 8, dc in 2nd ch from hook, dc in remaining 6 ch down from hook, slst in next BL* to make next petal, repeat ** 9 more times until you work all the way around the circle and have 10 big petals. Slst in next FL, do not turn work
Round R4 :
*ch 5, slst in next ch from hook, slst in remaining 3 ch from hook until you are back at the base, slst in same FL, ch5, slst in next ch from hook, slst in remaining 3 ch from hook, Slst in next FL* of base so that you are now working on top of big petals from R3, repeat ** until you are back the beginning of the row and have 20 small petals. Slst in base and fasten off.
— Leaf 1 for large flower 1 :
Info :
make 4, two for each large flower 1
Round R1 :
sc in 2nd ch from hook, sc in each ch until you reach the end. Ch 1 and turn work (10 sc)
Round R2 :
*in the first 4 sts, 1 sc, 1 hdc, 1 dc, and 1 tr. 5 dtr in the next st.* in the next 5 sts, (1 tr, 1 dc, 1 hdc, 1 sc,) and then Slst in the last st. Ch 3 and then rotate work so that you are now working on the other side of the 10 sc. slst in first st and ch1, repeat ** and then in the remaining 4 sts of the row, repeat ( ), fasten off.
— Small flower 1 :
Info :
make 16, eight for each assigned vine on each side of hood - Pink yarn
Round R1 :
Ch3, Slst in the 3rd ch from hook to make a circle
Round R1 :
*ch 4, Slst in center of circle*, repeat ** 9 more times so that you have 10 petals. Fasten off.
Info :
Yellow yarn - Ch 3 and Slst in first ch to make a circle, fasten off and use a weaving needle and the tail ends to weave onto the center of flower. Do not cut off the tail ends (we will use the to attach to vines later)
— Large flower 2 :
Info :
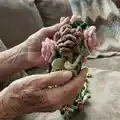
make 2, one for each side of hood - Note: This flower is basically a classic crochet rose. There are a lot of different ways to make them, and this is just the method that I use.
Round R1 :
sc in 2nd ch from hook, sc in each ch until you reach the end. Ch4 and turn work (43 sc)
Round R2 :
dc in 1st st (counts as 1st ch3 space) sk st, *dc in next st, ch3, dc in same st, sk st,* repeat ** until you reach the end of the row. Your work should start to curl. Ch1 and turn work. (22 ch 3 spaces/dc V spaces)
Round R3 :
8 dc in ch3 sp, slst in next st, *8 dc in ch3 sp, slst in next st,* repeat ** until you reach the end of the row. Slst in the bottom end ch and fasten off.
Info :
Roll up your flower and stitch it up with your needle as you roll, starting from the center.
— Leaf 2 for large flower 2 :
Info :
make 4, two for each large flower 2
Round R1 :
Slst in end of ch to make a circle. Ch1, 3 sc in circle, 3 hdc in circle, 3 dc in circle, 3 tr in circle, 1 DTR in circle, ch 3, Slst in the top of tdr st and then slst 1 more time on side of same DTR st, 1 dc in circle, 1 hdc in circle, 8 sc in circle. Fasten off.
— Small flower 2 :
Info :
make 16, eight for each assigned vine on each side of hood
Round R0 :
Ch10 (keep tail about 3-4 inches so you can use it later to attach flower to vine)
Round R1 :
sc in 2nd ch from hook, sc in the next 2 ch, *2 hdc in the next ch,* repeat ** 2 more times, (* 2 dc in the next ch, *) repeat (**) 2 more times. Slst into the bottom 1st ch of ch10 and fasten off with a 3” long tail. (3 sc, 6 hdc, 6 dc, two 3” tails)
Info :
Roll up flower and use a needle and tails ends to secure flower.
— Large flower 3 :
Info :
make 2, one for each side of hood
Round R1 :
make magic circle ring and Ch3 (counts as 1st dc) dc 11 times in circle, Close circle and Slst in the top of starting ch3 and fasten off (12 dc, keep both tails long)
Info :
Fasten off to change color. Note: the yarn I used for flower 3’s petals was very thin, so I ended up crocheting with three strands at once to give it some bulk. this of course is optional.
Round R2 :
Slst into work and ch2, dc in same st, dc in next st, ch 2, slst into same st, *slst into next st, ch2, dc in same st, dc in next st, ch2, slst in same st,* repeat ** until you have 6 petals in total, Slst into base of 1st petal.
Round R3 :
working behind the petals, *ch 4 and slst into a st in between the next petal*, repeat ** until you have 6 ch4 spaces behind petals.
Round R4 :
*Slst into next ch4 sp, ch2, dc 3 sts into same ch4 sp, ch2 and slst into same sp,* repeat until you have 6 larger petals behind the first 6 petals you made in R2.
Round R5 :
working behind the petals you made in R4, *ch 5 and slst into a st in between the next 2 petals*, repeat ** until you have 6 ch5 spaces behind petals you made in R4.
Round R6 :
*Slst into next ch5 sp, ch2, 2 dc into same ch5 sp, 1 tr into same ch5 sp, ch 2, slst into top st of tr st, 1 tr into same ch5 sp, 2 dc in same ch5 sp, ch2 and slst into same ch5 sp,* repeat ** until you have 6 larger pointed petals behind the petals you made in R4. Slst in ch5 sp and fasten off.
— Leaf 3 for Large flower 3 :
Info :
make 4, two for each large flower 3 - Note: This leaf is pretty simple, so you may want to use two strands of yarn at once and a larger hook so that they come out bigger.
Round R1 :
Slst in 1st st, sc in next st, hdc in next st, dc in the rest of the sts until you reach the end of the ch. Fasten off
— Small flower 3 :
Round R1 :
Make magic circle ring and ch1 (make sure starting tail is about 3” long) 10 sc in center of circle, slst into the starting ch1. Close circle and fasten off. (Tail should be about 3” long)
Round R2 :
slst into a sc st, *ch2, 1 dc in same st, 1 tr in same st, 1 tr in next st, 1 dc in same st, ch2, Slst in same st, Slst in next st*, repeat ** until you have 5 petals. Slst in same st as starting ch2 and fasten off.
— Large flower 4 :
Info :
make 2, one for each side of hood
Round R1 :
Make magic circle ring. *ch7, Slst in 2nd ch from hook, sc in next ch, hdc in next ch, dc in next 3 ch sts, Slst in center of magic circle*, repeat ** 2 more times. You should have three half petals here.
Round R2 :
(starting from the bottom of the 1st half petal you made from R1) *dc in bottom dc of first petal, dc in next 2 sts, hdc in next st, sc in next st, Slst at top of petal, ch 1, Slst in each ch st in center of petal until you reach the center of magic circle, Slst to outer part of petal*, repeat ** 2 more times. Slst in center of magic circle. Close magic circle and fasten off. (3 petals)
Info :
Bottom portion of flower 4: Repeat all steps in R1 and R2 to make the bottom portion of the flower. Optional: to make the bottom petals slightly larger than the top petals, add 1 more ch to the base of petals if you wish. Use the bottom tails of top flower to attach the two together.
Info :
To make the pictured yellow center, make magic circle, ch 3, and work 8 dc in center. Close magic circle ring, Slst in starting ch3 and fasten off. Use the tails to attach to center of petals.
— Leaf 4 for large flower 4 :
Round R1 :
sc in 2nd ch from hook, sc in each ch until you reach the end. Ch 6 and turn work (10 sc)
Round R2 :
*Slst in 2nd ch from hook, Slst in each ch until you get to the 10 sc base , Slst in next st* and ch6, repeat **, ch 5, repeat **, ch 5, repeat **, ch 4, repeat **, ch 4, repeat **, ch 3, repeat **, ch 3, repeat **, ch 2, repeat **, ch 2, Slst in 2nd ch from hook, slst on end/side of 10 sc base, ch 2, Slst in 2nd ch from hook, rotate work so that you are now on the other side of the 10 sc base. Slst in 1st st and ch 2, repeat ** until complete, fasten off
Info :
Optional stem: before you fasten off, sc in end/side of 10 sc base, (ch 1, turn, sc,) repeat ( ) 4 more times to make a stem. Fasten off
— Vines :
Info :
Note: You can add as many vines to this hood as you want. The more the better IMO, but for this pattern, and for the pictured hood, I made 14 vines altogether, (7 on each side.) I suggest keeping the number of vines on each side an odd number so that you can have climbing vines on the outer parts and filler vines on the inner parts
Info :
Instructions: 4 vines are climbing up the side (so 8 climbing in total) and 3 vines are filler (6 filler vines in total) The climbing vines will be the ones with flowers and the fillers don’t have flowers.
— Vine type 1 (small leaf) :
Round V0 :
Ch 5, Slst in 2nd ch from hook, sc in next ch, hdc in next ch, Slst in last ch,
Round V1 :
*Ch 10, Slst in 2nd ch from hook, sc in next ch, hdc in next ch, Slst in BL of next ch, throw work to back and pull of a loop around work*, cont to repeat ** until you reach a desired length.
— Vine type 2 (large leaf) :
Round W1 :
*2 sc in 2nd ch from hook, hdc in same ch, dc in same ch and ch 2, Slst in 2nd ch from hook, dc in same ch as prev dc, hdc in same ch, 2 sc in same ch, Slst in beg sc, ch 8*, cont to rep ** until your vine reaches the desired length.
This Flower Garden Hood Pattern invites you to build a wearable garden full of texture and color. Each flower and vine can be customized to make the hood uniquely yours, using scraps or special yarns to tell your story. Gather your hooks and let your creativity bloom — I can’t wait to see your garden grow! 🌸🧶