About This Feather Locklear the Chick Amigurumi Pattern
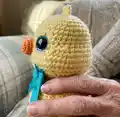
This pattern creates Feather Locklear, an adorable crocheted chick worked from the top of the head to the bottom in continuous rounds. It includes detailed round-by-round instructions for the head, body, wings, feet, tail and optional hair, plus step-by-step assembly and eye placement photos. Youll find tips for different yarn options (fluffy or chenille) and clear guidance for placing safety eyes and adding facial details.
Perfect for intermediate crocheters who want a small, satisfying project with cute finishing touches. Includes materials list, abbreviations, and helpful troubleshooting tips to get the best results.
Why You'll Love This Feather Locklear the Chick Amigurumi Pattern
I absolutely love this pattern because it mixes simple amigurumi construction with charming details that bring personality to every chick. I enjoy how the head-to-body construction keeps shaping easy while leaving room for creative finishing like eyelids, embroidered cheeks, and optional fluffy yarn. The step-by-step eye placement and photos gave me confidence the first time I tried the sunken eye look, and I wanted to pass those helpful techniques on. I hope you feel the same satisfaction I did when your chick comes together and stands ready to charm someone special.
Switch Things Up
I love how easy it is to customize this chick by changing yarn and hook sizes to get different finishes.
You can make a fluffy chick by using chenille or fluffy yarn and a slightly larger hook for a soft, plush texture.
If you want a mini version, switch to lighter weight yarn and a smaller hook to create a tiny keychain-friendly chick.
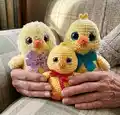
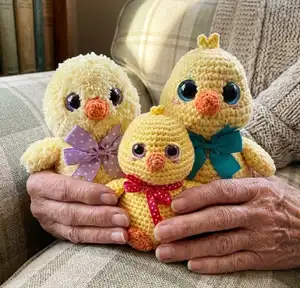
Try color changes for the belly, wings, or feet to make seasonal or themed chicks like pastel Easter or autumn tones.
I often embroider different cheek shapes and colors to change expressions; a tiny blush or freckle gives lots of personality.
For posability, I sometimes insert a small piece of wire into limbs before sewing to allow slight movement for posing.
Add tiny accessories — a crocheted bow, scarf, or hat — to customize for gifts or holidays; theyre quick and really elevate the look.
Swap safety eyes for embroidered eyes if youre making a toy for very small children, this gives a safer finished item.
Experiment with eyelids using contrasting yarn to change the chick's expression from wide-eyed to sleepy or shy.
I also like making matching sibling sets by altering eye sizes and feet colors to create a family of chicks with different personalities.
Common Mistakes & How to Fix Them
✗ Placing safety eyes without marking can lead to uneven spacing; mark the 6th and 7th increases and count stitches so the eyes are symmetrical.
✗ Overstuffing the head before placing the eye backs can prevent washers from sitting flat; remove most stuffing to attach washers then restuff gently to regain shape.
✗ Skipping stitch markers while working continuous rounds will cause you to lose track of round starts; use a stitch marker at the beginning of each round and move it up as you go.
✗ Inconsistent tension produces lumpy shaping and uneven stitch size; maintain steady, moderate tension and practice on a scrap to match gauge before starting.
✗ Rushing through decreases and increases in shaping rounds causes misshapen body parts; count stitches after each shaping round and slow down when doing dec/inc sequences.