🧢 Beautiful ✨ Detailed πŸ’ Adorable

Farrah Doll Amigurumi Pattern

Farrah Doll Amigurumi Pattern
4.4β˜… Rating
12-15 Hours Time Needed
2.7K Made This
βœ‚οΈ

Intermediate Level

Ideal for those with basic crochet experience, featuring slightly more advanced stitches and techniques to expand your skills.

⏱️

Multi-Day Project

A rewarding 12+ hour journeyβ€”perfect for dedicated crafters who love detailed work.

🧸

Cute Companion

An adorable friend to cherish, handcrafted with love to bring comfort and joy for years to come.

About This Farrah Doll Amigurumi Pattern

This pattern teaches you how to crochet Farrah, a detailed bridal amigurumi with a layered wedding dress, wig and accessories. It includes stitch-by-stitch rounds for arms, legs, body, neck, head, ears, wig and hair strands. Photos and tips are provided to help with placement, assembly and finishing touches.

Farrah Doll Amigurumi Pattern crochet pattern - detailed view of completed project

You will find yarn codes, tool lists and embroidery guidance for facial features. The instructions are written in spiral rounds and include border rounds and assembly steps.

Why You'll Love This Farrah Doll Amigurumi Pattern

I absolutely love this pattern because it creates a personality-packed keepsake with a flowing wedding dress and expressive face. I enjoy the layered wig technique β€” it adds so much movement and character to the doll. The pattern balances structured amigurumi shaping with decorative crochet details that are satisfying to make. Watching the doll come together from limbs to a complete bride always feels rewarding and makes a beautiful handmade gift.

Farrah Doll Amigurumi Pattern step 1 - construction progress Farrah Doll Amigurumi Pattern step 2 - assembly progress Farrah Doll Amigurumi Pattern step 3 - details and accessories Farrah Doll Amigurumi Pattern step 4 - final assembly and finishing

Switch Things Up

I love how easy it is to customize Farrah by swapping yarn colors β€” try pastel shades for a soft, vintage bride or bold colors for a playful twist.

You can change the yarn weight and hook size to make a mini keychain version or a larger cuddly doll; adjust the safety eye size accordingly.

I often add tiny crocheted accessories like a bouquet, veil or tiara using leftover yarn and beads to personalize the doll.

Try different hair colors and curl styles by varying the hair strand lengths and curl tightness when making the wig layers.

Embroider different facial expressions by repositioning the eyes and changing eyebrow shapes to give each doll a unique personality.

For a posable doll, insert wire in the arms or legs as suggested β€” I use jewelry wire wrapped and taped for safety.

Experiment with blushes and makeup placement for different ages and looks β€” softer blush makes a youthful look while stronger blush gives a stylized finish.

Make outfits to match seasons: a winter cape, spring bouquet, or a casual dress to change the doll's story.

I sometimes replace safety eyes with embroidered eyes for a fully handmade look and to make the doll safer for small children.

Use different beads and buttons to create jewelry and embellishments β€” a small pearl bead looks beautiful on the wedding dress or tiara.

Common Mistakes & How to Fix Them

βœ— Skipping stitch markers during spiral rounds leads to losing the beginning of each round; place a marker at the start of every round and move it up as you work. βœ— Forgetting to change yarn color exactly where instructed will create visible color lines; cut and join yarn neatly at the correct round and weave in ends securely. βœ— Not stuffing evenly causes lumpy or misshapen limbs and head; stuff gradually while shaping, adding small amounts of fiberfill and smoothing as you go. βœ— Pulling yarn too tight around increases or decreases distorts the shape; keep a consistent, moderate tension and check stitch counts often to maintain even shaping.

Farrah Doll Amigurumi Pattern

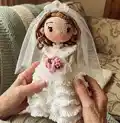
Create a charming handcrafted Farrah bridal doll with this detailed crochet pattern. You will follow step-by-step rounds for arms, legs, body, head, wig and a layered wedding dress to make a 32 cm doll. The pattern includes clear assembly photos, yarn codes and tips so you can customize hair, eyes and accessories with confidence. Perfect as a special gift or a keepsake for your collection.

Intermediate 12-15 Hours

Materials Needed for Farrah Doll Amigurumi Pattern

β€” Main Fabric

  • 01
    Jeans - Yarn Art Skin (code 73): 30g
  • 02
    Jeans - Yarn Art White (code 62): 160g
  • 03
    Jeans - Yarn Art Pink (code 36): 5g
  • 04
    Jeans - Yarn Art Light pink (code 18): 5g
  • 05
    Etrofil Jeans - Yellow (code 59): 30g

β€” Tools Required

  • 01
    Crochet hook size 2.3 mm (or the size you prefer)
  • 02
    Wire (gauge jewelry wire for posability)
  • 03
    Sewing needle
  • 04
    Stitch marker
  • 05
    Scissors
  • 06
    Pink blush make up powder
  • 07
    Pins
  • 08
    Optional: wooden spoon/chopstick and clamping scissor to simplify the filling
  • 09
    Silicon glue
  • 10
    3 buttons
  • 11
    Fiberfill stuffing
  • 12
    2 black safety eyes, size 10 mm
  • 13
    Tulle (50 cm x 60 cm)
  • 14
    Pearl beads

Progress Tracker

0% Complete

β€” ARMS (make two) :

Rd 1 :

6sc in the magic ring (6)

Rd 2 :

6inc (12)

Rd 3 :

*3sc, 1inc* crochet 3 times (15)

Rd 4 -Rd 5 :

15sc (15)

Rd 6 :

1sc , 2dec, 10sc (13)

Rd 7 :

1sc, 1N, 11sc (Crochet "N": photo 1, 2, 3) (13)

Rd 8 :

1sc, 1dec, 3sc, 2dec, 3sc (10)

Rd 9 :

1dec, 8sc (9)

Info :

Cut the white yarn (62), Change to the skin Yarn (73)

Rd 10 :

BLO: 9sc (Photo 05) (9)

Rd 11 -Rd 24 :

9sc (9)

Rd 25 :

9sc, 1slst, Fasten off (9)

β€” Border round :

Working in the FLO of round 09, attach the white yarn (62): (Photo 06)

Rd 1 :

9sc (9)

Rd 2 :

*[1slst, 3ch]* crochet 9 times (Photo 07) , Fasten off (9)

β€” LEGS (make two) :

Rd 1 :

Begin with 5 ch, start in 2nd chain from the hook: 1inc, 2sc, [4sc] bottom side of chain: 2sc, 1inc (photo 10, 11) (12)

Rd 2 :

1sc, 1inc, 2sc, 4inc, 2sc, 1inc, 1sc (18)

Rd 3 :

1inc, 4sc, *1sc, 1inc* crochet 4 times, 4sc, 1inc (24)

Rd 4-Rd 6 :

24sc (24)

Rd 7 :

6sc, 6dec, 6sc (18)

Rd 8 :

5sc, 4dec, 5sc (14)

Rd 9 :

6sc, 1dec, 6sc (13)

Rd 10 - Rd 11 :

13sc (13)

Info :

Tips: Prepare insoles. Draw an outline around the sole on the cardboard (if you plan to wash the toy, use plastic sheet). (Photo 12)

Change :

Change to the skin Yarn (73), with the last st of Rd 11

Rd 12 :

BLO: 6sc, 1dec, 5sc (Photo 14) (12)

Rd 13 - Rd19 :

12sc (12)

Rd 20 :

1inc, 11sc (13)

Rd 21-Rd 22 :

13sc (13)

Rd 23 :

1inc, 12sc (14)

Rd 24 - Rd 29 :

14sc (14)

Rd 30 :

1inc, 13sc (15)

Rd 31- Rd 34 :

15sc (15)

Rd 35 :

15sc, 1slst, Fasten off (15)

Border round :

Working in the FLO of round 11, attach the white yarn (62) (Photo 15)

Rd 1 :

13sc (13)

Rd 2 :

*[1slst, 3ch]* crochet 13 times, Fasten off (13)

Info :

Connect the two legs together from the back: first align the connection point to the middle, then from the second leg, use white yarn (62), crochet 4ch and connect to the first leg (Photo 21, 22)

Rd 36 :

15sc (around the 1st leg), 4sc (along the chain), 15sc (around the 2rd leg), 4sc (along the chain) (Photo 23) (38)

Rd 37 :

*2sc, 1inc* crochet 2 times, 1inc, 22sc, *1inc, 2sc* crochet 3 times (44)

Rd 38 :

:*4sc, 1inc* crochet 2 times, 24sc, *1inc, 4sc* crochet 2 times (48)

Rd 39- Rd 44 :

48sc (48)

Rd 45 :

:*6sc, 1dec* crochet 6 times (42)

Rd 46 :

:*1dec, 5sc* crochet 6 times (36)

Info :

Cut the white yarn (62), Change to the skin yarn (73)

Rd 47 :

36sc (36)

Rd 48-Rd 55 :

36sc (36)

Rd 56 :

start to join arms: 9sc on the body, from body and arm together 3sc, 15sc, from body and arm together 3sc, 6sc (Photo 25,26) (36)

Rd 57 :

9sc, 6sc from outer sts of arm, 15sc, 6sc from outer sts of arm, 6sc (Photo 27) (42)

Rd 58 :

:*5sc, 1dec* crochet 6 times (36)

Rd 59 :

:*2sc, 1dec, 2sc* crochet 6 times (30)

Rd 60 :

:*3sc, 1dec* crochet 6 times (24)

Rd 61 :

:*1sc, 1dec, 1sc* crochet 6 times (18)

Rd 62 :

:*1sc, 1dec* crochet 6 times (12)

β€” NECK AND HEAD :

Info :

If you choose the 2nd option, insert a stick (or wire) to the doll's neck (Photo 30)

Rd 63-Rd 66 :

12sc (12)

Rd 67 :

12inc (24)

Rd 68 :

: *1sc, 1inc* crochet 12 times (36)

Rd 69 :

:*5sc, 1inc* crochet 6 times (42)

Rd 70 :

: 3sc, 1inc,*6sc, 1inc* crochet 5 times, 3sc (48)

Rd 71 :

:*7sc, 1inc* crochet 6 times (54)

Rd 72-Rd 83 :

54sc (54)

Rd 84 :

:*7sc, 1dec* crochet 6 times (48)

Rd 85 :

: 3sc, 1dec, *6sc, 1dec* crochet 5 times, 3sc (42)

Rd 86 :

:*5sc, 1dec* crochet 6 times (36)

Rd 87 :

: 2sc, 1dec,*4sc, 1dec* crochet 5 times, 2sc (30)

Rd 88 :

:*3sc, 1dec* crochet 6 times (24)

Rd 89 :

: 1sc, 1dec,*2sc, 1dec* crochet 5 times, 1sc (18)

Rd 90 :

:*1sc, 1dec* crochet 6 times (12)

Rd 91 :

: 6dec, 1slst, Fasten off (6)

Info :

Put the eyes between round 76 and 77. The distance between two eyes is 9 stitches. Use the skin yarn (73) to attach yarn into eyes to make deep eyes (refer photo 32-35).

Info :

Embroider the nose with skin yarn, the distance from eye to nose is 3 stitches (photo 36). Embroider eyelashes and eyebrows with black thread (photo 37-44).

β€” EARS (make two) :

Info :

With skin (73) color : Begin with 2ch, start in 2nd chain from the hook: [6dc], 1slst, leave a long tail to sew the ears on the head, Fasten off (Photo 45)

Info :

Sew the ears between Rd 77 and Rd 79. The space between eye and ear is 5 stitches (photo 46)

β€” WIG :

Info :

With the Etrofil Jeans – Yellow (59)

Rd 1 :

8sc in the magic ring (8)

Rd 2 :

BLO: 8inc (16)

Rd 3 :

BLO: *1sc , 1inc* crochet 8 times (24)

Rd 4 :

BLO:*1sc , 1inc, 1sc* crochet 8 times, DO NOT cut the yarn (32)

β€” HAIR STRANDS :

a./ Layer: 1: Work in the Rd 4 (Total 16 strands) (photo 48, 49, 50)

Row 1 =>13 :

23ch, start in 2nd chain from the hook: 22hdc, then crochet in this Rd 4: 1sk, 1sc

Row 14=>16 :

28ch , start in 2nd chain from the hook: 27hdc, then crochet in this Rd 4: 1sk, 1sc

b./ Layer: 2 :

Work in the FLO of Rd 3 (Total 12 strands) (photo 51, 52) Row 17 =>28 : 39ch, start in 2nd chain from the hook: 38hdc, then crochet in this FLO of Rd 3: 1sk, 1sc

c./ Layer: 3 :

Work in the FLO of Rd 2 (Total 8 strands) (photo 53, 54) Row 29 =>36 : 39ch, start in 2nd chain from the hook: 38hdc, then crochet in this FLO of Rd 2: 1sk, 1sc

d./ Layer: 4 :

Work in the FLO of Rd 1 (Total 4 strands) (photo 55, 56) Row 37 =>40 : 36ch, start in 2nd chain from the hook: 35hdc, then crochet in this FLO of Rd 1: 1sk, 1sc , , Fasten off and weave in the ends.

β€” ASSEMBLY :

Info :

- For the correct placement of the wig insert a pin both through the magic ring of the cap and the magic ring of the head (photo 57). - Then align the wig in such a way that it also covers the sides of the head evenly. Pin the edge of the cap to the head (photo 58, 59). - Use matching colored sewing thread to sew (or Use the Silicon glue) the wig to the head (photo 60) - Blush your dolls cheeks (Photo 62).

β€” WEDDING DRESS :

a./ UPPER BODY :

With the White yarn (62)

Rd 1 :

Begin with 41, start in 2nd chain from the hook: 40sc, turn (40)

Rd 2 :

40sc, turn (40)

Rd 3 :

BLO: *9sc, 1inc* crochet 4times, turn (44)

Rd 4 :

1ch , 7sc, 7ch , 8sk, 14sc, 7ch , 8sk, 7sc, turn (Photo 64, 65) (42)

Rd 5 :

1ch , 1inc, 5sc, 1inc, 7sc ( into 7ch), 1inc, 12sc, 1inc, 7sc (into 7ch), 1inc, 5sc, 1inc, turn (48)

Rd 6 -Rd 9 :

1ch , 48sc, turn (48)

Rd 10 :

1ch , 48sc, (do not turn), 1slst onto the first stich to form a circle (48) (Photo 67)

Layer 1 :

Rd 11 : BLO: 2ch, *1dc, 1dc-inc* crochet 24 times , 1slst (72)

Rd 12-Rd14 :

2ch , 72dc, 1slst (72)

Rd 15 :

BLO: *2dc, 1dc-inc* crochet 24 times, 1slst (96)

Rd 16-Rd 18 :

2ch, 96dc, 1slst (96)

Rd 19 :

BLO: 2ch: *3dc, 1dc-inc* crochet 24 times, 1slst (120)

Rd 20-Rd 22 :

2ch, 120dc, 1slst (120)

Rd 23 :

BLO: 2ch: *4dc, 1dc-inc* crochet 24 times, 1slst (144)

Rd 24-Rd27 :

2ch, 144dc, 1slst (144)

Rd 28 :

2ch, *1dc, 1ch* crochet 144 times, 1slst (144)

Rd 29 :

: *[1sc, 5ch, 1slst] - at 1ch of Rd 28* crochet 144 times, Fasten off and weave in the ends. (photo 71) (144)

Assembly Instructions

  • For the correct placement of the wig insert a pin both through the magic ring of the cap and the magic ring of the head (photo 57).
  • Align the wig so it covers the sides of the head evenly, then pin the edge of the cap to the head before sewing (photo 58, 59).
  • Sew the wig to the head with matching sewing thread or use silicon glue for a permanent bond (photo 60).
  • Sew the ears between Rd 77 and Rd 79; space them 5 stitches from the eye for correct placement (photo 46).
  • Attach the head to the body by inserting the neck portion into the opening and secure with whipstitch, stuffing the head firmly before finishing.
  • Connect legs from the back: align the connection point to the middle then crochet 4ch from the second leg and attach to the first leg (Photo 21, 22).

Important Notes

  • πŸ’‘Use stitch markers to keep track of your rounds, especially during spiral rounds and when joining limbs.
  • πŸ’‘Stuff firmly but evenly: add fiberfill gradually while closing the head and limbs to avoid lumps and to maintain shape.
  • πŸ’‘Weave in ends as you go and pin parts before sewing to ensure correct placement and symmetry.

This Farrah bridal doll pattern guides you through a full, photo-illustrated amigurumi project with a layered wig and ruffled wedding dress. Each section includes clear rounds, border work and assembly tips so you can create a professional-looking doll. Perfect as a special handmade gift or a detailed personal keepsake. πŸ§ΆπŸ’

You ask,

we answer.

FAQs

What size will the finished piece be?

The finished amigurumi measures approximately 32 cm tall when using the recommended yarns and hook size as shown in the pattern.

Can I use different yarn weights for this pattern?

Yes, you can use different yarn weights but this will affect the final size. If you choose a bulkier yarn increase the hook size proportionally and expect a larger finished doll.

Do I need prior crochet experience for this pattern?

This pattern is rated intermediate; basic knowledge of single crochet, increases, decreases and working in spiral rounds is recommended for best results.

How long does this project typically take to complete?

Most crafters complete this project in 12-15 hours depending on experience, customization and assembly time.