🧢 Beautiful ✨ Detailed πŸ’ Adorable

EZ Diamond Lattice Blanket Pattern

EZ Diamond Lattice Blanket Pattern
4.1β˜… Rating
12-15 Hours Time Needed
3.8K Made This
βœ‚οΈ

Advanced Level

Designed for experienced crocheters, these patterns involve intricate designs and complex techniques to challenge and inspire.

⏱️

Multi-Day Project

A rewarding 12+ hour journeyβ€”perfect for dedicated crafters who love detailed work.

πŸ€—

Soft Hug

Gentle, plush, and full of warmth, creating a sense of comfort and coziness wherever they find a home.

About This EZ Diamond Lattice Blanket Pattern

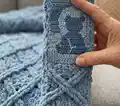
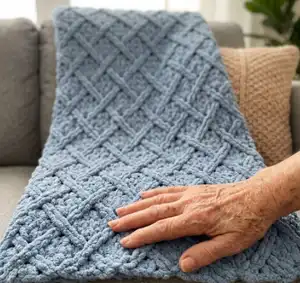
This pattern creates a cozy, chunky diamond-lattice blanket worked using Bernat Alize Blanket-EZ yarn and an easy loop technique. The texture is achieved by crossing loops in a 10-row repeat to build the raised lattice design. The finished blanket measures approximately 56" x 60" and makes a beautiful living room accent or thoughtful handmade gift.

EZ Diamond Lattice Blanket Pattern crochet pattern - detailed view of completed project

Pattern notes remind you to keep the right side facing and to hold the working yarn behind stitches. A video tutorial is available to help you master the loop technique and foundation row.

Why You'll Love This EZ Diamond Lattice Blanket Pattern

I absolutely love this pattern because it transforms simple loop stitches into a breathtaking lattice texture that feels luxurious and cozy. The blanket works up with chunky comfort and visual depth, making it satisfying at every stage. I enjoy how the repeating rows create a rhythmic process β€” it is meditative and fun. Sharing a finished blanket always brings smiles, and this design is especially gift-worthy and comforting.

EZ Diamond Lattice Blanket Pattern step 1 - construction progress EZ Diamond Lattice Blanket Pattern step 2 - assembly progress EZ Diamond Lattice Blanket Pattern step 3 - details and accessories EZ Diamond Lattice Blanket Pattern step 4 - final assembly and finishing

Switch Things Up

I love how easy this pattern is to customize by changing color or yarn type; try a variegated or ombre yarn for a softer gradient effect.

If you want a smaller throw, make fewer repeats of the 10-row pattern and shorten the blanket length, checking measurements as you go.

For a more substantial blanket, use a heavier loop yarn or double up strands (if compatible) to create extra loft and a chunkier texture.

I often swap Country Blue for neutral tones like cream or charcoal to match different living room styles for a more modern look.

Add fringe or a crocheted border in a contrasting color for a finished, bespoke appearance that highlights the lattice edges.

Try alternating two colors every few pattern repeats to create subtle stripes that cross with the lattice for an elegant two-tone effect.

I sometimes replace the bind off with a simple single crochet or reverse single crochet border worked in a coordinating yarn for a neater edge.

You can make a matching pillow by adapting the stitch repeat to a square dimension and stuffing or inserting a pillow form for coordinated decor.

Experiment with tying small tassels at corners or sewing on simple appliques for seasonal themes like autumn leaves or winter stars.

If you prefer a lightweight version, choose a finer loop yarn and a smaller hook, but check gauge and foundation loops to maintain the lattice look.

I also recommend making a small swatch of the 10-row repeat to practice crossings and tension before committing to the full blanket.

Common Mistakes & How to Fix Them

βœ— Skipping the proper count for the foundation row leads to uneven edges; count exactly 68 loops before starting the 1st row. βœ— Turning the work when instructions say 'Do not turn' will break the lattice orientation; follow direction carefully and keep working direction consistent. βœ— Holding the working yarn incorrectly will make loops hard to extract and messy; hold the working yarn behind the stitches as instructed throughout the work. βœ— Pulling loops inconsistently changes stitch size and texture; maintain even tension when pulling each loop to ensure uniform lattice. βœ— Not securing the bind off properly can cause the edge to unravel; follow the bind off sequence and cut the thread at the base of the loop, then tie and weave in securely.

EZ Diamond Lattice Blanket Pattern

Make a luxurious, textured throw with the EZ Diamond Lattice Blanket pattern using Bernat Alize Blanket-EZ yarn. This pattern creates a stunning lattice texture with simple loop techniques that produce dramatic results. Perfect for gifting or cozying up at home, you will enjoy the tactile, chunky fabric and quick progress. Clear notes and a video tutorial help you master the technique.

Advanced 12-15 Hours

Materials Needed for EZ Diamond Lattice Blanket Pattern

β€” Main Fabric

  • 01
    Bernat Alize Blanket-EZ (6.4 oz/180 g; 18 yds/16 m) - Country Blue (37018) - 7 balls (approximate)

β€” Tools Required

  • 01
    Large crochet hook suitable for Blanket-EZ (check yarn label for recommended hook size)
  • 02
    Scissors
  • 03
    Yarn needle for weaving in ends
  • 04
    Stitch markers (optional)
  • 05
    Measuring tape

Progress Tracker

0% Complete

β€” Blanket :

Measurements :

Approximately 56" [142 cm] wide x 60" [152.5 cm] long.

Infos :

Notes: Right side of project is facing at all times. 'Working yarn' is held behind stitches throughout work.

Info :

Count 68 loops for foundation row.

Round 1 :

1st row: Working from right to left, pull the 69th loop (from 'working yarn') up through 68th loop (last loop of foundation row) from behind to create a knit stitch.

Round 2 :

Pull next loop from working yarn up through next loop of foundation row. *Cross 2nd loop of foundation row in front of first loop of foundation row (to the right). Pull next loop from working yarn up from behind next loop. Pull next loop from working yarn up from behind next loop. Pull next loop from working yarn up from behind next loop. (Pull next loop from working yarn up from behind next loop) twice. Repeat from * to end of row. Do not turn work. 68 stitches in row.

Round 3 :

3rd row: Working from right to left, cross 2nd stitch of previous row over 1st stitch (to the right). Pull loop from working yarn up from behind 2nd stitch. Pull next loop from working yarn up from behind 1st stitch. *(Pull next loop from working yarn up from behind next loop) over next 4 stitches. Cross 2nd stitch in front of next stitch (to the right). Pull next loop from working yarn up from behind 2nd stitch. Pull next loop from working yarn up from behind 1st stitch. Rep from * to last 6 stitches. (Pull next loop from working yarn up from behind next loop) over next 4 stitches. Cross next stitch in front of 2nd stitch (to the left). Pull next loop from working yarn up from behind 2nd loop. Pull next loop from working yarn up from behind 1st loop. Do not turn.

Round 4 :

4th row: Working from left to right, pull next loop from working yarn up from behind last stitch worked on previous row. *Cross next stitch in front of 2nd stitch (to the right). Pull next loop from working yarn up from behind 2nd stitch. Pull next loop from working yarn up from behind 1st stitch. (Pull next loop from working yarn up from behind next loop) twice. Cross 2nd stitch in front of next stitch (to the left). Pull next loop from working yarn up from behind 2nd stitch. Pull next loop from working yarn up from behind 1st stitch. Pull next loop from working yarn up from behind next loop. Rep from * to end of row. Do not turn.

Round 5 :

5th row: Working from right to left, (pull next loop from working yarn up from behind last stitch worked on previous row) twice. *Cross next stitch in front of 2nd stitch (to the left). Pull next loop from working yarn up from behind 2nd stitch. Pull next loop from working yarn up from behind 1st stitch. (pull next loop from working yarn up from behind last stitch worked on previous row) three times. *Cross 2nd stitch in front of 1st stitch (to the left). Pull next loop from working yarn up from behind 2nd stitch. Pull next loop from working yarn up from behind 1st stitch. Pull next loop from working yarn up from behind next 4 stitches. Rep from * to last 5 stitches. Cross 2nd stitch in front of 1st stitch (to the left). Pull next loop from working yarn up from behind 2nd stitch. Pull next loop from working yarn up from behind 1st stitch. Do not turn.

Round 6 :

6th row: Working from left to right, (pull next loop from working yarn up from behind last stitch worked on previous row) twice. *Cross 2nd stitch in front of next stitch (to the right). Pull next loop from working yarn up from behind 2nd stitch. Pull next loop from working yarn up from behind 1st stitch. Pull next loop from working yarn up from behind next loop. Rep from * to end of row. Do not turn.

Round 7 :

7th row: Working from right to left, (pull next loop from working yarn up from behind last stitch worked on previous row) twice. *Cross 2nd stitch in front of next stitch (to the right). Pull next loop from working yarn up from behind 2nd stitch. Pull next loop from working yarn up from behind 1st stitch. Cross next stitch in front of 2nd stitch (to the left). Pull next loop from working yarn up from behind 2nd stitch. Pull next loop from working yarn up from behind 1st stitch. Rep from * to end of row. Do not turn.

Round 8 :

8th row: Working from left to right, pull next loop from working yarn up from behind last stitch worked on previous row. *Cross 2nd stitch in front of next stitch (to the left). Pull next loop from working yarn up from behind 2nd stitch. Pull next loop from working yarn up from behind 1st stitch. (Pull next loop from working yarn up from behind next loop) twice. Cross next stitch in front of 2nd stitch (to the right). Pull next loop from working yarn up from behind 2nd stitch. Pull next loop from working yarn up from behind 1st stitch. Rep from * to end of row. Do not turn.

Round 9 :

9th row: Working from right to left, cross 1st stitch over 2nd stitch (to the left). Pull next loop from working yarn up from behind 2nd loop. *Pull next loop from working yarn up from behind 1st loop. (Pull next loop from working yarn up from behind next loop) over next 4 stitches. Cross 2nd stitch in front of next stitch (to the right). Pull next loop from working yarn up from behind 2nd stitch. Pull next loop from working yarn up from behind 1st stitch. Rep from * to last stitches. Do not turn.

Round 10 :

10th row: Working from left to right, pull next loop from working yarn up from behind last stitch worked on previous row. Cross next stitch in front of 2nd stitch (to the right). Pull next loop from working yarn up from behind 2nd stitch. Pull next loop from working yarn up from behind 1st stitch. (Pull next loop from working yarn up from behind next loop) twice. Cross 2nd stitch in front of next stitch (to the left). Pull next loop from working yarn up from behind 2nd stitch. Pull next loop from working yarn up from behind 1st stitch. Rep from * to last stitch. Do not turn.

Info :

Repeat 5th to 10th rows for pattern. Work in pattern until Blanket measures approximately 60" [152.5 cm], ending on a 5th row.

Bind off row :

Bind off row: Working in same direction as last row, pull 2nd stitch through 1st stitch. Pull 3rd stitch through 2nd stitch. Pull 4th stitch through 3rd stitch. Continue in this manner to end of row. Cut thread at base of loop (thread used to create the loop) to create a yarn 'tail'. Tie to secure and weave in end.

Info :

Video tutorial available: Learn to use Bernat Alize Blanket-EZ and watch the EZ Diamond Lattice Blanket Tutorial for extra help.

Assembly Instructions

  • Weave in all yarn tails and secure the bind off tail by tying a knot and weaving the end at least 2 inches into the blanket.
  • Block or gently steam the blanket to even out stitches and set the lattice texture, shaping to approximately 56" x 60" if needed.
  • Trim any stray fibers and neaten edges by checking the bind off row for consistent tension; adjust by reweaving if necessary.
  • Store or package the blanket folded with a soft ribbon or wrap as a gift, ensuring the right side is displayed for presentation.
  • Use the video tutorial as a reference when repeating the 5th to 10th rows to maintain consistent crossing and loop placement.

Important Notes

  • πŸ’‘Right side of project is facing at all times; do not flip the work unless instructed.
  • πŸ’‘'Working yarn' is held behind stitches throughout work; keep it behind to make loop pulling easier.
  • πŸ’‘Count 68 loops for the foundation row precisely to ensure correct stitch repeat and edge alignment.
  • πŸ’‘Many rows include 'Do not turn' instructions; follow direction carefully to maintain lattice orientation.

This EZ Diamond Lattice Blanket Pattern is a beautiful, cozy project that creates a dramatic textured throw with simple loop techniques. It's perfect for gifting, styling your couch, or keeping warm on chilly evenings. Enjoy the rhythmic, meditative process of building the lattice and celebrate your handmade creation! πŸ§Άβœ¨πŸ›‹οΈ

You ask,

we answer.

FAQs

What size will the finished piece be?

The finished blanket measures approximately 56" [142 cm] wide x 60" [152.5 cm] long using the recommended yarn and techniques.

Can I use different yarn weights for this pattern?

You can substitute yarns, but the gauge and final size will change; choose a similar bulky loop yarn and test a sample before starting the full blanket.

Do I need prior crochet experience for this pattern?

This pattern is rated advanced (experienced) and uses loop-crossing techniques; familiarity with basic loop yarn handling and following directional rows is recommended.

How long does this project typically take to complete?

Most crafters complete this blanket in approximately 12-15 hours, depending on experience and working speed.

Is there a tutorial to help with the loop technique?

Yes, a video tutorial is available to demonstrate the EZ Diamond Lattice technique and the foundation loop setup for visual learners.