๐Ÿงถ Beautiful โœจ Detailed ๐Ÿ’ Adorable

Drooping Leave Crochet Pattern

Drooping Leave Crochet Pattern
4.6โ˜… Rating
5-7 Hours Time Needed
3.2K Made This
โœ‚๏ธ

Intermediate Level

Ideal for those with basic crochet experience, featuring slightly more advanced stitches and techniques to expand your skills.

โฑ๏ธ

Weekend Treat

Takes 5-7 hours, making it an enjoyable project to finish over a couple of days.

๐Ÿก

Cozy Accent

A warm touch for your space that transforms ordinary corners into inviting nooks filled with handmade charm.

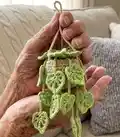
About This Drooping Leave Crochet Pattern

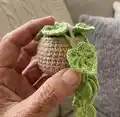
This pattern teaches you how to crochet a hanging pot with drooping Monstera-style leaves, a compact and decorative indoor plant. You will crochet the pot, a removable soil insert, and many small leaves that attach to create the cascading effect. The pattern uses common stitches like SC, DC, HDC, picot and magic ring for shaping, making it approachable with practice.

Drooping Leave Crochet Pattern crochet pattern - detailed view of completed project

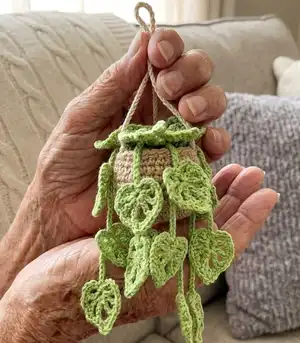
Clear row-by-row instructions are included for the pot, soil, and leaves, plus assembly guidance. Photos show leaf construction and how to sew leaves into the soil for a natural drape.

Why You'll Love This Drooping Leave Crochet Pattern

I absolutely love this pattern because it combines small, repetitive pieces into a striking hanging plant that feels magical when finished. I enjoy making many tiny leaves โ€” it is meditative and produces gorgeous texture. The removable soil insert means you can adjust the arrangement until the leaves drape how you like, which I find very satisfying. I also love that this project is portable and makes a lovely handmade gift or car/room accent.

Drooping Leave Crochet Pattern step 1 - construction progress Drooping Leave Crochet Pattern step 2 - assembly progress Drooping Leave Crochet Pattern step 3 - details and accessories Drooping Leave Crochet Pattern step 4 - final assembly and finishing

Switch Things Up

I love how easy it is to customize this pattern by changing yarn colors; try two-tone leaves or variegated yarn for visual interest.

If you want a larger version, I switch to a thicker yarn and a larger hook which gives a chunkier, more dramatic plant.

You can make tiny keychain versions by using thinner yarn and a 1.75-2.25mm hook to create mini leaves and a tiny pot.

I sometimes embroider veins on the leaves with a darker shade to add depth and realism to the Monstera leaves.

To create a trailing vine look, join several leaves on a longer chain and stagger them at different intervals for a natural cascade.

I recommend experimenting with the number of leaves per soil insert โ€” more leaves create a fuller plant while fewer leaves give a minimalist look.

Try using cotton yarn for a firmer pot and acrylic for softer leaves; the fiber choice impacts drape and structure.

Add beads or tiny crocheted flowers among the leaves for a whimsical touch and extra color contrast.

I sometimes stiffen the leaves lightly with a fabric stiffener if I want them to hold a specific pose on display.

Consider creating matching sets in different sizes and colorways to make attractive handmade gifts or a coordinated shelf display.

Common Mistakes & How to Fix Them

โœ— Skipping the slip stitch at the end of rows can distort edges; always slip stitch into the first stitch when a row ends as instructed. โœ— Not counting increases and decreases exactly can change the pot shape; count stitches after each round and mark your start stitch. โœ— Stuffing too tightly or unevenly will warp the soil insert; stuff gradually and evenly to keep a smooth round shape. โœ— Attaching leaves without pinning leads to awkward placement; pin or hold leaves in place before sewing to arrange a natural drape. โœ— Using a hook that is too large will make loose stitches and floppy leaves; keep to the recommended 2.5-3.0mm hook for the best structure.

Drooping Leave Crochet Pattern

Bring a tiny hanging Monstera to life with this charming drooping leaf crochet pattern. You will make a small hanging pot, soil insert, and many delicate leaves to create a cascading plant. The pattern includes step-by-step rounds, leaf diagrams, and assembly notes so you can finish a beautiful decor piece. Perfect for gifting or adding a handmade accent to your home.

Intermediate 5-7 Hours

Materials Needed for Drooping Leave Crochet Pattern

โ€” Main Fabric

  • 01
    Supper fine yarn (sock/fingering weight) approximately 1.8 oz (50 g) per skein
  • 02
    Color A: Green - leaves (approx 25-50 g)
  • 03
    Color B: Beige - pot (approx 25-50 g)
  • 04
    Color C: Brown - soil/inner ball (approx 10-25 g)

โ€” Tools Required

  • 01
    Crochet hook size 2.5mm to 3.0mm
  • 02
    Stitch marker
  • 03
    Sewing needle / yarn needle for sewing
  • 04
    Scissors
  • 05
    Cotton filling / polyester stuffing
  • 06
    Tapestry needle for weaving ends
  • 07
    Optional: pins to position leaves during assembly

Progress Tracker

0% Complete

โ€” Pots :

Info :

Note : for newbie. Slip stitch in the first stitch in every time a row ends and begin a chain in every time a new row starts example : single crochet begin 1 chain 1, double crochet begin chain 2

Row 1 :

MR, chain 1, 8SC (8 sts)

Row 2 :

chain 1, 8SC inc (16 sts)

Row 3 :

chain 1, (1SC, 1 inc) 8 time (24 sts)

Row 4 :

chain 1, (2SC, 1inc) 8 time (32 sts)

Row 5 :

(3 SC, 1 inc) 8 time (40 sts)

Row 6 :

(BLO) 40 SC (40 sts)

Row 7 :

40 DC (40 sts)

Row 8 :

40 SC (40 sts)

Row 9 :

40 DC (40 sts)

Row 10 :

40 SC (40 sts)

Row 11 :

40 SC (40 sts)

Info :

For the hanging pot, continue crocheting chain 30 (make 3) and tie it to the rim of the pot plant. The distance of each hanging rope is 12-13 sts

โ€” The Soil :

Row 1 :

mr 8SC (8sts)

Row 2 :

8 SC inc (16sts)

Row 3 :

(1 SC + 1 inc ) 8 tomes (24sts)

Row 4 :

(2SC + 1inc) 8 times (32sts)

Row 5-8 :

SC in each st to end

Row 9 :

(2 SC + 1 dec) 8 times (24sts)

Row 10 :

(1 SC + 1 dec) 8 times (16sts) (stuffing)

Row 11 :

8 dec (8sts)

Info :

cut yarn and leave a long tail for sew, close off the hole.

โ€” Leaves (1) :

ROW 1 :

Chain 4, slip stitch in the first chain from the hook to make an MR.

ROW 1 :

All st crochet of row 1 into the MR โ€ข Chain 3, 1DC + 3 Chain, 1HDC + 3 Chain,1DC + 3 Chain

ROW 1 :

โ€ข 1DC + 3 Chain, 1HDC + 3 Chain, 1DC + 3 Chain

โ€” Leaves (2) :

ROW 2 :

Now we have total 7 spaces

ROW 2 :

1st - 3rd space : 3SC, 1 slip st

ROW 2 :

4th space : 1SC, 1picot, 1SC, 1 slip st

ROW 2 :

5-7th space : 3SC, 1 slip st

Info :

When you're done with the leaf, chain 10 and again slip st in the 4th chain from the hook to make an MR, and begin making the next leaf.

โ€” Assembly :

Info :

Time to attach them onto the stem. Now we have toal of this.

Item :

Sew every drooping leaves into the soil

Item :

Put the soil inside the pot.

Assembly Instructions

  • For the hanging pot, crochet three chains of 30 and tie each chain to the rim of the pot; space the three hanging ropes about 12-13 stitches apart for even balance.
  • Sew every drooping leaf into the soil insert, arranging and pinning them first so they drape naturally before securing with small stitches.
  • Place the stuffed soil ball inside the pot and adjust leaves so they hang over the rim; sew the soil insert in place through the pot rim if desired to secure.
  • Leave a long tail when you finish the soil (Row 11) to sew the opening closed and to help secure the soil inside the pot.

Important Notes

  • ๐Ÿ’กUse a stitch marker to mark the start of each round; this helps keep track during increases and even rounds.
  • ๐Ÿ’กStuff the soil insert evenly and gradually; overstuffing will distort the pot shape while under-stuffing will make leaves sit poorly.
  • ๐Ÿ’กLeave long tails for sewing after finishing rounds that close the soil or pot so you can neatly close and attach pieces.
  • ๐Ÿ’กChain and slip stitch conventions: begin single crochet rows with chain 1 and double crochet rows with chain 2 as noted in the pattern.

This delightful hanging Monstera is a small, handmade accent that brings a touch of green indoors. It makes a perfect gift or a cheerful addition to your car or shelf. Enjoy arranging the drooping leaves to create your own cascading plant display. ๐Ÿชดโœจ

You ask,

we answer.

FAQs

What size will the finished piece be?

The finished hanging plant measures approximately 8-12 cm tall (not including the hanging chains) depending on yarn and hook size.

Can I use different yarn weights for this pattern?

Yes, you can substitute yarn weights, but this will change the final size; choose a hook appropriate for your selected yarn to maintain stitch density.

Do I need prior crochet experience for this pattern?

This pattern is rated intermediate; familiarity with single crochet, double crochet, half double crochet, increases, decreases and magic ring technique is recommended.

How long does this project typically take to complete?

Most crocheters complete this project in about 5-7 hours, though time will vary depending on how many leaves you make and your assembly speed.