About This Dove Amigurumi Pattern
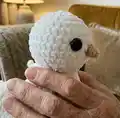
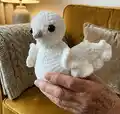
This pattern creates a charming plush dove worked mostly in continuous rounds for a seamless finish. It uses plush yarn for a soft texture and a contrasting yarn for a tiny beak detail. The pattern includes full round-by-round instructions for the head, body, tail, wings and beak so you can assemble the dove easily.

Clear abbreviations and a materials list are included, plus tips for assembly and symmetry. Suitable for crocheters with some amigurumi experience who want a rewarding weekend project.
Why You'll Love This Dove Amigurumi Pattern
I absolutely love this pattern because it combines simple shaping with a fluffy, tactile yarn that makes the dove incredibly soft and huggable. I enjoy the compact design that folds to create the chest and tail, it gives the finished toy a charming silhouette. The wings are made as small folded elements, which is a fun little finishing technique that always delights viewers. I also love that the pattern uses two different yarns so you can create subtle contrasts like a tiny beige beak against the white body. Finally, sewing and assembling the parts is satisfying and lets you personalize the pose and expression.
Switch Things Up
I love how this pattern invites customization — try different colors to make seasonal or stylized doves such as pastel spring tones or warm autumn hues.
You can change the size by using a thicker or thinner yarn and adjusting hook sizes; bulky yarn with a larger hook creates a chunky cuddle buddy while thinner yarn will produce a small, delicate dove.
Experiment with eye types: swap safety eyes for embroidered eyes for a safer toy for very young children, or use colored safety eyes for expressive looks.
Try adding tiny accessories like a crocheted ribbon, a small felt heart, or a mini scarf to personalize your dove for gifting occasions.
I often add a few back-stitched feather details on the wings or tail to enhance texture and expression without changing the basic construction.
For a mobile or garland, make several smaller versions using thinner yarn and hang them with thin ribbon — they make lovely nursery decor.
Consider filling lightly and inserting a small bell or rattle if you want a toy with sound; secure the bell inside the stuffing so it stays in place.
For a vintage look, try an off-white or oatmeal yarn and add a little blush with embroidery thread on the cheeks for personality.
If you want the dove to be poseable, carefully insert a small piece of craft wire in the neck or wings before finishing and secure it well inside the stuffing.
I also enjoy creating little themed sets — make a family of doves in coordinating colors and sizes to display together; they look adorable on a shelf or as a table centerpiece.
Common Mistakes & How to Fix Them
✗ Skipping the marker for the start of each round causes misplaced increases and decreases; place a marker in the first stitch of every round and move it as you go.
✗ Forgetting to stuff gradually makes shaping difficult and lumps appear; add stuffing in small amounts while checking the shape and firmness continuously.
✗ Overly tight tension when using plush yarn causes stitches to disappear and distort the texture; keep a relaxed, consistent tension so the yarn can fluff and show its texture.
✗ Not folding and closing the body correctly leads to uneven edges and a misshapen dove; pin the fold, count stitches carefully, and sew the front and back together evenly to make a neat seam.
✗ Attaching wings asymmetrically makes the dove look lopsided; pin both wings in place, compare positions visually, then sew with small stitches to secure symmetry.