🧢 Beautiful ✨ Detailed πŸ’ Adorable

Dottie the Panda Amigurumi Pattern

Dottie the Panda Amigurumi Pattern
4.5β˜… Rating
5-7 Hours Time Needed
2.1K Made This
βœ‚οΈ

Intermediate Level

Ideal for those with basic crochet experience, featuring slightly more advanced stitches and techniques to expand your skills.

⏱️

Weekend Treat

Takes 5-7 hours, making it an enjoyable project to finish over a couple of days.

🧸

Cute Companion

An adorable friend to cherish, handcrafted with love to bring comfort and joy for years to come.

About This Dottie the Panda Amigurumi Pattern

This pattern creates a 16-inch colorful panda amigurumi using worsted weight #6 yarn and a 3.75 mm hook. The design includes eye patches, a muzzle, ears, arms, legs, and a tail with full placement and assembly instructions. Make one in coordinating accent colors for a bright, playful result. Written in continuous rounds with clear stitch counts and finishing directions.

Dottie the Panda Amigurumi Pattern crochet pattern - detailed view of completed project

Includes exact materials, abbreviations, safety eye and nose placement, and helpful photos for assembly. Great for intermediate crocheters wanting a large, expressive plush toy.

Why You'll Love This Dottie the Panda Amigurumi Pattern

I absolutely love this pattern because it combines bold color blocking with classic amigurumi shaping to create a toy with tons of personality. I enjoy how the large eye patches and oversized muzzle let you customize expression easily. I designed the instructions to be clear for intermediate makers while leaving room for creative color choices. Sewing and placement steps are written to help you achieve a neat, professional finish every time.

Dottie the Panda Amigurumi Pattern step 1 - construction progress Dottie the Panda Amigurumi Pattern step 2 - assembly progress Dottie the Panda Amigurumi Pattern step 3 - details and accessories Dottie the Panda Amigurumi Pattern step 4 - final assembly and finishing

Switch Things Up

I love to change up colors to make each panda feel unique; try pastel shades for a soft nursery friend or neon accents for a playful look.

I often switch yarn brands and weights to create tiny or jumbo versions; use thinner yarn and a smaller hook for a mini keychain or bulky yarn for a big cuddly toy.

I add embroidered eyebrows and mouths to change expressions β€” a few stitches can make a joyful, sleepy, or surprised face.

I sometimes use felt or safety-felt for eye patches instead of crocheting them for a very flat graphic look; glue or stitch them in place carefully.

I try different eye sizes depending on the intended audience; smaller eyes are better for little kids while large decorative eyes make the toy more expressive.

I recommend swapping the muzzle color to contrast sharply with the head for a bold look, or tone-on-tone for a subtler finish.

I like to add accessories like tiny crocheted scarves, hats, or bows to personalize each panda for gifting occasions.

If you want a poseable toy, I sometimes add pipe cleaner or floral wire inside the arms and legs, wrapping it securely and covering with stuffing to avoid pokes.

For a more sculpted face, I use needle sculpting as described in the pattern; experiment with tension and the number of passes to get the look you like.

Don’t be afraid to mix texture yarns: pairing a plush chenille body with slightly firmer yarn for details gives nice contrast and makes small features hold shape better.

Common Mistakes & How to Fix Them

βœ— Skipping stitch markers during continuous spiral rounds leads to lost beginning points; place a marker at the start of every round and move it as you work to stay aligned. βœ— Not stuffing as you go causes uneven shaping and difficulty closing pieces; stuff gradually, shaping as you add small amounts of filling to maintain form. βœ— Changing hook sizes or yarn weight without adjusting stitch counts will alter final size and placements; if you change yarn, recalculate eye and nose placement and use appropriate hook size. βœ— Forgetting to leave long tails for sewing makes assembly awkward and insecure; always fasten off leaving a long tail for sewing and use a yarn needle to secure parts well. βœ— Crowding safety eyes too close together will distort facial shaping; follow the placement instructions (between rounds 12 and 13 with 10 holes apart) and pin before securing to confirm spacing.

Dottie the Panda Amigurumi Pattern

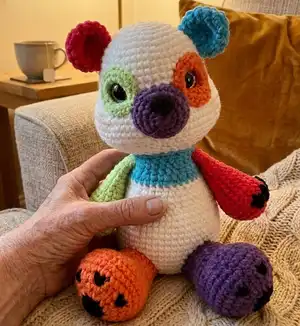
Make a colorful, cuddly panda with Dottie the Panda Amigurumi Pattern. This playful plush uses chunky/worst-weight yarn and large safety eyes to create a bold, expressive toy. You will enjoy step-by-step rounds for head, body, limbs, and assembly with helpful photos and placement notes. Perfect for gifting or keeping β€” follow the detailed instructions to make your own unique rainbow panda.

Intermediate 5-7 Hours

Materials Needed for Dottie the Panda Amigurumi Pattern

β€” Main Fabric

  • 01
    Worsted Weight yarn (#6) approximately 150g main color (Color A - White)
  • 02
    Accent colors: approximately 50g each of Color B (Pink/Hibiscus), Color C (Green/Key Lime), Color D (Blue/Turquoise), Color E (Orange/Mango), Color F (Purple/Iris)
  • 03
    Color G: Black - small amounts for claws and detail
  • 04
    All colors referenced are Premier Parfait shades (Turquoise, Mango, Iris, White, Hibiscus, Key Lime)

β€” Tools Required

  • 01
    Crochet hook size F / 3.75 mm
  • 02
    23 mm safety eyes (2 pieces)
  • 03
    24 mm safety nose (1 piece)
  • 04
    Scissors
  • 05
    Yarn/sewing needle for sewing pieces
  • 06
    Stitch markers
  • 07
    Polyester fiberfill stuffing
  • 08
    Pins for assembly and placement reference

Progress Tracker

0% Complete

β€” Eye Patches :

Round 1 :

Make 6 sc into a magic ring= 6

Round 2 :

Increase in each st around= 12

Round 3 :

(inc x 3, 3 sc) x 2= 18

Round 4 :

((sc, inc) x 3, 3 sc) x 2= 24

Info :

F/O and leave a long tail for sewing. Place the safety eyes after the 2nd increase, between rounds 1 and 2.

β€” Head :

Info :

Crocheted from top of head to bottom. With Color A: Ch 6

Round 1 :

sc in 2nd ch from hook, 4 sc, inc3 in last chain, working on the opposite side of the chain: 3 sc, inc= 12

Round 2 :

inc, 3 sc, inc x 3, 3 sc, inc x 2= 18

Round 3 :

(2 sc, inc) x 6= 24

Round 4 :

(3 sc, inc) x 6= 30

Round 5 :

(4 sc, inc) x 6= 36

Round 6 :

(5 sc, inc) x 6= 42

Round 7 :

(6 sc, inc) x 6= 48

Round 8-14 :

sc in each st around

Info :

In round 15: Mark the 1st sc and last sc of your first 12 sc worked in between your increases. The picture is to show you where the eyes go without the patches in the way.

Round 15 :

((sc, inc) x 3, 12 sc, (inc, sc x 3)) x 2= 60

Round 16 :

((2 sc, inc) x 2, 18 sc, (inc, 2 sc) x 2)) x 2= 68

Round 17-20 :

sc in each st around

Info :

Place eyes and eye patches between rounds 12 and 13 above the stitch markers. The eyes will be 10 holes apart. Stuff the head as you work.

Round 21 :

Dec x 6, 10 sc, dec x 10, 18 sc, dec x 4= 48

Round 22 :

(6 sc, dec) x 6= 42

Round 23 :

(5 sc, dec) x 6= 36

Round 24 :

(4 sc, dec) x 6= 30

Round 25 :

(3 sc, dec) x 6= 24

Info :

F/O the head. Sew the eye patches onto the head.

β€” Body :

Info :

Starting with Color A:

Round 1 :

Make 12 sc into a magic ring=12

Round 2 :

(sc, inc) x 6= 18

Round 3 :

(2 sc, inc) x 6= 24

Round 4 :

(3 sc, inc) x 6= 30

Round 5 :

(4 sc, inc) x 6= 36

Round 6 :

(5 sc, inc) x 6= 42

Round 7 :

(6 sc, inc) x 6= 48

Round 8 :

(7 sc, inc) x 6= 54

Round 9-15 :

sc in each st around

Round 16 :

15 sc, (dec, 2 sc) x 3, 15 sc, (dec, 2 sc) x 3= 48

Round 17 :

sc in each st around

Round 18 :

(6 sc, dec) x 6= 42

Round 19-20 :

sc in each st around

Round 21 :

(5 sc, dec) x 6= 36

Info :

Start stuffing the body

Round 22 :

sc in each st around

Info :

Change to Color D:

Round 23 :

sc in each st around

Round 24 :

(4 sc, dec) x 6= 30

Round 25-26 :

sc in each st around

Round 27 :

(3 sc, dec) x 6= 24

Round 28 :

sc in each st around

Info :

F/O and leave a long tail for sewing

β€” Arms :

Info :

Make 1 in Color C, 1 in Color B

Round 1 :

Make 6 sc into a magic ring= 6

Round 2 :

Increase in each st around= 12

Round 3 :

(sc, inc) x 6= 18

Round 4 :

(2 sc, inc) x 6= 24

Round 5 :

4 sc, (Color G: bob, Color C: sc) x 3, 14 sc

Round 6 :

Sc in each st around

Round 7 :

(dec, 10 sc) x 2= 22

Round 8 :

(dec, 9 sc) x 2= 20

Info :

Start stuffing the arms

Round 9 :

(dec, 8 sc) x 2= 18

Info :

Do not stuff the arms any more

Round 10 :

Sc in each st around

Round 11 :

(dec, 7 sc) x 2= 16

Round 12 :

Sc in each st around

Round 13 :

(dec, 6 sc) x 2= 14

Round 14 :

Sc in each st around

Round 15 :

(dec, 5 sc) x 2= 12

Round 16 :

Sc in each st around

Info :

Work a sc, fold the arms in half and sc the opening closed. F/O and leave a long tail for sewing

β€” Ears :

Info :

Make 1 in Color B, 1 in Color D

Round 1 :

Make 6 sc into a magic ring= 6

Round 2 :

Increase in each st around= 12

Round 3 :

(sc, inc) x 6= 18

Round 4 :

(2 sc, inc) x 6= 24

Round 5 :

sc in each st around

Info :

Do not stuff the ears

Round 6 :

(2 sc, dec) x 6= 18

Round 7 :

(sc, dec) x 6= 12

Info :

Fold the ears in half and sc the opening closed. F/O and leave a long tail for sewing

β€” Muzzle :

Info :

With Color F:

Round 1 :

Make 6 sc into a magic ring= 6

Round 2 :

Increase in each st around= 12

Round 3 :

(sc, inc) x 6= 18

Round 4 :

sc, inc, (2 sc, inc) x 5, sc= 24

Round 5 :

sc in each st around

Info :

Place the safety nose in between rounds 2 and 3. F/O and leave a long tail for sewing

β€” Tail :

Info :

With Color D:

Round 1 :

Make 6 sc into a magic ring= 6

Round 2 :

Increase in each st around= 12

Round 3 :

(sc, inc) x 6= 18

Round 4 :

Sc in each st around

Round 5 :

(sc, dec) x 6= 12

Info :

Start stuffing the tail

Round 6 :

Dec x 6= 6

Info :

F/O and sew the tail closed. Leave a long tail for sewing

β€” Legs :

Info :

Make 1 in Color E and 1 in Color F. Starting with Color G:

Round 1 :

Make 6 sc into a magic ring= 6

Round 2 :

Increase in each st around= 12

Info :

Change to Color E or F:

Round 3 :

(sc, inc) x 6= 18

Round 4 :

(2 sc, inc) x 6= 24

Round 5 :

3 sc, inc, (Color E or F: 3 sc, Color G: inc) x 3, Color E or F: (3 sc, inc) x 2= 30

Round 6 :

(4 sc, inc) x 6= 36

Round 7-8 :

sc in each st around

Round 9 :

10 sc, (2 sc, dec) x 4, 10 sc= 32

Round 10 :

10 sc, (sc, dec) x 4, 10 sc= 28

Round 11 :

10 sc, dec x 4, 10 sc= 24

Info :

Start stuffing the legs

Round 12 :

(dec, 10 sc) x 2= 22

Round 13 :

sc in each st around

Round 14 :

(dec, 9 sc) x 2= 20

Round 15 :

sc in each st around

Info :

F/O and leave a long tail for sewing

β€” Assembly :

Info :

Head/Body/Ears/Muzzle: If you want a needle sculpted look: Place a pin on the center of the head in between rounds 22 and 23. Thread your needle with a strand of yarn. (Any color yarn will work) Insert the needle into the hole on the bottom of the head. Bring the needle up to a corner on the bottom of an eye. Insert the needle into another hole next to that one and bring it through the head to a hole on the bottom of the opposite eye. Insert the needle into a hole next to that one and bring the needle down to the pinned spot. Insert the needle in another hole next to that one. Repeat this about 2 more times like a triangle pulling slightly to indent the eyes and make a little mouth.

Info :

Pin the muzzle onto the head in between the eyes. You may need to add more stuffing as you sew.

Info :

Sew the head and body together. You may need to add more stuffing before you close the head and body together.

Info :

Arms: Pin the arms to the sides of the body approximately between rounds 26 and 27. Sew the arms onto the body.

Info :

Legs: Pin the legs onto the front of the body. Sew the legs onto the body.

Assembly Instructions

  • If you want a needle sculpted look: place a pin at the center of the head between rounds 22 and 23, thread a yarn needle and pull through holes around the eyes in a triangle pattern to indent slightly and form a small mouth.
  • Pin the muzzle onto the head between the eyes and sew in place, adding stuffing as needed to maintain shape and fullness.
  • Pin the head to the body and sew securely, adding or removing stuffing to ensure a smooth neck join before closing.
  • Pin each arm to the sides of the body approximately between rounds 26 and 27, then sew the arms on using a whipstitch or mattress stitch for a flat seam.
  • Pin the legs to the front bottom of the body and sew the legs securely, making sure spacing is even so the panda sits upright.

Important Notes

  • πŸ’‘Do not join rounds unless stated; work in a continuous spiral for amigurumi shaping.
  • πŸ’‘Use a stitch marker to mark the beginning of each round and move it as you progress to keep count.
  • πŸ’‘All stitches are worked in both loops unless otherwise stated in the pattern.
  • πŸ’‘Stuff pieces firmly but evenly β€” overstuffing can distort shapes while under-stuffing will produce floppy limbs.

This colorful Dottie the Panda was designed to be whimsical, bright, and full of personality. Make one in your favorite palette to gift or display β€” each one will be a unique little companion. Thank you for supporting handmade patterns and happy crocheting! 🧢🧡

You ask,

we answer.

FAQs

What size will the finished piece be?

The finished amigurumi measures approximately 16 inches from bottom to top of head when using the recommended worsted weight #6 yarn and a 3.75 mm hook.

Can I use different yarn weights for this pattern?

Yes, but changing yarn weight or hook size will change the final size and may require you to adjust eye and nose placements; use appropriate hook adjustments for different yarns.

Do I need prior crochet experience for this pattern?

This pattern is rated intermediate and requires basic amigurumi knowledge like working in the round, increases/decreases, and sewing pieces; intermediate skills are recommended for best results.

How long does this project typically take to complete?

Most crocheters complete this project in about 5-7 hours, though time will vary depending on experience, customization, and assembly complexity.