๐Ÿงถ Beautiful โœจ Detailed ๐Ÿ’ Adorable

Doll Organizer Amigurumi Pattern

Doll Organizer Amigurumi Pattern
4.4โ˜… Rating
8-10 Hours Time Needed
1.8K Made This
โœ‚๏ธ

Intermediate Level

Ideal for those with basic crochet experience, featuring slightly more advanced stitches and techniques to expand your skills.

โฑ๏ธ

All-Day Adventure

Requires 8-10 hours, ideal for a full day of immersive crocheting.

๐Ÿงธ

Cute Companion

An adorable friend to cherish, handcrafted with love to bring comfort and joy for years to come.

About This Doll Organizer Amigurumi Pattern

This pattern creates a 25 cm (10 in) Doll Organizer that is both decorative and useful. You will crochet the head, torso, hair, arms, a stable base with a cardboard insert, and multiple pockets and an apron for holding needles and tools. The design uses simple amigurumi techniques with clear round-by-round instructions.

Doll Organizer Amigurumi Pattern crochet pattern - detailed view of completed project

Suitable for intermediate crocheters, the pattern includes assembly details, pocket templates, and ideas for customizing colors. Follow the step-by-step rounds to create a finished organizer-ready doll.

Why You'll Love This Doll Organizer Amigurumi Pattern

I absolutely love this pattern because it combines a cute amigurumi doll with practical storage for sewing tools, making craft time tidier and more joyful. I enjoy the mix of shaping techniques for the head and body, which give the doll a pleasing silhouette. The apron and pockets let me personalize colors and functions, and adding a needle ball is a delightful finishing touch. Working this pattern always feels rewarding as each section transforms into a charming, useful finished piece.

Doll Organizer Amigurumi Pattern step 1 - construction progress Doll Organizer Amigurumi Pattern step 2 - assembly progress Doll Organizer Amigurumi Pattern step 3 - details and accessories Doll Organizer Amigurumi Pattern step 4 - final assembly and finishing

Switch Things Up

I love how you can personalize this doll by changing yarn colors for the dress, apron and pockets to match your sewing room decor.

You can make a mini or maxi version by switching yarn weight and hook size; try bulky yarn with a larger hook for a plush, larger organizer or fine thread for a delicate miniature.

I like adding felt or embroidered motifs to the apron pocket for extra charm โ€” flowers, initials, or tiny tool silhouettes work well.

If you want extra stability, glue a small wooden disc to the cardboard base before inserting it, or use a heavier plastic disk and more glass beads to prevent tipping.

Swap the eye style: safety eyes, embroidered eyes, or French knot eyes all change the character of the doll significantly.

I sometimes add a loop or button closure to one of the pockets so small scissors or pins are secured when traveling.

Make the needle ball removable by attaching its ribbon with a small snap fastener so it doubles as a pincushion you can carry separately.

For a themed gift set, crochet matching mini accessories โ€” a tiny pincushion, miniature thread spool or tiny book โ€” and tuck them into the pockets.

I also enjoy changing hair styles using the same hair cap: try braids, a bun, or loose strands and use contrasting yarn for highlights.

Finally, experiment with embroidery for facial expressions; shifting the eyebrow angle or mouth curve gives the doll a whole new personality and mood.

Common Mistakes & How to Fix Them

โœ— Skipping stitch markers during long rounds can cause you to lose track of increases and decreases; place markers at the start of key rounds to maintain correct stitch counts. โœ— Forgetting to stuff as you go leads to lumps or collapsed shapes; stuff gradually during shaping and adjust filling frequently for an even result. โœ— Not counting stitches after increase/decrease rounds results in incorrect shaping; always count after each round to confirm the stated stitch totals and correct errors immediately. โœ— Attaching parts without pinning can lead to uneven placement and poor symmetry; pin pieces in position first, check alignment visually, then sew securely with small stitches. โœ— Changing yarn color without securing ends can cause loose threads and messy joins; fasten off neatly or weave in ends and carry color where appropriate to avoid gaps.

Doll Organizer Amigurumi Pattern

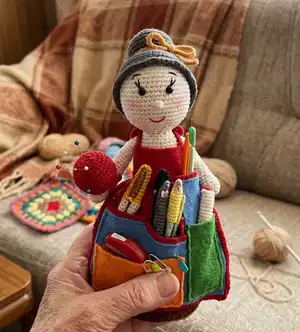
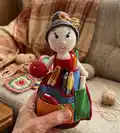
Make a charming crocheted doll that doubles as a handy organizer for your sewing notions. This pattern guides you through a doll with pockets, an apron, and a needle ball โ€” perfect for gifting or brightening your craft table. You will enjoy shaping the head, hair, arms and decorative pockets while learning useful assembly techniques.

Intermediate 8-10 Hours

Materials Needed for Doll Organizer Amigurumi Pattern

โ€” Main Fabric

  • 01
    Acrylic yarn 50 g / 125 m - beige (head and upper torso) approximately 20-30 g
  • 02
    Acrylic yarn 50 g / 125 m - brown (dress and base) approximately 50-70 g
  • 03
    Gray yarn - small amount for hair, approx 10-20 g
  • 04
    Red yarn - apron and decorative parts, approx 20-30 g
  • 05
    Blue yarn - large apron pocket, approx 20 g
  • 06
    Orange yarn - small pocket, approx 10 g
  • 07
    Green yarn - small pocket, approx 10 g
  • 08
    Small amounts of additional colors for details and trim

โ€” Tools Required

  • 01
    Crochet hook size 2.0 mm
  • 02
    Fiberfill (polyester stuffing)
  • 03
    Sewing needle for assembly and embroidery
  • 04
    Thread for embroidery (black for face details)
  • 05
    Eyes 8 mm
  • 06
    Scissors
  • 07
    Stitch markers
  • 08
    Pins for positioning parts
  • 09
    Hard cardboard or plastic circle (for base insert)
  • 10
    5-10 glass beads or marbles (to weight the base)

Progress Tracker

0% Complete

โ€” Materials :

Info :

Yarn acryl 50 g / 125m. Crochet 2.0 mm. Fiberfill. Needle. Tread for embroider. Eyes 8 mm.

โ€” Abbreviations and stitches user :

Infos :

MR - magic ring. Ch - chain stitch. Sc - single crochet. Dec - decrease ( sc 2 stitches together ). Inc - increase ( 2 sc in 1 ch ). Sl st - slip stitch. R - round. BLO - back loops only. FLO - front loops only.

โ€” Head and torso ( thread color beige ) :

Round 1 :

(6 sc) into MR

Round 2 :

(inc) x 6 = 12 sc

Round 3 :

(1sc, inc) x 6 = 18

Round 4 :

(2sc, inc) x 6 = 24

Round 5 :

(3sc, inc) x 6 = 30

Round 6 :

(4sc, inc) x 6 = 36

Round 7 :

(5sc, inc) x 6 = 42

Round 8 :

(6sc, inc) x 6 = 48

Round 9 :

(7sc, inc) x 6 = 54

Round 10-19 :

= 54 sc ( 10 rounds )

Info :

Place your eyes between the 12th and 13th rows. Distance between eyes 8 loops

Round 20 :

(7sc, dec) x 6 = 48

Round 21 :

(6sc, dec) x 6 = 42

Round 22 :

(5sc, dec) x 6 = 36

Round 23 :

(4sc, dec) x 6 = 30

Round 24 :

(3sc, dec) x 6 = 24

Round 25 :

(2sc, dec) x 6 = 18

Info :

In the process of crocheting, put filler inside the doll

Round 26 :

Sl st = 18

Round 27 :

BLO (2sc, inc) x 6 = 24

Round 28 :

(3sc, inc) x 6 = 30

Round 29 :

(9sc, inc) x 3 = 33

Round 30 :

(10sc, inc) x 3 = 36

Round 31 :

= 36 sc

Info :

Change the color of the yarn to brown. This will be the color of the dress.

Round 32-37 :

= 36 sc ( 6 rounds )

Round 38 :

(10sc, dec) x 3 = 33

Round 39 :

= 33 sc

Round 40 :

(9sc, dec) x 3 = 30

Round 41 :

Sl st = 30

Round 42 :

BLO (4sc, inc) x 6 = 36

Round 43 :

(5sc, inc) x 6 = 42

Round 44 :

(6sc, inc) x 6 = 48

Round 45 :

(7sc, inc) x 6 = 54

Round 46 :

(8sc, inc) x 6 = 60

Round 47-78 :

= 60 sc ( 32 rounds )

Round 79 :

(9sc, inc) x 6 = 66

Round 80 :

(10sc, inc) x 6 = 72

Info :

To break yarn.

โ€” The base of the doll ( crochet yarn color brown ) :

Round 1 :

(8 sc) into MR

Round 2 :

(inc) x 6 = 16 sc

Round 3 :

(1sc, inc) x 6 = 24

Round 4 :

(2sc, inc) x 6 = 32

Round 5 :

(3sc, inc) x 6 = 40

Round 6 :

(4sc, inc) x 6 = 48

Round 7 :

(5sc, inc) x 6 = 56

Round 8 :

(6sc, inc) x 6 = 64

Round 9 :

(7sc, inc) x 6 = 72

Info :

Do not cut the thread !

Info :

Cut a circle out of hard cardboard or plastic. The size of the circle should be the same size as the crocheted circle. Also put 5 to 10 glass balls inside. See the photo. This is necessary for the doll to stand well.

Round 1 (attach) :

(8sc, inc ) x 8, sl st = 80 Crochet 2 loops together: 1 body loop and 1 base loop

Round 2 (attach) :

(1sc, 2 ch, 1 sc ) - in 1 loop, loop 2 do not crochet, (1sc, 2 ch, 1 sc ) - in 3 loop, loop 4 do not crochet, repeat to the end of the row, sl st.

Info :

To break yarn. When crocheting half of the circle, place a cardboard or plastic circle inside the doll Crochet the circle to the end.

โ€” Hands (2 parts) :

Round 1 :

(6 sc) into MR

Round 2 :

(inc) x 6 = 12 sc

Round 3 :

(3sc, inc) x 3 = 15

Round 4-8 :

= 15 sc ( 5 rounds )

Round 9 :

(2sc, dec) x 5 = 10

Round 10-24 :

= 10 sc ( 15 rounds )

Round 25 :

( dec ) x 5 = 5

Info :

Fasten off. To break yarn. Attach arms to the torso.

โ€” Hair ( gray yarn ) :

Round 1 :

(6 sc) into MR

Round 2 :

(inc) x 6 = 12 sc

Round 3 :

(1sc, inc) x 6 = 18

Round 4 :

(2sc, inc) x 6 = 24

Round 5 :

(3sc, inc) x 6 = 30

Round 6 :

(4sc, inc) x 6 = 36

Round 7-11 :

= 36 sc ( 5 rounds )

Round 12 :

(4sc, dec) x 6 = 30

Round 13 :

Sl st = 30

Round 14 :

FLO (4sc, inc) x 6 = 36

Round 15 :

(5sc, inc) x 6 = 42

Round 16 :

(6sc, inc) x 6 = 48

Round 17 :

(7sc, inc) x 6 = 54

Round 18-26 :

= 54 sc ( 9 rounds )

Round 27 :

(1sc, 1 ch, 1 sc ) - in 1 loop, loop 2 do not crochet, (1sc, 1 ch, 1 sc ) - in 3 loop, loop 4 do not crochet, repeat to the end of the row, sl st.

Info :

Crochet a hair band : 20 ch or 40 ch. See how long the tape will be beautiful. Sew the hair to the head. Tie the ribbon around your hair. Sew the tape to the hair. Embroider the eyebrows on the face with black thread. Embroider the nose. Embroider the mouth. See the photo.
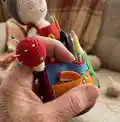
โ€” Needle ball :

Round 1 :

(6 sc) into MR

Round 2 :

(inc) x 6 = 12 sc

Round 3 :

(1sc, inc) x 6 = 18

Round 4 :

(2sc, inc) x 6 = 24

Round 5 :

(3sc, inc) x 6 = 30

Round 6 :

(4sc, inc) x 6 = 36

Round 7-9 :

= 36 sc ( 3 rounds )

Round 10 :

(4sc, dec) x 6 = 30

Round 11 :

(3sc, dec) x 6 = 24

Round 12 :

(2sc, dec) x 6 = 18

Round 13 :

(1sc, dec) x 6 = 12

Round 25 :

( dec ) x 6 = 6

Info :

Fasten off. To break yarn. Crochet a tape : 10 ch or 20 ch. See how long the tape will be beautiful. Attach tape to needle ball.

โ€” Large apron pocket ( blue yarn ) :

Info :

Knit in rows (not in a circle) . Start each row with 1 chain stitch, turn at the end of the row.

Round 1 :

41 ch, crochet into the 2nd ch from the hook 40 sc, turn knit

Round 2-21 :

40 sc, turn knit

Round 22 :

17 sc, turn knit

Round 23 :

1 ch, loop 1 do not crochet, 16 sc, turn knit

Round 24 :

1 ch, 15 sc, turn knit

Round 23 (again) :

1 ch, loop 1 do not crochet, 14 sc, turn knit

Info :

To break yarn. Attach thread from the other side of the pocket.

Round 22 (again) :

15 sc, turn knit

Round 23 (again) :

1 ch, loop 1 do not crochet, 14 sc, turn knit

Info :

To break yarn.

โ€” APRON ( Red yarn ) :

Info :

Knit in rows (not in a circle) . Start each row with 1 chain stitch, turn at the end of the row.

Round 1 :

41 ch, crochet into the 2nd ch from the hook 40 sc, turn knit

Round 2-29 :

40 sc, turn knit ( 28 rounds )

Round 30 :

(8sc, dec) x 4 = 36

Round 31 :

(7sc, dec) x 4 = 32

Round 32 :

(6sc, dec) x 4 = 28

Round 33 :

(5sc, dec) x 4 = 24

Info :

Place the large pocket exactly on the apron. Mark the place where the pocket ends with a marker. Parts will be attached at this point later.

Round 34 :

30 โ€“ 40 ch Attach the apron to the doll to find out how long the ribbon is needed.

Round 35 :

crochet into the 2nd ch from the hook 30 - 40 sl st

Round 36 :

24 sl st crochet on apron

Round 34 (again) :

30 โ€“ 40 ch

Round 35 (again) :

crochet into the 2nd ch from the hook 30 - 40 sl st

Round 36 (again) :

Crochet sc along the side of the apron. When crochet to marker, crochet apron and large pocket together.

Info :

Crochet all 3 sides of the apron to attach a large pocket. To break yarn.

Info :

On the 4th side of the apron, attach the thread to the 7th loop.

Round 1 (small part) :

1 ch, 12 sc, turn knit

Round 2-8 :

12 sc, to break yarn.

Info :

Attach thread from the lower right side of this piece. Crochet 1 side of the part sc. Crochet 30 - 40 ch for the ribbon. Crochet into the 2nd ch from the hook 30 - 40 sl st. Crochet 2 top part sc. Crochet 30 - 40 ch for the ribbon. Crochet into the 2nd ch from the hook 30 - 40 sl st. Crochet 3 side of the part sc. To break yarn.

โ€” Small pockets :

1 pocket ( orange yarn ) :

R1. 21 ch, crochet into the 2nd ch from the hook 20 sc, turn knit

Round 2-12 :

20 sc . To break yarn.

2 pocket ( green yarn ) :

R1. 11 ch, crochet into the 2nd ch from the hook 10 sc, turn knit

Round 2-20 :

10 sc . To break yarn.

Info :

Crochet the sides of small pockets sc. In the corners, crochet 3 loops in 1. It will be beautiful. Divide the large pocket into 3 parts. To do this, sew the pocket to the apron in 2 places at the top of the pocket. Sew small pockets to big pocket. Put an apron on the doll. Tie the ribbons. Place the needle ball on your hand.

Info :

DOLL ORGANIZER READY!

Assembly Instructions

  • Attach the base to the body by crocheting both loops together (body loop and base loop) following the attach round: (8sc, inc) x 8, sl st = 80 and then joining with the (1sc,2ch,1sc) pattern as described; insert cardboard/plastic disk and 5-10 glass beads before closing.
  • Position and sew the arms to the torso after finishing arm rounds; make sure arms are angled and symmetrical before securing with small whipstitches.
  • Place and sew the large pocket onto the apron at the marked location, then crochet the apron sides to join pocket and apron together; sew small pockets onto the large pocket dividing it into three sections.
  • Sew the hair piece to the head, attach a hair band and ribbon, then embroider eyebrows, nose and mouth with black thread for facial details.
  • Attach the needle ball to the hand by sewing the ribbon/tape to the needle ball and positioning it on the doll's hand, securing firmly so it sits as shown in the photo.

Important Notes

  • ๐Ÿ’กUse stitch markers to keep track of round starts and important placement points like eye rows and pocket markers.
  • ๐Ÿ’กStuff the head and body gradually while shaping to avoid lumps; add filler as you progress and before final decreases.
  • ๐Ÿ’กPlace the cardboard or plastic circle into the base when instructed and add 5-10 glass beads or marbles for stability so the doll stands well.
  • ๐Ÿ’กPin pockets and apron pieces in place before sewing to ensure correct alignment and symmetrical placement.

This cheerful Doll Organizer doubles as a cute craft helper and a decorative amigurumi for your workspace. It features a weighted base, an apron with multiple pockets, and a removable needle ball โ€” all finished with embroidered face details and a hair ribbon. Make one for yourself or as a thoughtful handmade gift! ๐Ÿงถ โœจ

You ask,

we answer.

FAQs

What size will the finished piece be?

The finished doll organizer measures approximately 25 cm (10 inches) tall when using the recommended yarn weight and 2.0 mm hook.

Can I use a different hook or yarn weight?

Yes, you can change yarn weight and hook size, but this will affect the final size and the fit of pockets; adjust quantities and possibly the cardboard base to suit the new size.

Do I need prior amigurumi experience?

This pattern is rated intermediate; familiarity with magic ring, single crochet, increases, decreases, BLO/FLO techniques, and simple sewing/assembly is recommended.

How do I make the doll stand securely?

Cut a cardboard or plastic circle to fit inside the base, add 5 to 10 glass beads or marbles for weight, then insert before finishing the base and crochet the body to the base as instructed.