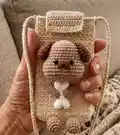
🧢 Beautiful ✨ Detailed πŸ’ Adorable

Dog Phone Pouch Amigurumi Pattern

Dog Phone Pouch Amigurumi Pattern
4.3β˜… Rating
5-7 Hours Time Needed
1.2K Made This
βœ‚οΈ

Intermediate Level

Ideal for those with basic crochet experience, featuring slightly more advanced stitches and techniques to expand your skills.

⏱️

Weekend Treat

Takes 5-7 hours, making it an enjoyable project to finish over a couple of days.

🧸

Cute Companion

An adorable friend to cherish, handcrafted with love to bring comfort and joy for years to come.

About This Dog Phone Pouch Amigurumi Pattern

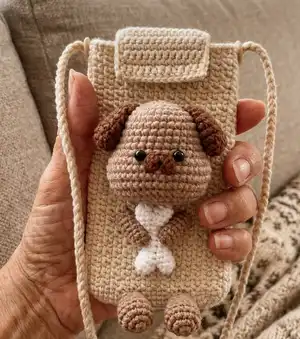
This pattern creates a textured phone pouch with a sewn-on amigurumi dog holding a little bone. It includes full round-by-round instructions for the pouch, lid, strap and each dog part (head, ears, muzzle, arms, legs, bone). Photos and clear assembly steps make it simple to position pieces and finish with buttons and glue.

Dog Phone Pouch Amigurumi Pattern crochet pattern - detailed view of completed project

Designed using sport yarn and a 2.3 mm hook, the finished pouch fits most phones (approx 17 x 10 cm). The dog adds a playful 3D detail and can be sewn or glued in place for a durable finish.

Why You'll Love This Dog Phone Pouch Amigurumi Pattern

I absolutely love this pattern because it combines a useful accessory with a charming amigurumi detail that brings personality to everyday items. I enjoyed designing the textured pouch stitches to give a neat, woven look that looks professionally finished. The dog is small enough to be quick to make but full of character with simple shaping for the head, ears and muzzle. Sewing and gluing the pieces in place gives a satisfying finishing step that really makes the piece pop.

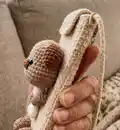
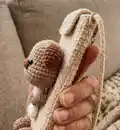
Dog Phone Pouch Amigurumi Pattern step 1 - construction progress Dog Phone Pouch Amigurumi Pattern step 2 - assembly progress Dog Phone Pouch Amigurumi Pattern step 3 - details and accessories Dog Phone Pouch Amigurumi Pattern step 4 - final assembly and finishing

Switch Things Up

I love experimenting with color combinations β€” you can create a monochrome neutral pouch or a bright, playful version by switching the pouch color from cream to pastel or bold hues.

I often change the dog color scheme to match the pouch: try a grey dog with charcoal ears or a white dog with pink ears for a softer look.

Want a smaller or larger pouch? I change the yarn weight and hook size to scale the pattern; bulky yarn with a larger hook makes a chunky, fast version while thinner yarn creates a tiny keychain-friendly size.

I like adding embroidery details to the dog’s face instead of safety eyes for a wholly handmade look β€” a few stitched eyelashes or a tiny smile offers lots of personality.

I sometimes replace the shoulder strap with a short wrist loop for a wristlet style; work fewer repeat rows on the strap until you reach the desired length.

For a durable finish, I sew all parts securely and add a dab of clear fabric glue at attachment points; this helps if the pouch will be used frequently.

I embellish the lid with a small patch, leather label, or decorative button to personalize each pouch for gifts; try a wooden button or tiny metal charm.

If you want a more 3D plush dog, I make the head slightly larger by adding an extra increase round and stuffing a bit more; just adjust ear and muzzle placement accordingly.

I sometimes create matching accessories like a tiny amigurumi collar or removable scarf for the dog β€” theyre quick little additions that increase the charm.

I encourage you to experiment with stitch variations: try a subtle rib or a different textured stitch for the pouch body to make your version truly unique.

Common Mistakes & How to Fix Them

βœ— Skipping stitch markers during foundation and shaping rounds leads to miscounts and uneven sides; place a marker at the start of the round and mark the middle stitches for the lid to keep shaping accurate. βœ— Overstuffing the head or legs causes bulging and distortion when you pin them into the pouch; stuff gradually and stop when the piece holds its shape but remains slightly soft. βœ— Forgetting to place safety eyes and measure spacing before final closing will misplace facial features; place eyes between rows 11-12 and confirm spacing (5 stitches apart) before fastening off. βœ— Not keeping consistent tension while working the pouch row repeats results in uneven texture and size; practice the x-stitch/v-stitch method described and maintain even tension throughout the spirals. βœ— Sewing pieces on without pinning first can cause misalignment; pin or use fabric glue temporarily to test placement, then sew securely for a neat finish.

Dog Phone Pouch Amigurumi Pattern

Make a charming dog phone pouch with a tiny amigurumi dog attached β€” a perfect handmade accessory and gift. This pattern guides you through the textured pouch, buttoned lid, shoulder strap, and the cute little dog with step-by-step rounds and assembly notes. Youll learn simple shaping and finishing techniques to create a polished, ready-to-gift phone pouch with personality.

Intermediate 5-7 Hours

Materials Needed for Dog Phone Pouch Amigurumi Pattern

β€” Main Fabric

  • 01
    Sport weight yarn (Jeans from YarnArt) - main cream/ivory for pouch, approximately 100g
  • 02
    Sport weight yarn - light brown for dog head and legs, approximately 30g
  • 03
    Sport weight yarn - dark brown for dog ears and muzzle, approximately 20g
  • 04
    Sport weight yarn - white small amount for bone and tongue details, approx 5-10g
  • 05
    Polyester fiberfill for stuffing head and legs

β€” Tools Required

  • 01
    Crochet hook size 2.3 mm
  • 02
    Two 6 mm safety eyes
  • 03
    Two 15 mm buttons (for decorative strap or closure)
  • 04
    Scissors
  • 05
    Yarn needle for sewing
  • 06
    Stitch markers
  • 07
    Polyester stuffing (fiberfill)
  • 08
    Fabric glue (for securing head, muzzle and bone)
  • 09
    Pins for positioning pieces (optional)

Progress Tracker

0% Complete

β€” Bag :

Info :

There are 2 ways to make a single crochet: v-stitch (yarn over single crochet) and x-stitch (yarn under single crochet). There are a lot of video tutorials on youtube, you can watch on it. I use x-stitch (yarn under single crochet).

Info :

Work in spirals

Info :

Make 24 ch, start in the second ch from hook

Round 1 :

22 sc, 3 sc in the last stitch, continue on the other side of the foundation chain, 21 sc, inc (48)

Round 2 :

inc, 21 sc, 3 inc, 21 sc, 2 inc (54)

Round 3 :

inc, 24 sc, 3 inc, 24 sc, 2 inc (60)

Round 4 :

60 sc (60)

Round 5 :

(1 ch, skip 1 stitch, 1 sc in the next stitch)*30 (60)

Round 6 :

(1 sc in the space of 1 ch, 1 sc in the next stitch)*30 (60)

Info :

From here: the odd rounds (7, 9, 11, 13, 15...) will be made same round 5, the even rounds (8, 10, 12, 14, 16...) will be made same round 6. And stop after finish the 48th round.

β€” Lid of pouch :

Info :

Identify the 14 stitches in the middle of the 46th round

Round 1 :

14 sc, turn

Round 2-13 :

14 sc. Cut and weave the yarn. Sew the button into the lid of pouch.

β€” Make shoulder - strap :

Info :

Make 3 ch, start in the second ch from hook: 2 sc, turn

Round 2 :

2 sc, turn

Info :

Crochet repeat 2 sc until the shoulder-strap is about 113 cm. Fasten off and weave the yarn.Sew the shoulder - strap and button into the pouch.

β€” Head :

Info :

Start in brown

Round 1 :

6 sc in the magic ring (6)

Round 2 :

6 inc (12)

Round 3 :

(1 sc, inc)*6 (18)

Round 4 :

(inc, 2 sc)*6 (24)

Round 5 :

(3 sc, inc)*6 (30)

Round 6 :

1 sc, inc, (4 sc, inc)*5, 3 sc (36)

Round 7-10 :

36 sc (36)

Round 11 :

9 sc, 6 inc, (use maker for the first eye), 5 sc, (use maker for the second eye), 1 sc, 6 inc, 9 sc (48)

Round 12-15 :

48 sc (48)

Round 16 :

9 sc, dec, 8 sc, dec, 6 sc, dec, 8 sc, dec, 9 sc (44)

Round 17 :

9 sc, (dec, 6 sc)*3, dec, 9 sc (40)

Round 18 :

(dec, 3 sc)*8 (32)

Round 19 :

(2 sc, dec)*8 (24)

Info :

Stuff the head

Round 20 :

(dec, 1 sc)*8 (16)

Round 21 :

8 dec (8)

Info :

Slst and stuff the head, then fasten off and weave the yarn.

Info :

Put in the eyes between rows 11-12, leaving 5 stitches space between them

Info :

Use fabric glue to pin the head into the pouch.

β€” Ear (make 2) :

Info :

Start in dark brown

Round 1 :

6 sc in the magic ring (6)

Round 2 :

6 inc (12)

Round 3 :

(2 sc, inc)*4 (16)

Round 4-6 :

16 sc (16)

Round 7 :

(dec, 6 sc)*2 (14)

Round 8 :

(dec, 5 sc)*2 (12)

Round 9 :

(2 sc, dec)*3, slst. (9)

Info :

Fasten off the yarn, leaving a long tail for sewing.

Info :

Don’t stuff the ear, flatten and fold the top of the ear. Put in the ears between rows 3-7.

β€” Muzzle :

Info :

Start in dark brown

Round 1 :

make 4 ch, start in the second ch from hook: inc in the first stitch, 3 sc in the same next stitch, inc in the last stitch (7)

Info :

Fasten off and weave the yarn. Use fabric glue to pin the muzzle into the head between rows 10-14. Sew the tongue with pink yarn.

β€” Leg (make 2) :

Info :

Start in brown

Round 1 :

6 sc in the magic ring (6)

Round 2 :

6 inc (12)

Round 3 :

(2 sc, inc)*4 (16)

Round 4-5 :

16 sc (16)

Round 6 :

(2 sc, dec)*4 (12)

Round 7 :

(2 sc, dec)*3 (9)

Round 8-9 :

9 sc (9)

Info :

Slst and fasten the yarn, leaving a long tail for sewing. Stuff up to the 5th row of the leg.

Info :

Sew the legs at row 4.

β€” Arm (make 2) :

Info :

Start in brown

Round 1 :

7 sc in the magic ring (7)

Round 2-7 :

7 sc (7)

Info :

Slst and fasten off the yarn, leaving a long tail for sewing. Don’t stuff the arm.

β€” Bone :

Info :

Start in white

Round 1 :

6 sc in the magic ring (6)

Round 2 :

5 sc, inc (7)

Info :

Slst and fasten off the yarn

Info :

Make 2 one, from the second one don’t cut the yarn, join to the first one and continue to make:

Round 3 :

7 sc on the first one, 7 sc on the second one (14)

Round 4 :

(5 sc, dec)*2 (12)

Round 5 :

(2 sc, dec)*3 (9)

Round 6-7 :

9 sc (9)

Info :

Slst and fasten off the yarn.

Info :

The second side of the bone. Repeat from the beginning to 5th round to make the second side of the bone. Slst and fasten off the yarn, leaving a long tail for sewing. Stuff each side of the bone and sew the two sides together.

β€” Assembling :

Info :

Sew the legs at row 4.

Info :

Use fabric glue to paste the bone into the pouch.

Info :

Sew the arms into the pouch and the bone.

Info :

Use fabric glue to paste the head into the pouch.

Assembly Instructions

  • Sew the legs at row 4, spacing them evenly and securing firmly with a yarn needle so they hang from the bottom edge of the pouch.
  • Use fabric glue to paste the bone into the pouch in the center back area before sewing arms over it to hide seams.
  • Sew the arms into the pouch and also sew them around the bone so they appear to hold the bone, using the long tails left from finishing for secure stitching.
  • Use fabric glue to paste the head into the pouch, then sew around the base for extra security and to hide the raw edges.
  • Position and attach the ears between rows 3-7 on the head, flattening and folding the top of each ear before sewing to achieve the correct shape.
  • Sew the shoulder strap and attach the decorative buttons to each side; fasten off and weave all ends for a tidy finish.

Important Notes

  • πŸ’‘Work in spirals for the pouch to maintain the textured fabric and avoid a visible seam line.
  • πŸ’‘Use stitch markers to mark the start of rounds and the center stitches where the lid and strap will be made.
  • πŸ’‘Stuff the head and legs gradually and stop stuffing when the shape is held but slightly soft to allow easy pinning into the pouch.
  • πŸ’‘Pin or temporarily glue the muzzle, head and bone to the pouch to check placement before sewing permanently.
  • πŸ’‘Weave in ends and fasten off securely for each small piece to prevent unraveling during assembly.

This Dog Phone Pouch pattern brings a delightful handmade charm to your everyday essentials. Create a cozy textured pouch with a playful dog holding a tiny bone for a special finishing touch. Make one as a gift or a treat for yourself β€” every stitch adds personality and warmth. 🧢🐢

You ask,

we answer.

FAQs

What size will the finished piece be?

If you use the recommended sport yarn and 2.3 mm hook, the finished phone pouch measures approximately Length: 17 cm and Width: 10 cm.

Can I use different yarn weights for this pattern?

Yes, but using a different yarn weight will change the final size; choose an appropriate hook size and adjust stitch counts if needed for fit.

Do I need experience to make the dog and pouch?

This pattern is rated intermediate β€” basic knowledge of single crochet, increases and decreases is recommended for best results.

How long does this project typically take to complete?

Most crocheters complete this project in 5-7 hours, depending on experience and the time spent on assembly and finishing.