🧢 Beautiful ✨ Detailed πŸ’ Adorable

Daisy The Duck Amigurumi Pattern

Daisy The Duck Amigurumi Pattern
4.8β˜… Rating
2-3 Hours Time Needed
1.5K Made This
βœ‚οΈ

Beginner Friendly Level

Perfect for those just starting their crochet journey, with clear instructions and simple techniques

⏱️

Bite-Sized Project

Finishes in 2-4 hoursβ€”perfect for an afternoon of creative relaxation.

🧸

Cute Companion

An adorable friend to cherish, handcrafted with love to bring comfort and joy for years to come.

About This Daisy The Duck Amigurumi Pattern

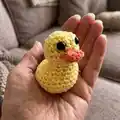
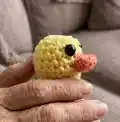
This pattern makes a small palm-sized Daisy the Duck amigurumi using 4ply yarn and a 3.5mm hook. You will work the duck body in rounds and create a simple folded beak to stitch on. The design is compact, quick to make, and ideal for gifts, keychains, or tiny decor. Photos and clear notes are included to guide placement of eyes and shaping.

Daisy The Duck Amigurumi Pattern crochet pattern - detailed view of completed project

Suitable for beginners familiar with single crochet, increases, and decreases. The pattern includes exact round-by-round instructions and assembly tips to help you achieve a neat, balanced duck.

Why You'll Love This Daisy The Duck Amigurumi Pattern

I absolutely love this pattern because it turns just a few simple stitches into a delightful little character you can finish in an afternoon. I enjoy how friendly and forgiving the shaping is β€” a little stuffing and gentle reshaping brings Daisy to life. The finished duck is perfectly portable and makes a lovely handmade gift or charm. I also love that you can personalise Daisy with different yarn colours or tiny accessories to make each one unique.

Daisy The Duck Amigurumi Pattern step 1 - construction progress Daisy The Duck Amigurumi Pattern step 2 - assembly progress Daisy The Duck Amigurumi Pattern step 3 - details and accessories Daisy The Duck Amigurumi Pattern step 4 - final assembly and finishing

Switch Things Up

I love to change up this little duck by swapping yarn colours β€” try pastel blues or mint green for a fresh twist.

I sometimes use a thicker yarn and a larger hook to make a chunky cuddly duck instead of a tiny palm-sized one.

I also experiment with different eye types, using embroidered eyes for a softer, child-safe version.

I add tiny accessories like a crocheted scarf or bow to personalise each duck for gifts.

I adjust stuffing levels to alter postureβ€”more at the back for a stable sitting duck or less for a top-heavy pose.

I often embroider small details such as eyebrows or a heart on the chest for extra character.

I turn this into a keychain by attaching a small ring through the top of the head before closing the final rounds.

I sometimes change the beak colour and shape to create different species or stylised faces.

I make small sets with matching colourways β€” a family of ducks looks charming displayed together.

I encourage trying contrasting yarn textures like cotton for a crisp finish or acrylic for durable toys depending on usage.

Common Mistakes & How to Fix Them

βœ— Skipping the increase rounds early on will make the body too small and misshapen; follow the increases exactly and count stitches after each round to ensure correct shaping. βœ— Forgetting to insert safety eyes before stuffing can make placement difficult later; place and secure the safety eyes between rounds 4 and 5 while the opening is still accessible. βœ— Under-stuffing the back end causes the duck to tip forward and not sit flat; add extra stuffing to the back end to balance the weight and test sitting frequently. βœ— Not closing the gap evenly when decreasing will leave an uneven finish; stuff firmly, align your final decreases, and weave the tail end through remaining stitches to close smoothly.

Daisy The Duck Amigurumi Pattern

Create a tiny, adorable Daisy the Duck with this friendly amigurumi pattern. You will make a small, palm-sized duck using simple stitches and clear step-by-step rounds. The pattern includes materials, stitch explanations, full rounds for the body and beak, and helpful assembly tips. Perfect for gifting or keeping as a sweet handmade companion.

Beginner Friendly 2-3 Hours

Materials Needed for Daisy The Duck Amigurumi Pattern

β€” Main Fabric

  • 01
    King Cole Giza 4ply in yellow (A) - 1x ball
  • 02
    King Cole Giza 4ply in orange (B) - 1x ball
  • 03
    Polyester stuffing - small amount (enough to firmly stuff body)
  • 04
    Small lengths of 4ply yarn for sewing the beak and finishing

β€” Tools Required

  • 01
    Crochet hook 3.5mm
  • 02
    Plastic safety eyes - 0.3cm
  • 03
    Polyester stuffing
  • 04
    Needle and thread (for sewing; designer sewed beak with 4ply yarn)
  • 05
    Yarn needle for sewing and weaving in ends

Progress Tracker

0% Complete

β€” Materials :

Infos :

Yarn: King Cole Giza 4ply in yellow (A) 1x ball. King Cole Giza 4ply orange (B) 1x ball. Crochet hook 3.5mm. Plastic safety eyes- 0.3cm. Polyester stuffing. Needle and thread - I sew the beak on using the 4ply yarn. End size = 4cm by 3cm by 4cm.

β€” Stitches :

Infos :

Ch = Chain stitch. Sc = Single Crochet. Inc = Increase. Single crochet into the next stitch then single crochet again into the same stitch. Dec = Decrease. Push the hook through the next stitch, yarn over and pull through then push the crochet hook into the next stitch, yarn over and pull through. Now yarn over again and pull through all three stitches.

β€” Duck body (A) :

Round 1 :

Sc 6 into a magic ring

Round 2 :

Inc into each stitch (12)

Round 3 :

[Sc, inc into next stitch] x6 (18)

Round 4-7 :

Sc into each stitch round (18)

Round 8 :

Dec into each stitch (9)

Round 9 :

Inc 3, sc 6 (12)

Round 10 :

Inc 6, sc 6 (18)

Round 11 :

[Sc, inc] x6, sc 6 (24)

Round 12 :

Sc 7, inc 4, sc 13 (28)

Round 13 :

Sc 11, dec, sc 15 (27)

Round 14+15 :

Sc into each stitch round (27)

Round 16 :

Sc 9, dec 4, sc 10 (23)

Info :

Insert the safety eyes between row 4+5, 4/5 stitches apart.

Info :

Now stuff the body.

Info :

To ensure the duck does not overbalance, make sure you add a lot of stuffing to the back end.

Round 17 :

Dec x11, sc (12)

Round 18 :

Dec into each stitch (6)

Info :

Close the hole and cast off

Info :

In order for it to be shaped like a duck, you may have to squeeze it and re-shape it a little.

Info :

If it is not sitting flat: turn the duck over and push both of your thumbs in from the bottom up towards the head. This re-adjustment should help it to sit flat.

β€” Duck beak (B) :

Chain :

Chain 5

Row 1 :

Starting from the 2nd chain from the hook, sc into each stitch along the chain (4)

Row 2 :

Chain 1, sc into each stitch along the row (4)

Info :

Cast off

Info :

This has now formed a rectangle.

Info :

Fold in half and stitch the two shorter edges shut.

Info :

Stitch along the bottom edge of the beak so it is in-line with the join of row 7/8.

Info :

Stitch along the edge of the mouth then along the top of the mouth so it lines up with the join between row 6/7.

Assembly Instructions

  • Insert the safety eyes between rounds 4 and 5, positioning them approximately 4-5 stitches apart before stuffing the body.
  • Stuff the body firmly, adding extra stuffing to the back end to prevent the duck from tipping forward, then close the hole and cast off.
  • Fold the beak rectangle in half and stitch the two shorter edges shut, then stitch the bottom edge of the beak in-line with the join of body rows 7/8.
  • Stitch along the edge and the top of the mouth so it aligns with the join between body rows 6/7, using small suturing stitches to keep the beak neat.
  • If the duck will not sit flat, turn it over and push both thumbs from the base up towards the head to re-shape the base so it sits evenly.

Important Notes

  • πŸ’‘Insert safety eyes before stuffing to ensure accurate placement and easier securing.
  • πŸ’‘Stuff the back end more firmly than the front to create a balanced base that allows the duck to sit upright.
  • πŸ’‘Pin and test beak placement before permanent stitching so the mouth lines up with the specified body row joins.

Thank you for making Daisy the Duck β€” a tiny pocket-sized friend you can crochet in an afternoon! 🧢 This pattern is made to be quick, joyful, and easy to personalise with your favourite colours. ✨ Share your finished Daisy with the designer and join the community of handmade duck lovers! πŸ₯

You ask,

we answer.

FAQs

What size will the finished piece be?

The finished amigurumi measures approximately 4cm by 3cm by 4cm when using the recommended 4ply yarn and 3.5mm hook.

Can I use different yarn weights for this pattern?

Yes, you can use different yarn weights but the final size will change; use an appropriate hook for your chosen yarn and expect different stitch counts and proportions.

Do I need prior crochet experience for this pattern?

This pattern is beginner friendly but assumes you know single crochet, increases, decreases, and how to work into a magic ring.

How long does this project typically take to complete?

Most crocheters finish this mini duck in about 2-3 hours, though time may vary with experience and finishing details.