🧢 Beautiful ✨ Detailed πŸ’ Adorable

Daisy flowers car hanging Amigurumi Pattern

Daisy flowers car hanging Amigurumi Pattern
4.6β˜… Rating
5-7 Hours Time Needed
3.3K Made This
βœ‚οΈ

Intermediate Level

Ideal for those with basic crochet experience, featuring slightly more advanced stitches and techniques to expand your skills.

⏱️

Weekend Treat

Takes 5-7 hours, making it an enjoyable project to finish over a couple of days.

🎁

Tiny Treasure

Small, sweet, and gift-worthy creations that fit perfectly in the palm of your hand with detailed charm.

About This Daisy flowers car hanging Amigurumi Pattern

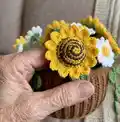
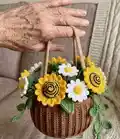
This pattern creates a charming daisy-flower car hanging made of multiple tiny crocheted flowers, stems and a small pot. You will make white daisies, yellow flowers, pistils, eucalyptus stems, soil inserts and a hanging pot, then assemble them into a hanging decoration. Techniques include working in the magic ring, puff/cluster-like petal construction, seamless petal joins, and simple wire wrapping for stems.

Daisy flowers car hanging Amigurumi Pattern crochet pattern - detailed view of completed project

The pieces are small and perfect for practicing shaping and joining techniques on a miniature scale. Instructions include exact stitch counts and finishing notes so you can recreate the sample precisely.

Why You'll Love This Daisy flowers car hanging Amigurumi Pattern

I absolutely love this pattern because it turns simple stitches into a delightful miniature garden that fits in the palm of your hand. I enjoy the mix of textures created by the dense pot, fluffy daisy petals, and delicate stems β€” it feels like crafting tiny, joyful details. The pattern lets me practice small-scale shaping and finishing, which is satisfying and quick to complete. I also love that the finished piece makes a sweet, handmade gift or a unique car accessory that brightens any commute.

Daisy flowers car hanging Amigurumi Pattern step 1 - construction progress Daisy flowers car hanging Amigurumi Pattern step 2 - assembly progress Daisy flowers car hanging Amigurumi Pattern step 3 - details and accessories Daisy flowers car hanging Amigurumi Pattern step 4 - final assembly and finishing

Switch Things Up

I love how easy it is to customize this pattern β€” I often change colors to make pastel or bright versions depending on the season.

I sometimes switch yarn weight and bump up the hook size to make a chunky, tactile version that feels extra plush in the hand.

I also make tiny keychain-sized versions by using finer yarn and a smaller hook so they become portable charms.

I like to add embroidery or tiny felt leaves for personality β€” a stitched smile or bead center changes the whole look.

If I want posable stems I add a slightly thicker wire, wrapped tightly, and test the bend before inserting into the foam.

I sometimes use patterned or variegated yarn for petals to create subtle color changes without switching colors while crocheting.

I recommend experimenting with the number of petals β€” adding more petals gives a fuller blossom, while fewer petals create a minimalist look.

To make a gift set I create matching brooches or hair clips using single flowers from this pattern and secure them with hot glue or a bar pin.

For a wall-hanging version I join several pots on a longer cord and space them evenly for a charming row of mini planters.

I also swap the pot texture β€” use a different stitch for the pot body to create ribbing or a smoother finish depending on your aesthetic preference.

Common Mistakes & How to Fix Them

βœ— Not leaving long tails for sewing and finishing; always leave a generous long tail when instructed so you can sew parts together securely without reattaching yarn. βœ— Skipping stitch counting during increases and decreases causes mismatched stitch counts; count your stitches at the end of each round to ensure the correct total. βœ— Failing to stuff at the correct petal to avoid flat shapes; start stuffing exactly where the pattern instructs (for example from the 9th or 4th petal) to keep shape consistent. βœ— Not keeping consistent tension will result in uneven petals and pot rows; maintain steady tension and use the recommended hook sizes for uniform pieces. βœ— Wrapping wire too loosely or without anchoring will make stems unstable; cut tails and wrap yarn tightly around the wire and secure ends to keep leaves in place. βœ— Forgetting to cut foam to size for Type 2 soil will make assembly difficult; measure and cut the foam to fit snugly inside the pot before inserting.

Daisy flowers car hanging Amigurumi Pattern

Make a sweet, pocket-sized daisy flower car hanging to brighten your car or give as a handmade gift. This pattern guides you through crocheting tiny daisies, yellow sunflowers, eucalyptus stems, soil and a little hanging pot with clear step-by-step rounds. Youll learn small amigurumi shaping techniques, seamless petal construction, and simple wire-wrapping for stems.

Intermediate 5-7 Hours

Materials Needed for Daisy flowers car hanging Amigurumi Pattern

β€” Main Fabric

  • 01
    Supper fine yarn (1.8 oz / 50 g) - main weight for all pieces
  • 02
    Green yarn - small amounts for stems and pistils (approx 10-20 g)
  • 03
    White yarn - for daisy petals (approx 10-20 g)
  • 04
    Yellow yarn - for flower centers and petals (approx 10-20 g)
  • 05
    Brown yarn - for yellow flower pistils and pot color (approx 20-30 g)

β€” Tools Required

  • 01
    Crochet hook size 2.5-3.0 mm
  • 02
    Crochet hook size 3.0 mm (for pots)
  • 03
    Stitch marker
  • 04
    Sewing needle / yarn needle
  • 05
    Scissors
  • 06
    Hot gun glue
  • 07
    Cotton (yarn) for wrapping
  • 08
    Wire for stems
  • 09
    Foam (for Type 2 soil)
  • 10
    Cotton filling / polyester stuffing

Progress Tracker

0% Complete

β€” Daisy Flower :

Info :

Pistils & Peduncle (green & yellow)

Round 1 :

(make 2 : one by green one by yellow) Row 1 : MR, 6 SC (6sts)

Round 2 :

Row 2 : 6 SC inc (12sts)

Round 3 :

Row 3 : 12 SC (12sts)

Info :

Petal (white). Seamless piece Join with petal crochet

Round 4 :

( chain 8, You\'re going to be working into the second from the hook : 7HDC, slst in next st) x 12 times (start stuffing from 9th petal) *wrap yarn around the stems*

Info :

Images show joining petals and stuffing sequence for daisy petals; follow pictures for positioning and stuffing from the 9th petal.

β€” Yellow Flower :

Info :

Pistils & Peduncle (green & brown)

Round 1 :

(make 2 piece : one by green one by brown) Row 1 : MR, 6 SC (6sts)

Round 2 :

Row 2 : 6 SC inc (12sts)

Info :

Petal (yellow). Seamless piece Join with petal crochet

Round 3 :

Chain 2, 3HDC in one st

Round 4 :

Chain 2, sl st in next st X 6 times

Info :

(start stuffing from the 4th petal)

β€” Eucalyptus Stems :

Info :

(make 2)

Round 1 :

Row 1 (make 2) : MR, 8 SC (6sts) cut yarn and leave a shot tail for wrap wire

Round 2 :

Row 1 (make 4) : MR, 6 SC (6sts) cut yarn and leave a shot tail for wrap wire

Info :

The first one we stick 2 piece (8sc piece) together and star wrap around the wire to stick each leaves on the stem (look like photo)

β€” Pots :

Info :

Using 3mm size hook

Round 1 :

Row 1: 8sc (8)

Round 2 :

Row 2: 8 inc (16)

Round 3 :

Row 3: (sc,inc) 8 times (24)

Round 4 :

Row 4: (2sc,inc) 8 times (32)

Round 5 :

Row 5: (3sc,inc) 8 times (40)

Round 6 :

Row 6: BLO 40dc (40)

Round 7-9 :

Row 7-9: 1FPDC, 1BPDC repeat in end (40)

Round 10 :

Row 10: 40sc (40)

Round 11 :

Row 11: 40slst

Info :

continue chain 70 to make hanging

β€” The Soil :

Info :

Type 1:

Round 1 :

Row 1: 8 SC in an MR (8sts)

Round 2 :

Row 2: 8 SC INC (16sts)

Round 3 :

Row 3: (1 SC + 1 INC) 8 times (24sts)

Round 4 :

Row 4: (2SC + 1 INC) 8 times (32sts)

Round 5-9 :

Row 5-9: SC in each st to end

Round 10 :

Row 10: (2 SC + 1 DEC) 8 times (24sts)

Round 11 :

Row 11: (1 SC + 1 DEC) 8 times (16sts)

Info :

*stuffing*

Round 12 :

Row 12: 8 DEC (8sts)

Info :

Cut yarn and leave a long tail for sewing, close off the hole.

Info :

Type 2: Cut the foam to fit the size of the pot and place the foam in the plant pot

β€” Mixed Flowers & Assembly :

Info :

This is all we have. Finally fixed tegether

Round 1 :

Put the soil in plant pots

Round 2 :

Insert each flower into a pots

Info :

Congratulations! Your Daisy flowers car hanging is complete!

Assembly Instructions

  • Put the soil insert (Type 1 or Type 2 foam insert) into the plant pot so it sits snugly before adding flowers.
  • Insert each flower stem into the soil/foam in the pot, arranging daisies and yellow flowers to create a balanced cluster.
  • Wrap and secure eucalyptus stems around the flower stems using the short tails left for wire wrapping to hold leaves in place.
  • Attach the hanging chain (continue chain 70) to the pot rim securely by slipstitching or sewing ends into the pot to form the hanging loop.
  • Glue or stitch any loose parts and weave in ends; leave a long tail when closing the soil hole to finish sewing neatly.

Important Notes

  • πŸ’‘Use stitch markers to keep track of rounds and the start of each row when working in continuous rounds.
  • πŸ’‘Start stuffing at the exact petal number instructed (for daisies start stuffing from the 9th petal; for yellow flowers from the 4th petal) to ensure consistent shaping.
  • πŸ’‘Leave short tails when instructed for wrapping wires and leave long tails when instructed for sewing parts together.
  • πŸ’‘Cut foam to fit the pot for Type 2 soil so the foam holds stems securely and the pot keeps its shape.

This tiny Daisy Flowers car hanging brings a pocket garden to your travels and makes a heartfelt handmade gift. It combines small amigurumi flowers, wrapped stems, and a cozy pot for a charming finished piece. Thank you for making one β€” enjoy your little bouquet on the road! 🧢🌼

You ask,

we answer.

FAQs

What size will the finished piece be?

The finished car hanging is a small decorative amigurumi, roughly pocket-sized; exact measurements depend on yarn tension but expect a pot about 5-7 cm across with hanging cord of about 70 chained stitches.

Can I use different yarn weights for this pattern?

Yes, but changing yarn weight will affect size and texture; choose a hook appropriate for your yarn and note that bulkier yarn creates a chunkier hanging while finer yarn yields a more delicate piece.

Do I need prior crochet experience for this pattern?

This pattern is rated intermediate because it uses shaping, seamless petal joins, and wire wrapping; basic familiarity with MR, SC, HDC, and working in rounds is recommended.

How long does this project typically take to complete?

Most crafters finish this project in 5-7 hours over a couple of sessions, depending on experience and how many flowers you make.