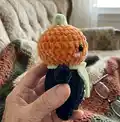
About This Mini Pumpkin Man Amigurumi Pattern
This pattern creates an adorable mini pumpkin man amigurumi, worked in velvet yarn for a plush finish. You will crochet a pumpkin head, sewn-on little stem, a compact body with legs and tiny arms, plus finishing details for the face and pumpkin dents. The design uses basic single crochet, increases and decreases, and assembly instructions to shape the pumpkin grooves.
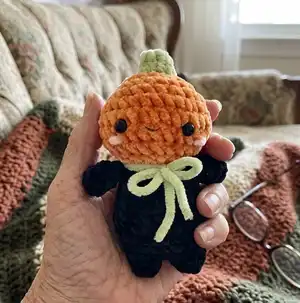
The pattern is worked in continuous rounds and uses 4.5mm hook with 8mm safety eyes. Clear step-by-step rounds and assembly notes are included to guide you through shaping and finishing.
Why You'll Love This Mini Pumpkin Man Amigurumi Pattern
I absolutely love this pattern because it turns simple stitches into a charming seasonal character that feels special and handmade. I love how the velvet yarn gives the pumpkin a plush, textured look without complicated stitches. I enjoy the creative assembly step where you sew the dents and add lines to make the pumpkin realistic. I also appreciate that the whole toy is compact and quick to make, perfect for gifting or making multiples. I get excited about the little finishing touches like the V-shaped mouth and blush lines that give the pumpkin its personality.
Switch Things Up
I love to change the yarn color to create different seasonal characters; try pastel orange for a softer look or deep orange for a classic pumpkin.
You can make the doll larger by using bulkier velvet yarn and a larger hook, or smaller by switching to sport or fingering weight yarn with a smaller hook.
I often swap the velvet yarn for regular acrylic or cotton yarn to give a different texture and easier sewing for beginners.
Embroider different facial expressions: a wide smile, surprised O, or sleepy eyes to change personality with the same pattern.
Add accessories like a tiny crocheted hat, a scarf, or a removable bow to personalize each pumpkin man.
Try using safety eyes of different sizes or embroidered eyes for a softer look suitable for small children.
For a rustic look, use natural-colored yarns and a darker brown for the pumpkin lines instead of sport weight yarn lines.
I sometimes add pipe-cleaner or thin wire inside the arms for a posable finish so the pumpkin can hold tiny props.
Mix-and-match colors: black body with pastel head, or make a full-orange pumpkin with a contrasting green stem for variety.
If you want a miniature keychain, reduce the hook size and yarn weight, then attach a keyring to the head seam for portability.
Common Mistakes & How to Fix Them
✗ Not placing safety eyes at the correct round can misalign the face; insert eyes between R7-R8 and count 5 stitches apart as instructed.
✗ Overstuffing the head before shaping dents will make it hard to create pumpkin grooves; stuff gradually and leave room to pull yarn for dents.
✗ Forgetting to attach the second leg before joining will create a seam mismatch; do not fasten off the second leg and attach it by crocheting into leg 1 as directed.
✗ Skipping the step of pulling the dent yarn tight enough will result in shallow grooves; pull firmly on the yarn when forming each dent to create visible pumpkin segments.