🧢 Beautiful ✨ Detailed πŸ’ Adorable

Cute cat Amigurumi Pattern

Cute cat Amigurumi Pattern
4.9β˜… Rating
5-7 Hours Time Needed
3.1K Made This
βœ‚οΈ

Intermediate Level

Ideal for those with basic crochet experience, featuring slightly more advanced stitches and techniques to expand your skills.

⏱️

Weekend Treat

Takes 5-7 hours, making it an enjoyable project to finish over a couple of days.

🧸

Cute Companion

An adorable friend to cherish, handcrafted with love to bring comfort and joy for years to come.

About This Cute cat Amigurumi Pattern

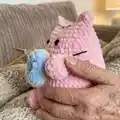
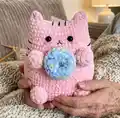
This pattern creates a soft, plush cat amigurumi holding a tiny donut accessory using velvet-style yarn for a cuddly texture. You will crochet the rounded body, ears, arms, legs, tail and a small donut, then assemble and embroider facial details. The instructions are photo-supported and ideal for experienced beginners comfortable with basic shaping and sewing.

Cute cat Amigurumi Pattern crochet pattern - detailed view of completed project

Includes detailed round-by-round instructions for each piece and clear assembly notes. The finished toy measures about 21-23 cm with recommended materials.

Why You'll Love This Cute cat Amigurumi Pattern

I absolutely love this pattern because it turns simple stitches into a sweet, huggable character you will want to make again and again. I enjoy the contrast between the plush yarn body and the small detailed donut accessory that brings a playful personality. I also love how forgiving the shaping is β€” small adjustments in stuffing and stitch tension change the expression and size. Sharing this pattern makes it easy for other crocheters to create a cheerful handmade gift quickly.

Cute cat Amigurumi Pattern step 1 - construction progress Cute cat Amigurumi Pattern step 2 - assembly progress Cute cat Amigurumi Pattern step 3 - details and accessories Cute cat Amigurumi Pattern step 4 - final assembly and finishing

Switch Things Up

I love how easy it is to customize this pattern by changing colors β€” try soft pastels for a nursery or bold brights for a playful version.

I often swap the donut color and add embroidered sprinkles for seasonal variations like pink for Valentine or orange for Halloween.

If you want a bigger cat, I recommend using a thicker plush yarn and a larger hook; for a mini version use thinner yarn and a smaller hook.

I sometimes replace safety eyes with embroidered eyes for a fully child-safe toy β€” it changes the expression softly.

Try different face expressions by moving the eyes and mouth placement slightly; small changes create very different personalities.

I like to add tiny accessories like a bow, scarf, or a tiny hat crocheted separately and sewn on for character outfits.

Consider making the donut removable by sewing a small loop on the back of the donut and a button on the cat for interactive play.

You can add wire inside the tail or arms if you want a posable cat for display β€” just be careful with safety for kids.

I also experiment with embroidery yarn thickness for the whisker lines; a thin cotton gives subtle lines and a thicker yarn gives bold stripes.

Make a matching set in different colors for a gift box β€” siblings or friends will love getting a coordinated pair of cats and donuts.

Common Mistakes & How to Fix Them

βœ— Skipping stitch markers when working in continuous rounds causes you to lose the start of the round; place and move a stitch marker at the beginning of every round to stay aligned. βœ— Overstuffing the body makes the toy rigid and can distort shaping; stuff gradually, checking shape and firmness as you go for a smooth finish. βœ— Forgetting to leave long ends for sewing arms and legs leads to difficult finishing; always leave a long tail on limbs and ears for easy attachment. βœ— Placing safety eyes too late can be awkward and mispositioned; attach or glue eyes between the recommended rounds (between rounds 5 and 6) to match the pattern placement.

Cute cat Amigurumi Pattern

Make an adorable plush cat holding a tiny donut with this full crochet pattern. You will work soft velvet yarn to create a cuddly, rounded body, ears, arms, legs, tail and a cute donut accessory. Every step and round is included so you can follow along and finish a sweet toy perfect for gifting or decorating your home.

Intermediate 5-7 Hours

Materials Needed for Cute cat Amigurumi Pattern

β€” Main Fabric

  • 01
    Himalaya Dolphin Baby plush yarn - 1-1.5 skeins for the cat body (main color)
  • 02
    Small amounts of the same plush yarn in 2 additional colors for the donut (approx 10-25g each)
  • 03
    YarnArt Jeans (or similar) for embroidered lines on donut and body (small amount)
  • 04
    Black yarn (YarnArt Jeans used by designer) for embroidered body lines and mouth
  • 05
    Embroidery thread for nose and facial details (black and pink or desired colors)

β€” Tools Required

  • 01
    Crochet hook size 4 mm
  • 02
    Safety eyes or black plastic eyes 10 mm (2 pieces)
  • 03
    Glue for eyes (glue gun recommended)
  • 04
    Scissors
  • 05
    Yarn needle for sewing and embroidery
  • 06
    Stitch markers
  • 07
    Polyester stuffing (fiberfill)
  • 08
    Pins for assembly (optional)

Progress Tracker

0% Complete

β€” Body :

R1 :

make ch2, in the second ch from the hook: 6 sc (6)

R2 :

6inc (12)

R3 :

(1sc, inc )*6 (18)

R4 :

(2sc, inc)*6 (24)

R5 :

(3 sc, inc)*6 (30)

R6 :

(4sc, inc)*6 (36)

R7 :

(5sc, inc)*6 (42)

R8 :

(6sc, inc)*6 (48)

R9 :

(3sc, inc)*12 (60)

R10 :

(4sc, inc)*12 (72)

R11-16 :

(6 rounds) without changes (72)

R17 :

(4sc, dec)*12(60)

R18-21 :

(4 rounds): without changes (60)

R22 :

(8sc, dec)*6 (54)

R23-24 :

(2 rounds): without changes (54)

R25 :

(7sc, dec)*6 (48)

R26-27 :

(2 rounds): without changes (48)

R28 :

(6sc, dec)*6 (42)

R29-33 :

(5 rounds): without changes (42)

β€” Crochet ears :

Info :

Fold the bode in half and work, joining 2 sides:

R34 :

3 dc, 14 sl st, 3 dc

Info :

Cut off the yarn and hide the end.

β€” Arms and Legs :

Info :

Arms and legs are crocheted in the same way (make 4)

R1 :

Make ch2, in the second ch from the hook: 6sc (6)

R2 :

6inc (12)

R34 :

(2 rounds): without changes (12)

Info :

Leave a long end for sewing

β€” Glue eyes :

Info :

Count 5 round from the top. Glue eyes between rounds 5 and 6 The distance between eyes is 5 stitches.

β€” Embroidery a mouth :

Info :

Embroidery a mouth (as it is shown on the pictures)

β€” Embroidery cheeks :

Info :

Make several stitches (you may use embroidery thread/ cotton thread or plush yarn, as you like more).

β€” Tail :

R1 :

Make ch2, in the second ch from the hook: 6sc (6)

R2 :

6inc (12)

R3-4 :

(2 rounds): without changes (12)

R5 :

(1sc, dec)*4 (8)

R6-13 :

(8 rounds): without changes (8)

Info :

Leave a long end for sewing

Info :

Sew the tail at level of rounds 10-11

β€” Sew arms :

Info :

Count from the ears 8 rounds and sew arms. Lightly stuff the arms. The distance between arms is 8 stitches

β€” Sew legs :

Info :

Sew legs at level of rounds 11-12 of the body The distance between legs is 8 stitches. Lightly stuff the legs.

β€” Donut :

R1 :

Make ch12, close in a ring, 12sc in a ring

R2 :

(1sc, inc)*6 (18)

R3 :

18sc

R4 :

BLO: 18sc

R5 :

1sc, dec (12)

R6 :

without changes (12)

Info :

Leave the end for sewing Sew the first and the last rounds Stuff as you go.

β€” Donut - Embroider colored spots :

Info :

Embroider colored spots on the donut using small stitches of embroidery thread or yarn as you like.

β€” Sew the donut to the arms :

Info :

Sew the donut to the arms joining to the side stitches of the arms.

β€” Embroider lines on head :

Info :

Embroider lines of 2 cm on the head

β€” Embroider lines on the body :

Info :

count 2 rounds down from the eyes, the width of the lines is 5-6 stitches.

Assembly Instructions

  • Glue or attach safety eyes between rounds 5 and 6, spacing them 5 stitches apart; secure with glue or safety backs.
  • Sew the tail into the body at the level of rounds 10-11 and hide the tail end inside the body for a neat finish.
  • Position and sew arms at 8 rounds down from the ears, spacing the two arms 8 stitches apart; lightly stuff arms before finishing.
  • Sew legs at the level of rounds 11-12 on the body, spacing legs 8 stitches apart; lightly stuff the legs and hide ends.
  • Sew the donut to the arms by joining it to the side stitches of each arm so it sits centered in front.
  • Embroider the mouth, cheeks and body/head lines as shown in photos; use black yarn for lines and pink or blush for cheeks.

Important Notes

  • πŸ’‘Use stitch markers to mark the beginning of each round to keep track of your rounds during continuous crochet.
  • πŸ’‘Stuff as you go to control shapeβ€”overstuffing can distort the plush shape while under stuffing leaves gaps.
  • πŸ’‘Leave long yarn tails on limbs and ears for easier sewing and stronger assembly when attaching parts.

Make a charming plush kitty to brighten any room and bring a smile to its new owner. This little cat and donut set is perfect for gifts, decor, and quick handmade projects. Enjoy the cozy process and share your finished friend with loved ones! 🧢🧁

You ask,

we answer.

FAQs

What size will the finished piece be?

The finished amigurumi measures approximately 21-23 cm tall when using the recommended Himalaya Dolphin Baby yarn and 4 mm hook.

Can I use different yarn weights for this pattern?

Yes, you can use different yarn weights but the final size and stitch counts will vary; adjust your hook size and expect different finished dimensions.

Do I need prior crochet experience for this pattern?

This pattern is rated intermediate and assumes you are comfortable with single crochet, increases, decreases and basic shaping in continuous rounds.

How do I secure the safety eyes and donut accessory?

Glue eyes with a small amount of craft glue or use safety eye backs; sew the donut to the side stitches of the arms with a yarn needle and secure with hidden stitches.