🧢 Beautiful ✨ Detailed πŸ’ Adorable

Cute cat Amigurumi Pattern

Cute cat Amigurumi Pattern
4.9β˜… Rating
5-7 Hours Time Needed
3.5K Made This
βœ‚οΈ

Intermediate Level

Ideal for those with basic crochet experience, featuring slightly more advanced stitches and techniques to expand your skills.

⏱️

Weekend Treat

Takes 5-7 hours, making it an enjoyable project to finish over a couple of days.

🧸

Cute Companion

An adorable friend to cherish, handcrafted with love to bring comfort and joy for years to come.

About This Cute cat Amigurumi Pattern

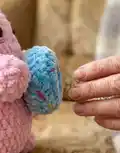
This pattern guides you step-by-step to crochet a plush cat amigurumi with a small donut accessory. It uses Plush/Himalaya Dolphin Baby yarn for a super-soft finish and simple shaping to form the body, ears, arms, legs and tail. Clear round-by-round instructions and photos help you through assembly and embroidery details.
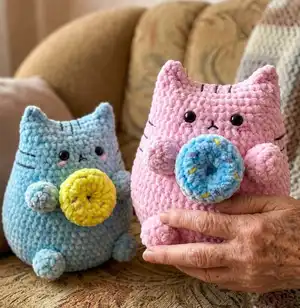
Cute cat Amigurumi Pattern crochet pattern - detailed view of completed project

Perfect as a gift or a cozy companion, this pattern includes the donut accessory and embroidery tips for eyes, mouth and whisker lines. Suitable for crocheters comfortable with basic increases, decreases and sewing parts together.

Why You'll Love This Cute cat Amigurumi Pattern

I absolutely love this pattern because the plush yarn creates the softest, huggable texture that looks and feels delightful. I enjoy the simple shaping that still gives the cat a charming, rounded silhouette and expressive ears. The donut accessory is a fun little touch that makes each finished toy extra playful. I find the step-by-step rounds and photos make assembly and embroidery straightforward and rewarding.

Cute cat Amigurumi Pattern step 1 - construction progress Cute cat Amigurumi Pattern step 2 - assembly progress Cute cat Amigurumi Pattern step 3 - details and accessories Cute cat Amigurumi Pattern step 4 - final assembly and finishing

Switch Things Up

I love how versatile this pattern is for customization; you can experiment with yarn colors to create many different personalities for your cat.

Try pastel shades for a soft nursery toy or bright colors for a playful look β€” swapping yarn colors for the donut makes it pop.

I often change the yarn weight and hook size to make mini or jumbo versions; using bulky plush yarn and a larger hook creates a chunkier, cuddlier cat.

For a keychain or bag charm version, use thinner yarn and smaller hook to reduce size and add a keyring loop at the top.

I like to add little accessories like a tiny scarf, bow or embroidered heart to personalize each toy as a gift.

You can embroider different facial expressions β€” adjust eye spacing or mouth shape for a sleepy, happy or surprised look.

Try using felt for small details like blush spots or tiny inner ear patches for a different texture contrast.

For a different theme, change the donut to another small toy: a tiny fish, ball, or mini cupcake using the same round technique.

I sometimes stuff with a small sachet of lavender for a scented plush; place the sachet inside the stuffing for a calming effect.

Don't be afraid to combine yarns β€” a textured yarn for the body and a smooth cotton for the donut looks delightful and unique.

Common Mistakes & How to Fix Them

βœ— Not placing eyes before stuffing can make placement difficult later; count the rounds carefully and glue or attach eyes between rounds 5 and 6 to ensure correct spacing. βœ— Forgetting to leave long tails for sewing results in messy joins and extra work; always leave a long end when finishing pieces to make sewing into the body easier. βœ— Skipping the step to stuff gradually causes lumps and uneven shape; stuff as you go and add small amounts of stuffing gradually to achieve a smooth, even form. βœ— Not counting stitches when increasing or decreasing can make the body shape incorrect; count after each round and mark the beginning of rounds with a stitch marker for accuracy.
Cute cat Amigurumi Pattern

Make an irresistibly soft plush cat with this complete crochet pattern. You will create a cuddly 21-23 cm kitty using plush yarn and a fun donut accessory. The pattern includes clear round-by-round instructions, assembly tips, and finishing touches so you can finish a charming handmade gift.

Intermediate 5-7 Hours

Materials Needed for Cute cat Amigurumi Pattern

β€” Main Fabric

  • 01
    Himalaya Dolphin Baby plush yarn (main color) - approximately 1-1.5 skeins for the cat body
  • 02
    Same plush yarn - small amounts in 2 additional colors for the donut accessory
  • 03
    YarnArt Jeans (or similar) - small amounts for embroidered lines on the donut and body
  • 04
    Black yarn (YarnArt Jeans recommended) - for embroidered whisker/body lines and mouth
  • 05
    Embroidery thread - small amount for nose/mouth details
  • 06
    Polyester stuffing - enough to firmly fill body, arms, legs and donut

β€” Tools Required

  • 01
    Crochet hook size 4 mm
  • 02
    Safety eyes 10 mm (2 pieces)
  • 03
    Glue for eyes (I used a glue gun)
  • 04
    Scissors
  • 05
    Yarn needle for sewing and embroidery
  • 06
    Stitch markers (optional)
  • 07
    Polyester stuffing
  • 08
    Pins for assembly (optional)

Progress Tracker

0% Complete

β€” Body :

Round 1 :

make ch2, in the second ch from the hook: 6 sc (6)

Round 2 :

6inc (12)

Round 3 :

(1sc, inc )*6 (18)

Round 4 :

(2sc, inc)*6 (24)

Round 5 :

(3 sc, inc)*6 (30)

Round 6 :

(4sc, inc)*6 (36)

Round 7 :

(5sc, inc)*6 (42)

Round 8 :

(6sc, inc)*6 (48)

Round 9 :

(3sc, inc)*12 (60)

Round 10 :

(4sc, inc)*12 (72)

Round 11-16 :

(6 rounds) without changes (72)

Round 17 :

(4sc, dec)*12(60)

Round 18-21 :

(4 rounds): without changes (60)

Round 22 :

(8sc, dec)*6 (54)

Round 23-24 :

(2 rounds): without changes (54)

Round 25 :

(7sc, dec)*6 (48)

Round 26-27 :

(2 rounds): without changes (48)

Round 28 :

(6sc, dec)*6 (42)

Round 29-33 :

(5 rounds): without changes (42)

β€” Crochet ears :

Info :

Fold the bode in half and work, joining 2 sides

Round 34 :

3 dc, 14 sl st, 3 dc

Info :

Cut off the yarn and hide the end.

β€” Arms and Legs :

Info :

Arms and legs are crocheted in the same way (make 4)

Round 1 :

Make ch2, in the second ch from the hook: 6sc (6)

Round 2 :

6inc (12)

Round 34 :

(2 rounds): without changes (12)

Info :

Leave a long end for sewing

β€” Glue eyes :

Info :

Count 5 round from the top. Glue eyes between rounds 5 and 6 The distance between eyes is 5 stitches.

β€” Embroidery (mouth) :

Info :

Embroidery a mouth (as it is shown on the pictures)

β€” Embroidery (cheeks) :

Info :

Embroidery cheeks: Make several stitches (you may use embroidery thread/ cotton thread or plush yarn, as you like more).

β€” Tail :

Round 1 :

Make ch2, in the second ch from the hook: 6sc (6)

Round 2 :

6inc (12)

Round 3-4 :

(2 rounds): without changes (12)

Round 5 :

(1sc, dec)*4 (8)

Round 6-13 :

(8 rounds): without changes (8)

Info :

Leave a long end for sewing

Info :

Sew the tail at level of rounds 10-11

β€” Donut :

Round 1 :

Make ch12, close in a ring, 12sc in a ring

Round 2 :

(1sc, inc)*6 (18)

Round 3 :

18sc

Round 4 :

BLO: 18sc

Round 5 :

1sc, dec (12)

Round 6 :

without changes (12)

Info :

Leave the end for sewing. Sew the first and the last rounds. Stuff as you go.

Info :

Embroider colored spots on the donut as desired using embroidery thread.

Info :

Sew the donut to the arms joining to the side stitches of the arms.

β€” Final embroidery and finishing :

Info :

Embroidery lines of 2 cm on the head as desired. Embroidery lines on the body: count 2 rounds down from the eyes, the width of the lines is 5-6 stitches.

Assembly Instructions

  • Glue or attach safety eyes between rounds 5 and 6, spacing them 5 stitches apart, then continue stuffing the head and body.
  • Count from the ears down 8 rounds and sew the arms in place; lightly stuff the arms before closing and ensure the distance between arms is 8 stitches.
  • Sew legs at the level of rounds 11-12 of the body; place them 8 stitches apart and lightly stuff the legs for a stable base.
  • Sew the tail at the level of rounds 10-11 on the back of the body and hide ends securely inside the toy.
  • Sew the donut accessory to the arms by joining it to the side stitches of the arms so it sits centered between the paws.
  • Pin parts in place to check symmetry before sewing, then use a mattress or whip stitch and hide yarn ends neatly inside the body.

Important Notes

  • πŸ’‘The size of finished toy is 21-23 cm when using the recommended materials and hook size.
  • πŸ’‘You may use any other yarn but the position of the eyes, nose, arms and legs may vary; thinner yarn will increase gaps between stitches compared to thick plush yarn.
  • πŸ’‘Leave long ends for sewing when finishing small pieces to make assembly easier and tidier.
  • πŸ’‘Stuff as you go to keep shape smooth and avoid lumps; overstuffing can distort the amigurumi shape.

This cute cat amigurumi pattern turns plush yarn into a soft handmade friend you can treasure or gift. The little donut accessory and embroidered details add personality and charm to every finished toy. Try different color combos and enjoy the cozy, creative process! 🧢✨🎁

You ask,

we answer.

FAQs

What size will the finished piece be?

The finished amigurumi measures approximately 21-23 cm tall when using the recommended Himalaya Dolphin Baby yarn and a 4 mm hook.

Can I use different yarn weights for this pattern?

Yes, you can use different yarn weights, but this will change the final size and stitch spacing; adjust your hook size accordingly and expect placement of eyes and appendages to vary.

Do I need prior crochet experience for this pattern?

This pattern is rated intermediate and assumes you know basic stitches (sc, inc, dec, sl st, dc) and simple assembly techniques.

How long does this project typically take to complete?

Most crocheters complete this project in 5-7 hours, though time may vary based on experience level and how detailed you are with embroidery and finishing.

Where should I place the safety eyes?

Count 5 rounds down from the top and glue or attach the eyes between rounds 5 and 6, keeping a distance of 5 stitches between them for the correct look.