🧢 Beautiful ✨ Detailed πŸ’ Adorable

Cuddly Nessie Monster Amigurumi Pattern

Cuddly Nessie Monster Amigurumi Pattern
4.8β˜… Rating
12-15 Hours Time Needed
2.9K Made This
βœ‚οΈ

Intermediate Level

Ideal for those with basic crochet experience, featuring slightly more advanced stitches and techniques to expand your skills.

⏱️

Multi-Day Project

A rewarding 12+ hour journeyβ€”perfect for dedicated crafters who love detailed work.

🧸

Cute Companion

An adorable friend to cherish, handcrafted with love to bring comfort and joy for years to come.

About This Cuddly Nessie Monster Amigurumi Pattern

This pattern guides you step-by-step to crochet a large, plush Nessie monster using fluffy yarn. It covers materials, abbreviations, detailed crocheting of head, neck, body and tail as one continuous piece and finishing touches like felt clouds and rainbow horns. The pattern includes tips for working with plush yarn and video references to support your learning.

Cuddly Nessie Monster Amigurumi Pattern crochet pattern - detailed view of completed project

Perfect for making a special handmade gift or a cozy room companion, this pattern teaches techniques to shape and stuff smoothly. Youll learn to use thread-markers, stretching methods and assembly tips for professional results.

Why You'll Love This Cuddly Nessie Monster Amigurumi Pattern

I absolutely love this pattern because it celebrates the playful, huggable side of amigurumi while teaching techniques that make working with fluffy yarn manageable. I enjoyed designing the long neck and gentle shaping to create an expressive, squishy Nessie. I poured attention into the thread-marker method and the stretchy filling tips so your shapes will come out smooth and rounded. I love how the rainbow tail and soft felt clouds let you add personality and color to every piece.

Cuddly Nessie Monster Amigurumi Pattern step 1 - construction progress Cuddly Nessie Monster Amigurumi Pattern step 2 - assembly progress Cuddly Nessie Monster Amigurumi Pattern step 3 - details and accessories Cuddly Nessie Monster Amigurumi Pattern step 4 - final assembly and finishing

Switch Things Up

I love how many ways you can customize this Nessie pattern; change yarn colors to create different moods from pastel calming tones to vibrant playful shades.

Try using a bulkier plush yarn and a larger hook to make a chunkier, cuddlier Nessie thatll be great for hugs.

If you want a mini version, use thinner plush yarn or cotton with a smaller hook for a palm-sized Nessie that works as a keychain or gift.

I often swap the rainbow tail colors for ombre shades or metallic yarn to give a shimmering finish that's unique and eye-catching.

Swap the felt clouds for embroidered clouds using wool thread for a handcrafted look that ages beautifully and feels cozy.

You can add wire inside the neck to make the head posable; I recommend using thin craft wire and wrapping it before inserting to keep it safe and stable.

Experiment with embroidered eyes and expression: moving the eyes higher or lower changes the personality from sleepy to curious.

Add tiny accessories like a crocheted scarf, tiny bow, or a felt heart sewn to the chest to personalize your Nessie as a custom gift.

For a baby-safe version, avoid removable parts and use securely sewn felt details and embroidered eyes instead of buttons or safety eyes.

Mix yarn textures: a smooth cotton belly patch with plush body yarn creates contrast and helps the cloud shapes pop visually.

I also like to surface crochet little stars or dots on the body instead of felt clouds to give a textured, integrated finish.

Common Mistakes & How to Fix Them

βœ— Skipping thread-markers and not changing marker positions; solution: use contrasting thread-markers as instructed so you always see the start of each section and move markers when instructed. βœ— Overstuffing early causes distorted shaping and lumps; solution: stuff gradually, stretch the detail slightly and distribute stuffing evenly as described to maintain smooth curves. βœ— Not watching the linked videos when working with fluffy yarn; solution: watch the referenced video segments several times to learn the stretching and crocheting technique for plush yarn. βœ— Crocheting too tightly with plush yarn makes the piece stiff and small; solution: use a slightly larger hook (4.5mm recommended) and maintain relaxed tension for soft, flexible stitches.

Cuddly Nessie Monster Amigurumi Pattern

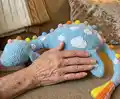
Create your own cuddly Nessie monster with this detailed, photo-assisted amigurumi pattern. Youll learn how to crochet with fluffy yarn, shape the head, neck, body and tail as one continuous piece, and add rainbow details and felt clouds. This pattern is designed as a learning journey with tips, video references and sewing guidance to help you succeed.

Intermediate 12-15 Hours

Materials Needed for Cuddly Nessie Monster Amigurumi Pattern

β€” Main Fabric

  • 01
    Fluffy plush yarn - 4-5 skeins (example brands: Himalaya Koala, YarnArt Fable Fur, Koala Baby Premium Yarns, Premier Yarns Little Bunny) - quantity depends on desired size
  • 02
    Small amounts of 6 colors of plush yarn for rainbow tail detail and rainbow horns (small skeins or scraps)
  • 03
    White felt - at least two A4 sheets for cloud details
  • 04
    Cotton thread - small amount to sew rainbow details on the tail
  • 05
    Contrasting thread (several short pieces) for thread-markers
  • 06
    Hollow fiber (polyester stuffing) - quantity to fill head, neck, body and tail as you go

β€” Tools Required

  • 01
    Crochet hook size 4.5mm (recommended for main fluffy yarn)
  • 02
    Crochet hook size 2.5mm (for hiding ends and fine details)
  • 03
    Sharp scissors for cutting felt
  • 04
    Small scissors for other processes
  • 05
    Tapestry needle for sewing crocheted details
  • 06
    Small needle for sewing felt clouds
  • 07
    Sewing pins for attaching felt clouds
  • 08
    Toothbrush to fluff the monster and make it fluffier
  • 09
    Washable marker for transferring cloud patterns onto felt
  • 10
    Knitting needles for easy sewing of crocheted parts (optional)
  • 11
    Cardboard for printing or drawing a cloud pattern

Progress Tracker

0% Complete

β€” Materials :

Info :

Hooks:4.5-for crocheting all the details and 2.5-to hide the ends of yarn in all details.4-5 skeins of fluffy yarn in the color you want (Himalaya Koala,YarnArt Fable Fur,Koala Baby Premium Yarns,Premier Yarns Little Bunny).Hollow fiber (stuffing for toys).Sharp scissors for cutting out felt details and one more scissors for other processes.White felt for cloud details (at least two sheets of felt in A4 format).White thread for felt clouds.Sewing pins for attaching felt clouds to a crocheted body.6 colors of plush yarn for the rainbow tail detail AND rainbow horns.Cotton thread-to sew the rainbow detail on the tail.Toothbrush-to make your Monster fluffier.A few contrasting threads(to mark the beginning of the row and to see the shape of the Monster).Threads in 6 colors of the rainbow for embroidering the eyes.Tapestry needle for sewing all the crocheted details.Small needle for sewing felt clouds.Washable marker-for transferring pattern clouds onto felt.Cardboard-for printing or drawing a cloud pattern.Knitting needles for easy sewing of crocheted parts.

β€” Abbreviations :

Infos :

ch - chain. mr - magic ring. sc - single crochet. inc - increase. dec - decrease. dc - double crochet. hdc - half double crochet. tr - treble crochet. blo - through back loop. flo - through front loop. x (...) - repeat ... times.

β€” Important to read :

Info :

I created this pattern to learn how to crochet Nessie with fluffy yarn. In this pattern I shared my tips and secrets for working with fluffy yarn. You can try other plush yarns but choose the right hook size and expect a different look.

β€” Crochet part :

β€” Head - Neck - Body - Tail (all this will be crocheted as one detail) :

Start crocheting the head (muzzle).

Round 1 :

1 row: 2 ch, in the second chain from the hook - 8 sc (8) or 1 row: 8 sc in mr (8)

Info :

So here we use a thread of a contrasting color (next-thread-marker) to mark the beginning of the row.

Round 2 :

2 row: 8 inc (16)

Round 3 :

3 row: (1 sc, 1 inc) x 8 (24)

Round 4 :

4 row: 24 sc (24)

Round 5 :

5 row: (5 sc, 1 inc) x 4 (28)

Round 6-7 :

6-7 rows (2 rows): 28 sc (28)

Info :

Advice/tip/secret from me: Use contrasting thread-markers because they are comfortable to use while crocheting with fluffy yarn and help see the shape of the Monster's muzzle.

Round 8 :

8 row: mark the beginning of the row with contrasting thread - (1 sc, 1 inc) x 3, here we put one more thread-marker - 8 sc, here we put the third thread-marker - (1 inc, 1 sc) x 3, here we put the last thread-marker then - 8 inc (42)

Info :

So we have a total of 4 thread-markers in this row.

Round 9 :

9 row: 42 sc (42)

Round 10 :

10 row: mark the beginning of the row with first thread-marker (1 inc, 2 sc) x 3, here second thread-marker - 8 sc, here third thread-marker - (2 sc, 1 inc) x 3, and the last thread-marker - 1 inc, 6 sc, 2 inc, 6 sc, 1 inc (52)

Round 11-16 :

11-16 row (6 rows): 52 sc (52)

Info :

ATTENTION: Here I share the secret of work with fluffy yarn. This is how I get the perfect shape of a crocheted detail and Cuddly Monsters: I stretch the detail a little and fill a little, spread the hollow fiber evenly. I will stretch the detail at certain stages and write about it.

Round 17 :

17 row: (1 dec, 2 sc) x 3, 8 sc, (2 sc, 1 dec) x 3, 1 dec, 6 sc, 2 dec, 6 sc, 1 dec (42)

Round 18 :

18 row: (5 sc, 1 dec) x 6 (36)

Round 19 :

19 row: 2 sc, 1 dec, (4 sc, 1 dec) x 5, 2 sc (30)

Round 20 :

20 row: 4 sc, 1 dec (8 sc, 1 dec) x 2, 4 sc (27)

Round 21 :

21 row: (7 sc, 1 dec) x 3 (24)

Info :

ATTENTION: stretch the detail a little, fill more (here we fill the Monster's head fully), spread the hollow fiber evenly.

β€” Neck :

Here we start crocheting the Nessie's neck.

Round 22-26 :

22 - 26 rows (5 rows): 24 sc (24)

Round 27-31 :

27 - 31 rows (5 rows): 24 sc (24) stretch the detail a little fill spread the hollow fiber evenly

Round 32-36 :

32 -36 rows (5 rows): 24 sc (24) stretch the detail a little fill spread the hollow fiber evenly

Round 37-41 :

37- 41 rows (5 rows): 24 sc (24) stretch the detail a little fill spread the hollow fiber evenly

Round 42 :

42 row: (5 sc, 1 inc) x 4 (28)

Round 43 :

43 row: 28 sc (28)

Round 44 :

44 row: (6 sc, 1 inc) x 4 (32)

Info :

Start crocheting the body.

β€” Body :

Round 45 :

45 row: 5 sc, now there is a new beginning of the row - put a thread-marker here, 1 inc, 3 sc, 1 inc, here we put one more thread-marker - 10 sc, here we put the third thread-marker - 1 inc, 3 sc, 1 inc, here we put the last thread-marker - 1 inc, 10 sc, 1 inc (38)

Round 46 :

46 row: 30 sc, 2 inc, 6 sc (40)

Round 47 :

47 row: 1 inc, 22 sc, 1 inc, 7 sc, 2 inc, 7 sc (44)

Round 48 :

48 row: 1 inc, 5 sc, 2 inc, 10 sc, 2 inc, 5 sc, 2 inc, 2 sc, 1 inc, 2 sc, 1 inc, 4 sc, 1 inc, 2 sc, 1 inc, 2 sc, 1 inc (56)

Round 49 :

49 row: 56 sc (56)

Round 50 :

50 row: 1 inc, 7 sc, 2 inc, 12 sc, 2 inc, 7 sc, 2 inc, 22 sc, 1 inc (64)

Info :

Here I ended up with the first skein of fluffy yarn.

Round 51-54 :

51 - 54 rows (4 rows): 64 (64)

Round 55 :

55 row: 1 inc, 9 sc, 2 inc, 14 sc, 2 inc, 9 sc, 1 inc, 26 sc (70)

Round 56-65 :

56 - 65 rows (10 rows): 70 sc (70)

Info :

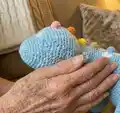
ATTENTION: Here we stretch the Monster's body a bit (photos bellow) to get a smoother shape.

Assembly Instructions

  • Sew felt cloud details onto the crocheted body using white thread and small needle, pinning clouds with sewing pins before stitching to ensure correct placement.
  • Attach fins to the sides of the body between the indicated rounds (place fins symmetrically along the body curve) and sew securely with tapestry needle and matching yarn.
  • Sew rainbow horns and rainbow tail detail using the 6 colors of plush yarn; use cotton thread to stitch the rainbow detail onto the tail and secure ends neatly.
  • Position and sew the ears near the head top (use photos as reference), ensuring symmetry and secure stitching so they hold shape.
  • Weave in all yarn ends with a tapestry needle and trim excess; brush gently with a toothbrush to fluff the yarn where desired.

Important Notes

  • πŸ’‘Use contrasting thread-markers to mark the beginning of rows during shaping; move markers as instructed so you can see the Monster's shape.
  • πŸ’‘Work gradually when stuffing: slightly stretch the detail, add small amounts of hollow fiber and spread stuffing evenly to avoid lumps.
  • πŸ’‘Watch the linked video references several times to understand the stretching and shaping technique for fluffy yarn and follow the thread-marker method exactly.

This Cuddly Nessie pattern is a heartfelt project designed to teach you how to crochet with fluffy yarn step by step. Its full of practical tips, video links, and lots of photos to support your learning. Make a whimsical companion to hug and keep or gift to someone special. 🧢🧡✨

You ask,

we answer.

FAQs

What size will the finished piece be?

The finished Nessie measures approximately a large plush size depending on yarn and stuffing; using recommended fluffy yarn and 4.5mm hook creates a sizeable cuddly monster.

Can I use different yarn weights for this pattern?

Yes, you can use different plush yarns but the final size and texture will vary; adjust hook size (bigger for chunkier yarn, smaller for thinner yarn) and expect changes in shape.

Do I need prior crochet experience for this pattern?

This pattern is rated intermediate; basic knowledge of single crochet, increases, decreases and working in the round is recommended for best results.

How long does this project typically take to complete?

This multi-day project typically takes around 12-15 hours depending on your speed, experience and the level of detail you add.