🧢 Beautiful ✨ Detailed πŸ’ Adorable

Crochet Turtle memory game Amigurumi Pattern

Crochet Turtle memory game Amigurumi Pattern
4.2β˜… Rating
5-7 Hours Time Needed
2.3K Made This
βœ‚οΈ

Intermediate Level

Iο»Ώdeal for those with basic crochet experience, featuring slightly more advanced stitches and techniques to expand your skills.

⏱️

Weekend Treat

Takes 5-7 hours, making it an enjoyable project to finish over a couple of days.

🎁

Tiny Treasure

Small, sweet, and gift-worthy creations that fit perfectly in the palm of your hand with detailed charm.

About This Crochet Turtle memory game Amigurumi Pattern

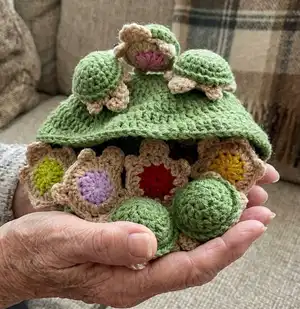
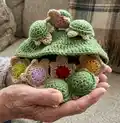
This pattern teaches you how to crochet a mama turtle shell and multiple baby turtles to create a matching memory game set. It includes detailed round-by-round instructions for baby bottoms, shells, legs, tails and mama head plus assembly notes. The pattern uses worsted weight yarn (weight 4) and simple shaping techniques to create tidy, durable pieces.

Crochet Turtle memory game Amigurumi Pattern crochet pattern - detailed view of completed project

Follow the clear rounds and placement instructions to make a full set of babies and shell with a secure button closure. Ideal for gifting or as a fun project to build a small collection of matching turtles.

Why You'll Love This Crochet Turtle memory game Amigurumi Pattern

I absolutely love this pattern because it combines small, satisfying crochet rounds with a playful finished project you can use and gift. I enjoy how each baby turtle works up quickly, giving you visible progress and momentum as you make an entire set. The mama shell is a lovely little bowl of stitches that comes together with simple increases and a neat joining method. Sewing the pieces together and adding the button closure is a relaxing final step that really makes the set feel complete.

Crochet Turtle memory game Amigurumi Pattern step 1 - construction progress Crochet Turtle memory game Amigurumi Pattern step 2 - assembly progress Crochet Turtle memory game Amigurumi Pattern step 3 - details and accessories Crochet Turtle memory game Amigurumi Pattern step 4 - final assembly and finishing

Switch Things Up

I love how easy it is to customize colorways in this pattern; try pastel scraps for a baby-themed set or bright contrasting centers for a more playful game.

You can change the yarn weight and hook size to make tiny keychain turtles or a much larger play set; switch to a 3.5mm hook and fingering yarn for mini versions.

I often add embroidered faces or tiny felt cheeks to give each baby turtle a different personality β€” embroidery makes each match unique.

For safety-conscious projects for very young children, omit safety eyes and embroider the eyes with contrasting yarn instead for a fully soft toy.

If you want a sturdier shell, try using a slightly tighter tension or a smaller hook for the top shell, which will make the storage pocket more defined.

I sometimes add a loop and button closure variation by placing the button in a different stitch or adding a crocheted loop to the opposite side for a decorative finish.

Try using variegated yarn for the baby shells to give each piece a subtly different look, making the memory game more visually interesting.

If you like a more polished finish, block the top and bottom shells lightly before joining to help the pieces sit flat and align more easily.

I like to create themed sets (ocean colors, rainbow, woodland) and package them as gifts β€” a small ribbon or tag makes a lovely presentation.

For an interactive twist, make pairs using slightly different textures (smooth cotton vs acrylic) so matching includes a tactile element as well as color recognition.

Common Mistakes & How to Fix Them

βœ— Skipping the note that the starting chain does NOT count as a stitch can throw off your stitch counts; always remember to follow the pattern's counting rules and recount after increases. βœ— Working the wrong loop (FLO vs BLO) will change the appearance and joining points of the pieces; mark FLO or BLO sections and double-check which loop to use before stitching. βœ— Not stuffing pieces gradually will create lumps or overly tight stitches; add small amounts of polyfil as you shape to maintain even, smooth stuffing throughout the piece. βœ— Failing to place the safety eyes at the correct rows causes misaligned features; insert safety eyes between rows 9 and 10 for the mama head, spaced 4 stitches apart, as instructed. βœ— Cutting yarn too early when joining top and bottom shells can make the no-sew option difficult; follow the instructions for leaving yarn and joining through both loops to avoid this problem.

Crochet Turtle memory game Amigurumi Pattern

Create a charming crochet turtle memory game set that includes a mama turtle shell and multiple tiny baby turtles and matching shells. This pattern guides you step-by-step through each round, assembly detail, and placement so you can make a beautiful, functional toy set. Perfect as a handmade gift or a playful keepsake, you will enjoy the calm, repetitive rhythm of the stitches while building something delightful.

Intermediate 5-7 Hours

Materials Needed for Crochet Turtle memory game Amigurumi Pattern

β€” Main Fabric

  • 01
    Worsted weight yarn (Weight 4) green - less than 7 oz (main mama shell/top and babies)
  • 02
    Worsted weight yarn (Weight 4) tan - less than 7 oz (shell trim, legs, heads, details)
  • 03
    Scraps of 10 different colors - small amounts for the match centers (one scrap per match)
  • 04
    Polyfil stuffing - small bag for stuffing baby turtles and heads

β€” Tools Required

  • 01
    Crochet hook size 4.0mm
  • 02
    Crochet hook size 3.5mm (used for mama's head pieces)
  • 03
    Yarn needle for sewing and weaving in ends
  • 04
    Polyfil stuffing
  • 05
    Button for tail closure (small, sew-on)
  • 06
    2 x 12mm safety eyes

Progress Tracker

0% Complete

β€” Supplies needed :

Info :

4mm crochet hook. 3.5mm crochet hook(used for mamas head). yarn needle. weight 4 green yarn- less than 7 oz. weight 4 tan yarn- less than 7 oz. scraps of 10 different colors (for the matches). polyfil. yarn needle. button. (2) 12mm safety eyes.

β€” Abbreviations and stitches used :

Info :

Dc- double crochet. Sc- single crochet. Ss- slip stitch. Mc- magic circle. Dc inc- double crochet increase. Tr-treble crochet. Hdc- half double crochet. St- stitch. FLO- front loop only. Sc dec- single crochet decrease.

β€” Baby bottom :

Info :

(make 2 of each color). using your 4mm hook. NOTE: don't worry about hiding yarn tails they will be hidden inside the turtle shell.

Round 1 :

with your match color- start a magic circle and chain 2. (chain 2 will NOT count as a stitch) 12 dc into a magic circle. Ss to top of first dc. Chain 1 and cut yarn (12)

Round 2 :

In tan- Join to any st on the previous round. Chain 2 and dc inc into the same st and each st around. Ss to first dc. (24)

Round 3 :

this will form the head and legs of the baby- [this whole round is worked into the FLO.] chain 2. Dc and Tr into the same St as Ss. Tr and Dc into the next st. Chain 2 and ss into the same st. Ss into the next 2 st. (ss, ch1,2hdc,ch1,ss) into the next st. Ss into the next 5 st. (ss, ch1,2hdc,ch1,ss) into the next st. ss into the next 4 st. (ss, ch1,2hdc,ch1,ss) into the next st. ss into the next 5 st. (ss,ch1,2hdc,ch1,ss) into the next st. ss into the next 2 st. Cut yarn and fasten off. Bring the yarn tail to the other side.

β€” Baby shell :

Info :

*note- it will begin to form into a bowl shape.

Round 1 :

In green- starting with a MC ch1 and sc6 into the ring. ss in 1st st, ch 1 (6)

Round 2 :

hdc inc in all, ss to 1st st, ch 1(12)

Round 3 :

(hdc, hdc inc)x6 ss to 1st st, ch1 (18)

Round 4 :

(hdc 2, hdc inc)x6 ss to 1st st, ch 1(24)

Info :

For the no sew version chain 1 and line up with the shell bottom (make sure the right side is facing outward), begin to work through both the shell loops and the FLO of the shell bottom. [This will be the exposed stitches from when we work in the FLO of the 3rd round of the bottom] SC all the way around pausing toward the end to stuff with polyfil and then join and sew in tail.

Info :

If you prefer you can cut the yarn, leaving a 12 inch tail and use a needle and work through both loops of the shell and the front loop only as well and work all the way around pausing before the end to stuff with polyfil. This method works well for when you want to make all the pieces ahead of time.

β€” Mama bottom shell :

Info :

Now we will begin the mama turtle starting with her bottom shell. *ch2 does not count as dc. Always start the round by working into the same st as ss. Ss to the beginning ch after each round.

Round 1 :

In tan- Starting with a MC, ch2 and dc 12 into the ring. Ss to the top of the first dc. (12)

Round 2 :

ch2, dc inc x 12. (24)

Round 3 :

ch2 (dc,dc inc)x12 (36)

Round 4 :

ch2 (dc2,dc inc)x12 (48)

Round 5 :

ch2 (dc3,dc inc)x12 (60)

Round 6 :

ch2 (dc4, dc inc)x12 (72)

Round 7 :

ch2 (dc5,dc inc)x12 (84)

Round 8 :

ch2 (dc6,dc inc)x12 (96)

Info :

Ss to top of first dc and do not cut yarn. You will immediately move onto making the tail.

β€” Tail :

Row 1 :

Ch 1 and sc 4. Ch 1 turn. (4)

Row 2 :

Sc 4 across. Ch 1 turn. (4)

Row 3 :

Sc dec x2. Ch 1 turn. (2)

Row 4 :

Sc 2. Ch 1 turn. (2)

Row 5 :

Sc dec (1). Chain 1 and cut off yarn and leave an 8 inch tail. This will be where we secure the button later on.

Info :

To make the first leg of the mama turtle count over 9 st from the left of the tail. To make the second leg count over 16 st from the left the first leg. To make the third leg count over to the right 14 st from the right of the tail. To make the 4th leg count over 21 st to the right of the third leg (see photo on next page)

β€” Turtle legs :

Info :

All 4 legs worked in the BLO for row 1 (see above for placement). With your tan yarn-

Row 1 :

Join yarn ch1 sc in same st, sc 5. Ch1 turn.(6)

Row 2-4 :

Ch1 sc 6 across. Ch1 turn. (6)

Row 5 :

Sc dec, sc2, sc dec Ch1 turn. (4)

Row 6 :

(Sc dec) x2 ch 1 to secure yarn and cut off (2) Weave in yarn tails & cut ends.

Info :

*When you are finished there will be 15 st unworked between the front and the back leg. & there will be 8 st unworked between the back legs and the tail.

β€” Mama's head :

Info :

(make 2 pieces) With your 3.5mm hook- In tan, Ch 9.

Row 1 :

starting in 2ch from hook, Sc 8 across. Ch1 turn. (8)

Row 2 :

Sc 8. Ch 1 turn. (8)

Row 3 :

Sc 8. Ch 1 turn. (8)

Row 4 :

Sc INC, Sc 6, Sc INC. Ch 1 turn. (10)

Row 5 :

Sc INC, Sc 8, Sc INC. Ch 1 turn. (12)

Row 6-9 :

Sc 12 Ch 1 turn. (12)

Row 10 :

Sc DEC, Sc 8, SC DEC. Ch 1 turn. (10)

Row 11 :

Sc 10. Ch 1 turn. (10)

Row 12 :

Sc DEC, sc 6, Sc DEC. Ch 1 turn. (8)

Row 13 :

Sc DEC, sc 4, Sc DEC Ch 1 turn. (6)

Info :

Ch 1, Cut yarn and weave in the tails. On the second piece insert safety eyes between rows 9 & 10, 4 st apart. Put the piece with the eyes on top of the other, and join yarn at the turtle's neck on the right. (see photo)

Info :

To join pieces:(you will have to make up where the stitches go, just make sure your hook is going through both pieces. If stitches aren't adding up, just use your best judgement.) Sc 3, SC INC, (Sc 2,SC INC)x3, SC 4 across the top of the head, (Sc INC, Sc 2)x3, ScINC, sc3 back down the other side of the neck. Leave a long tail to sew the head to the bottom shell. Stuff head with polyfil.

Info :

Find the middle of the front legs (there should be 7 unworked stitches on either side. Grab your needle and using the tail from the head, sew the head to the BLO of the middle 8 stitches. BE SURE- that you go through both loops of the pieces of the head AND the BLO of the shell. Weave in ends and cut yarn.

β€” Top of mama's shell :

Info :

*ch2 does not count as dc. Always start the round by working into the same st as ss. Ss to the beginning ch after each round. Using your 4mm hook.

Round 1 :

In green- Starting with a MC, ch2 and dc 12 into the ring. Ss to the top of the first dc. (12)

Round 2 :

ch2, dc inc x 12. (24)

Round 3 :

ch2 (dc,dc inc)x12 (36)

Round 4 :

ch2 (dc2,dc inc)x12 (48)

Round 5 :

ch2 (dc3,dc inc)x12 (60)

Round 6 :

ch2 (dc2,dc inc,dc2)x12 (72)

Round 7 :

ch2 (dc5,dc inc)x12 (84)

Round 8 :

ch2 (dc6,dc inc)x12 (96)

Round 9 :

ch2 and dc 96 around. (96)

Info :

*OPTIONAL ROUND 10- if you make more matches you'll want you turtle to have more storage space so go around another time with 96 dc. (96) Chain 1 but DO NOT cut yarn. We are going to join to the bottom shell by working into the front loops that are left exposed.

Info :

Place the top shell onto the bottom shell. Starting in the first st of the right back leg, join yarn. (see photo) Working through both loops of the shell and the FLO, sc x 76. All the way until you get to the last exposed stitch of the 4th leg. (there will be 20 unworked stitches, this is where the babies will be stored.) cut yarn and sew in the tail.

Info :

Lastly, you will need to sew the button to the tail, using the yarn tail that was left. The button will go through whatever DC falls above it as the hole. Hide tail, and cut yarn.

Info :

Your Turtle memory game is finished!

Assembly Instructions

  • Sew the mama head to the bottom shell by finding the middle of the front legs (there should be 7 unworked stitches on either side) and using the head tail, sew the head to the BLO of the middle 8 stitches through both loops of the head pieces and the BLO of the shell.
  • Place the top shell onto the bottom shell and, starting in the first stitch of the right back leg, join yarn and single crochet through both loops of the top shell and the FLO of the bottom shell to join them together, leaving the storage space under the shell.
  • Position and sew each leg into place following the stitch count placement directions (first leg 9 sts from left of tail, second leg 16 sts from first, third leg 14 sts from right of tail, fourth leg 21 sts to the right of third leg) and weave in tails securely.
  • Sew the tail in place and attach the button using the tail left on the tail piece so it aligns with the corresponding dc above as a closure for the shell storage.
  • Insert safety eyes on the second head piece between rows 9 and 10, spaced 4 stitches apart, then join the two head pieces and stuff before finishing sewing and weaving in ends.

Important Notes

  • πŸ’‘The starting chain at the beginning of each round does NOT count as a stitch unless otherwise specified, so follow the pattern counts carefully.
  • πŸ’‘Work the indicated rounds in FLO or BLO exactly where stated; these loop choices create the exposed edges used when joining the top and bottom shells.
  • πŸ’‘Stuff the head and baby turtles gradually and firmly before closing to achieve neat shaping without overstuffing which can distort stitches.
  • πŸ’‘Leave long tails when instructed for sewing pieces together and attaching the button; these tails make assembly and secure attachment much easier.

This crochet Turtle Memory Game brings playful learning and handmade charm to any child or collector. The set includes a mama turtle shell that stores tiny baby turtles, perfect for matching games and imaginative play. Make a full set in bright scraps or soft neutrals for a beautiful, tactile gift. 🐒🧢

You ask,

we answer.

FAQs

What size will the finished piece be?

The mama turtle shell measures approximately small to medium depending on tension and yarn but babies measure roughly 3-4 cm across when using weight 4 yarn and the recommended hooks.

Can I use different yarn weights for this pattern?

Yes, you can, but the finished size will change; use an appropriate hook for the yarn weight and note storage capacity and button placement will shift accordingly.

Do I need prior crochet experience for this pattern?

This pattern is rated intermediate, so basic knowledge of single crochet, double crochet, increases and decreases and working in FLO/BLO is recommended.

How long does this project typically take to complete?

Most crocheters complete the set (mama plus multiple babies) in about 5-7 hours total, though time varies with experience and number of baby turtles made.

How do I join the top and bottom shells?

Place the top shell onto the bottom shell and join starting at the first stitch of the right back leg; single crochet through both loops of the top shell and the FLO of the bottom shell until you reach the storage opening.