🧶 Beautiful ✨ Detailed 💝 Adorable

Crochet Puff Quilt Pattern

Crochet Puff Quilt Pattern
4.2★ Rating
12-15 Hours Time Needed
1.4K Made This
✂️

Beginner Friendly Level

Perfect for those just starting their crochet journey, with clear instructions and simple techniques

⏱️

Multi-Day Project

A rewarding 12+ hour journey—perfect for dedicated crafters who love detailed work.

🤗

Soft Hug

Gentle, plush, and full of warmth, creating a sense of comfort and coziness wherever they find a home.

About This Crochet Puff Quilt Pattern

This pattern creates a quilt-like crochet blanket made from individual stuffed squares worked in flat rounds, then seamed together. The technique uses only half double crochet stitches and three simple seaming tutorials to assemble the blanket. It is designed to be heavy-weight and cozy, ideal for using up yarn scraps or working with a consistent fiber.
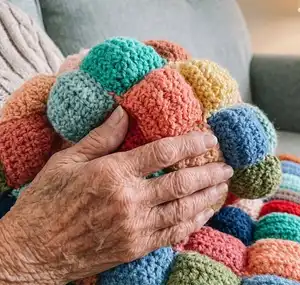
Crochet Puff Quilt Pattern crochet pattern - detailed view of completed project

Each square measures roughly 3" x 3" before stuffing and is worked from a chain foundation into flat rounds. The pattern includes step-by-step photos and three seaming tutorials for neat, invisible joins.

Why You'll Love This Crochet Puff Quilt Pattern

I absolutely love this pattern because it turns small, repetitive squares into a stunning, tactile blanket that feels like a handmade quilt. I adore the way the stuffed squares add dimension and weight, making each blanket look professionally finished. The seaming tutorials make assembly approachable, and I enjoy that the design encourages using yarn scraps, which is so satisfying and sustainable. Making a whole blanket like this feels meditative and rewarding — each row brings you closer to a beautiful, cozy result.

Crochet Puff Quilt Pattern step 1 - construction progress Crochet Puff Quilt Pattern step 2 - assembly progress Crochet Puff Quilt Pattern step 3 - details and accessories Crochet Puff Quilt Pattern step 4 - final assembly and finishing

Switch Things Up

I love how easy it is to customize this pattern by changing your color palette; try ombre shades, neutrals, or high-contrast brights for different moods.

You can change the size by adding or removing squares—each square is roughly 3" wide, so plan in 3" increments for width and length.

If you want a chunkier blanket, switch to a bulkier yarn and larger hook to create a super cuddly, fast-to-make version.

Make a mini version for a baby or pet blanket by using a lighter yarn and smaller hook, then reduce the number of squares accordingly.

I sometimes add a simple single crochet border around the finished blanket to tidy the edges and create a cohesive frame for mixed colors.

Try alternating square stuffing amounts for a more textured or flatter look; less stuffing yields a sleeker quilt, more stuffing gives pronounced puffed squares.

Consider adding tassels, pom-poms, or a fabric backing to make your blanket look more polished and durable for everyday use.

For a more modern look, stick to two or three complementary colors and repeat them across the blanket in a planned sequence.

I also experiment with mixing fibers carefully; using yarns of similar gauge but different fibers can create interesting texture, but try to keep fiber content consistent where possible.

Don’t be afraid to sew squares together in different layouts—diagonal arrangements, blocks of color, or random scrappy placement can each produce very different final effects.

Common Mistakes & How to Fix Them

✗ Not securing the starting tail when working the second side of the chain leads to loose edges; lay the starting tail across the row and crochet over it to secure it without weaving. ✗ Stuffing the squares too tightly creates bulging, uneven squares; stuff lightly at first and add small amounts as you close the top to maintain even shape. ✗ Skipping stitch markers during rounds may cause you to lose track of your stitch count; place a marker at the beginning of each round to keep consistent counts. ✗ Seaming exactly at the very edge of the square makes seams visible on the front; pick up strands just off the very side of the flat edge to hide the seam on the front. ✗ Forgetting to leave a long tail when fastening off prevents easy seaming; fasten off leaving a long tail (roughly 20"-24") for closing and seaming.

Crochet Puff Quilt Pattern

Make a cozy, quilt-like blanket using simple half double crochet rounds and easy seaming techniques. This pattern guides you through making stuffed puff-style squares, assembling rows, and joining them with whip and mattress stitch. Perfect for using yarn scraps or a single fiber for a polished finish. You'll love how quickly the repeating square motif builds into a substantial, textured blanket.

Beginner Friendly 12-15 Hours

Materials Needed for Crochet Puff Quilt Pattern

— Main Fabric

  • 01
    Worsted/Medium weight yarn (4-weight), roughly 15-20 yds per square, plus yarn for seaming
  • 02
    100% cotton yarn (used by the maker, optional preference)
  • 03
    Yarn scraps in multiple colors (optional) to create a scrappy blanket

— Tools Required

  • 01
    Crochet hook size 5.0mm (or hook to meet gauge)
  • 02
    Yarn needle for seaming
  • 03
    Scissors
  • 04
    Polyester stuffing
  • 05
    Stitch marker
  • 06
    Flexible tape measure

Progress Tracker

0% Complete

— Square :

Info :

Ch 11

Round 1 :

Starting in the second ch from the hook, hdc in each ch across. Rotate your work to the other side of the ch (see figure 1) and hdc in each ch across. Slst to the starting stitch. (20 stitches)

Infos :

*tip: when working along the second side of your ch, lay your starting tail down across the row and crochet over top of it to secure this tail without having to weave it in (see figure 2). *tip: if needed, use a stitch marker at the beginning of each round to help keep track of your stitch count.

Round 2-8 :

Ch 1 and turn. Hdc in each of the next 20 stitches. Slst to the starting stitch. (20 stitches)

Info :

Fasten off, leaving a long tail (roughly 20"-24").

Info :

Begin lightly stuffing your square (see figure 3 for the recommended stuffing amount). Attach a yarn needle to the end of your tail and use the whip stitch (Tutorial #1) to begin seaming across the top. Finish filling in stuffing if needed, and whip stitch to the end, completely closing off your square. If this is your first square of a new row, you may go ahead and weave in this end.

— Assembly :

Info :

Repeat this entire process for your next square, but don't weave in your final end yet.

Info :

As you seam all of your squares together, you will be looking at the back side of the work. Keep this in mind as you seam, if you would like your colors to be in a specific arrangement.

Info :

With your yarn needle still attached, seam this square to your previous square (Tutorial #2).

Info :

Decide how wide you would like your blanket to be, in increments of 3" (or increments of how wide each square is for you). Continue repeating this pattern until you have attached enough squares side by side to achieve your desired width. This will be one "row" of squares.

Info :

Complete a second full row of squares. Now, you will seam the two rows together using the mattress stitch (Tutorial #3). You will be using a completely separate strand of yarn for this, any color of your choosing.

Info :

Repeat this entire process for your entire project.

Info :

Once you achieve your desired width and length, weave in all ends and enjoy!

— Tutorials :

Tutorial #1 (P1) :

Whip stitch across the top: Attach your yarn needle to the end of your tail.

Tutorial #1 (P2) :

Align the stitches from one side to the other. Insert your yarn needle through the first set of stitches and pull your yarn through.

Tutorial #1 (P3) :

Come back around and insert your yarn needle through the next set of stitches, going the same direction as last time. Continue repeating this until you get to the end of the square, but don't fasten off the tail.

Tutorial #2 (P1) :

Whip stitch 2 squares together: You will NOT be seaming along the very sides of the squares. You want to begin picking up strands on the flat side of the square, *just off* from the very side. Insert your yarn needle into your first square (peach), picking up at least 2 strands. Pull the yarn through.

Tutorial #2 (P2) :

Come back over to your second square (white), pick up at least 2 strands, and pick up at least 2 strands in your first square. Pull the yarn through. Continue this method all the way down.

Tutorial #2 (P3) :

Do your last strand grab in the corners of each square.

Tutorial #2 (P4) :

Flip your squares to work along the bottom edge. Go through the very bottom/corners one more time, ending on your second square (the color of the tail you are currently working with). Run your tail through your square and stuffing to "hide" the tail inside. Snip off the remainder of the tail.

Tutorial #3 (P1) :

Mattress stitch the rows together: Measure out a strand of yarn that is roughly 3x the length of work you need to seam. Attach one side to your yarn needle, and use the other side to tie a knot through both corners of the first set of squares.

Tutorial #3 (P2) :

You will NOT be inserting the yarn needle from front to back, like pictured here. Similar to Tutorial #2, you will pick up stitches on the top and bottom of your squares, so that your seam lines don't show on the front of the work.

Tutorial #3 (P3) :

Pick up a set of loops close to the top of your bottom square. Insert your yarn needle from the very bottom of your top square, up through a hole in the first row. Pull the yarn through.

Tutorial #3 (P4) :

Move to the next space to seam through, but go in the opposite direction. Insert down through the top square and down through the bottom square.

Tutorial #3 (P5) :

Continue this method across the first set of squares, switching directions with each stitch.

Tutorial #3 (P6) :

When you get to the corners, you want to make a nice and secure connection between all 4 corners.

Tutorial #3 (P7) :

It does not matter which square you end on. Insert through that square again (orange) up to the diagonal corner (yellow). Pull tightly. Ensure that all corner connections are nice and snug.

Tutorial #3 (P8) :

Come back to the corner next door (tan) and down into the diagonal opposing corner (white). Pull tightly. Ensure that all corner connections are nice and snug.

Tutorial #3 (P9) :

Continue on to the very end of your row. When you get to the end, go through the corners one more time and fasten off. Secure with a knot and weave in the end.

Assembly Instructions

  • Complete each square (Ch 11, Rnd 1, Rnd 2-8), fasten off leaving a long tail (roughly 20"-24") and stuff lightly before closing the top with the whip stitch.
  • Whip stitch adjacent squares together along the flat sides, picking up at least two strands from each square and working along the back side so seams remain hidden.
  • After forming full rows of side-by-side squares, join two full rows together using a separate strand and the mattress stitch for a neat, invisible seam.
  • When seaming with mattress stitch, measure out a strand roughly 3x the length to seam, tie through the corner and pick up loops on top and bottom so seams don't show on the front.
  • Once you've attached enough rows to reach your desired width and length, weave in all ends, snip tails after hiding them inside squares, and secure corner joins before finishing.

Important Notes

  • 💡Beginning ch 1 does NOT count as a stitch—treat each round accordingly to maintain accurate stitch counts.
  • 💡Each square measures approximately 3" x 3" before stuffing; measure as you go to ensure consistent square size for assembly.
  • 💡Work with consistent tension and stuff squares lightly and evenly to avoid misshapen or lumpy squares during assembly.
  • 💡As you seam squares together you will be looking at the back side of the work; plan color placement accordingly if you want a specific arrangement.

This Crochet Puff Quilt Pattern turns simple half double crochet into a cozy, quilt-like blanket with delightful dimension. I used scraps to make a colorful, heavy-weight afghan that feels like a soft hug every time I wrap up in it. Whether you make a small lapghan or a full-sized blanket, this project is perfect for using up yarn and creating something warm and handmade. 🧶✨🛋️

You ask,

we answer.

FAQs

What size will the finished piece be?

The sample finished measurements are 54" x 54" (18 squares by 18 squares) when each square measures about 3" x 3" before stuffing.

Can I use different yarn weights for this pattern?

Yes, but using a different yarn weight will change the size of each square; adjust your hook accordingly and check gauge so squares fit together neatly.

Do I need prior crochet experience for this pattern?

This pattern is beginner friendly; familiarity with chains, half double crochet, and basic seaming is helpful, and the tutorials walk you through the seaming techniques.

How long does this project typically take to complete?

Most crocheters will spend 12-15 hours or more depending on the size you choose, the number of squares, and time spent on seaming and finishing.