🧢 Beautiful ✨ Detailed πŸ’ Adorable

Crochet Flexagon Pattern

Crochet Flexagon Pattern
4.4β˜… Rating
5-7 Hours Time Needed
1.1K Made This
βœ‚οΈ

Intermediate Level

Ideal for those with basic crochet experience, featuring slightly more advanced stitches and techniques to expand your skills.

⏱️

Weekend Treat

Takes 5-7 hours, making it an enjoyable project to finish over a couple of days.

🧸

Cute Companion

An adorable friend to cherish, handcrafted with love to bring comfort and joy for years to come.

About This Crochet Flexagon Pattern

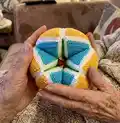
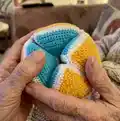
This pattern creates a colorful crochet flexagon β€” a small, hand-held toy made from 24 equilateral triangles joined into 6 soft pyramids. You will crochet triangles in four bright colors and finish each triangle with a neat white edge before assembling pyramids and sewing them into a flexing toy. Techniques used include chains, single crochet, single crochet decreases, edge finishing with single crochet and joining by hand sewing. The finished toy from the indicated materials measures approximately 15 cm and makes a great fidget or gift.

Crochet Flexagon Pattern crochet pattern - detailed view of completed project

The pattern includes a complete materials list, abbreviations and step-by-step row instructions for each triangle, plus clear assembly guidance. Photos and sewing tips are provided to help you align seams and achieve a smooth final flexagon.

Why You'll Love This Crochet Flexagon Pattern

I absolutely love this pattern because it turns simple crochet triangles into a playful, interactive toy that invites fidgeting and discovery. I enjoy the bright color combinations and the satisfying symmetry when the pyramids are sewn together. The finishing row (white edge) gives a crisp, professional look that I find especially rewarding. Sewing the pyramids and assembling the flexagon is meditative and makes the whole project feel like a creative puzzle that comes to life in your hands.

Crochet Flexagon Pattern step 1 - construction progress Crochet Flexagon Pattern step 2 - assembly progress Crochet Flexagon Pattern step 3 - details and accessories Crochet Flexagon Pattern step 4 - final assembly and finishing

Switch Things Up

I love to experiment with colors β€” try pastel shades for a soft, calming flexagon or neon brights for high-contrast visuals that really pop.

If you want a larger flexagon, use a bulkier yarn and a larger hook; conversely, use finer yarn and a smaller hook for a tiny keychain-sized version.

I sometimes skip the white edge and use a contrasting color edge for a bolder look; the edge color completely changes the toy's character.

Try embroidering small motifs on each triangle before assembly to personalize each face of the flexagon.

For a baby-safe version, use cotton yarn and secure all tails and seams more heavily; avoid small decorations and ensure stuffing is firmly enclosed.

I also like to add a small bell or rattle inside one pyramid for an auditory surprise when the flexagon is moved.

Experiment with different seam styles: a whipstitch gives a different visible finish than the recommended half-cross seam β€” choose the look you prefer.

To make matching sets, create several flexagons in the same color family and vary only the edge color for a cohesive stack of toys.

I often change the order of colors when assembling pyramids to create asymmetric patterns that reveal interesting color sequences when folded.

If you enjoy mixed media, try combining a cotton front triangle and a slightly stretchy acrylic back triangle for subtle texture contrast.

Common Mistakes & How to Fix Them

βœ— Skipping the chain at the start of a row can throw off your stitch count; always work the chain and count stitches after each row to stay accurate. βœ— Inconsistent tension during the triangle rows leads to uneven edges and misshapen pyramids; keep a steady, moderate tension and correct immediately if rows look loose or tight. βœ— Forgetting to fasten off and leave a tail for sewing makes finishing difficult; always leave a 10-15 cm tail when you cut the thread to sew edges securely. βœ— Not stuffing the pyramids enough causes floppy shapes and a poor final flexagon; add polyester filler gradually and check shape before closing the seam to ensure a firm result. βœ— Rushing the edge finishing row results in messy corners at triangle tips; attach the white yarn carefully and place 3 sc at each triangle top for neat, rounded corners.

Crochet Flexagon Pattern

Make a colorful, tactile crochet flexagon β€” a playful soft fidget toy that twists and turns in your hands. This pattern walks you through making 24 triangles, assembling 6 pyramids and sewing a compact flexagon about 15 cm across. You will learn edge finishing, simple decreases, and a neat seam technique to achieve crisp pyramid edges.

Intermediate 5-7 Hours

Materials Needed for Crochet Flexagon Pattern

β€” Main Fabric

  • 01
    YarnArt Jeans 33 (blue) - small amount (one ball or approximately 20-30g recommended)
  • 02
    YarnArt Jeans 77 (orange) - small amount (one ball or approximately 20-30g recommended)
  • 03
    YarnArt Jeans 60 (light green) - small amount (one ball or approximately 20-30g recommended)
  • 04
    YarnArt Jeans 35 (yellow) - small amount (one ball or approximately 20-30g recommended)
  • 05
    Alize Cotton Gold 55 (white) - small amount for edges and seams (one ball or approximately 20-30g recommended)

β€” Tools Required

  • 01
    Crochet hook No 2 (recommended, metric approx 2.0 mm)
  • 02
    Holofiber filler (polyester stuffing)
  • 03
    Sewing needle for assembly
  • 04
    Blunt-end needle (for sewing through loops as indicated)
  • 05
    Scissors
  • 06
    Yarn needle for weaving ends

Progress Tracker

0% Complete

β€” Notes :

Info :

You can use any yarn and a suitable hook. If you work with other colors than indicated in the pattern, I would recommend you to write down which color you use and which color you are replacing with. The size of the finished toy from the indicated materials is ~15 cm

β€” Abbreviations :

Infos :

ch - chain. sc - single crochet. dec - decrease. inc3 - increase (3 sc in one stitch). sl st - slip stitch. (...) - the number in parentheses indicates the number of stitches in the row.

β€” Materials and Tools :

Info :

Yarn: YarnArt Jeans 33 (blue). YarnArt Jeans 77 (orange). YarnArt Jeans 60 (light green). YarnArt Jeans 35 (yellow). Alize Cotton Gold 55 (white). Tools: Crochet hook β„– 2. Holofiber filler. Sewing needle. Scissors. Blunt-end needle as needed for assembly.

β€” Equilateral triangle :

Info :

Note! How to make a single crochet decrease: - Insert hook into the indicated stitch. Yarn over and pull up a loop. (2 loops on the hook.) - Insert hook into the next stitch. Yarn over and pull up a loop. (3 loops on the hook.) - Yarn over, pull through all 3 loops on the hook. Make 6 triangles of yellow, orange, light green and blue. You should have 24 triangles in total.

Round 1 :

17 ch, from the second stitch from the hook - 16 sc, ch, turn (16)

Round 2 :

dec, 12 sc, dec, ch, turn (14)

Round 3 :

14 sc, ch, turn (14)

Round 4 :

dec, 10 sc, dec, ch, turn (12)

Round 5 :

12 sc, ch, turn (12)

Round 6 :

dec, 8 sc, dec, ch, turn (10)

Round 7 :

10 sc, ch, turn (10)

Round 8 :

dec, 6 sc, dec, ch, turn (8)

Round 9 :

8 sc, ch, turn (8)

Round 10 :

dec, 4 sc, dec, ch, turn (6)

Round 11 :

6 sc, ch, turn (6)

Round 12 :

dec, 2 sc, dec, ch, turn (4)

Round 13 :

4 sc, ch, turn (4)

Round 14 :

2 dec, ch, turn (2)

Round 15 :

dec (1)

Info :

Fasten off, cut the thread.

Info :

Attach the white thread to any of the sides of the triangle and work with sc along the edge, in the tops of the triangle - 3 sc in one stitch. Finish with a needle (see photo) and fasten the thread from the inside. You should have - (14 sc - on the side, 3 sc - at the top) *3 (51)

β€” Pyramids :

Info :

Now you need to assemble the pyramids from the triangles. To do this, take a needle with a blunt end (or another one that is convenient for you), and sew 3 (!!!!) pyramids with white (or the color that you worked with) yarn according to the following schemes.

Info :

Sew with an Half Cross stitch seam for the back half-loops. Fill with filler.

Info :

You should get 3 of pyramids A and 3 of pyramids B.

β€” Assembly :

Info :

Now you can start assembling the flexagon. Connect pyramid A and pyramid B (see photo) - sew in the place indicated by a stroke. Use the seam formed when sewing the pyramids.

Info :

Make 3 parts, each part consists of 2 pyramids.

Info :

Assembly the parts in the way as shown in the next photo and sew along the line that is indicated by a stroke.

Info :

If you look from above, the seams are located where the arrows indicate.

Info :

Done! Let's twist and turn!! And also to develop imagination, fine motor skills and simply distract yourself from the outside world and calm down. I hope you enjoyed the process! Happy crocheting!

Assembly Instructions

  • Sew three triangles together along their edge seams to form a pyramind: align triangle edges and use a blunt-end needle with white yarn, sewing into the back half-loops and leaving an opening to add filler before fully closing.
  • Fill each pyramid firmly but evenly with polyester filler through the opening, then finish sewing the seam and hide the yarn tail inside before fastening off.
  • Make six pyramids total and pair them into three parts by sewing Pyramid A to Pyramid B along the seam formed during pyramid sewing, aligning the red-stroke area shown in the photos.
  • Assemble the three parts together following the photo layout and sew along the indicated lines so the seams meet where the arrows point, creating the final flexagon shape.
  • Use the seam formed when sewing the pyramids as your guide for placement so the flexagon will fold and twist properly once all seams are sewn and reinforced.

Important Notes

  • πŸ’‘Use stitch markers or a scrap thread to mark triangle tops to ensure corners line up consistently when sewing pyramids.
  • πŸ’‘Stuff pyramids gradually and check the shape before finishing the seam so you end up with evenly rounded pyramids.
  • πŸ’‘Sew using the back half-loop seam as instructed for a neat visible edge and secure joins that allow the flexagon to move smoothly.
  • πŸ’‘Keep long tails when cutting yarn and weave them inside the pyramids to hide ends and secure the joins.
  • πŸ’‘Work consistently with the same hook and tension across all triangles to ensure the pyramids match in size and the flexagon assembles correctly.

This colorful Crochet Flexagon is a small handmade toy full of tactile fun and clever geometry. 🧢 It folds, flips and surprises β€” perfect for play, fidgeting, or as a handmade gift to delight someone special. 🎁 Enjoy the bright color combinations and the meditative rhythm of sewing the pyramids together β€” happy crocheting! ✨

You ask,

we answer.

FAQs

What size will the finished piece be?

The size of the finished toy from the indicated materials is approximately 15 cm across when assembled, using the recommended hook and yarn.

Can I use different yarn weights for this pattern?

Yes, you can use a different yarn weight, but the final size and the number of stitches per triangle will change; choose an appropriate hook and make a gauge test to maintain consistent pyramid sizes.

Do I need prior crochet experience for this pattern?

This pattern is rated intermediateβ€”basic knowledge of single crochet, decreases and rowing is recommended for best results.

How long does this project typically take to complete?

Most crocheters finish this project in about 5-7 hours, depending on experience, sewing speed, and how many color changes you do.