🧶 Beautiful ✨ Detailed 💝 Adorable

Crochet Flexagon Amigurumi Pattern

Crochet Flexagon Amigurumi Pattern
4.5★ Rating
5-7 Hours Time Needed
2.0K Made This
✂️

Intermediate Level

Ideal for those with basic crochet experience, featuring slightly more advanced stitches and techniques to expand your skills.

⏱️

Weekend Treat

Takes 5-7 hours, making it an enjoyable project to finish over a couple of days.

🧸

Cute Companion

An adorable friend to cherish, handcrafted with love to bring comfort and joy for years to come.

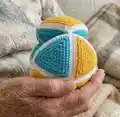
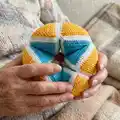
About This Crochet Flexagon Amigurumi Pattern

This pattern teaches you how to crochet a flexible hexagonal fidget toy (flexagon) built from small triangular pieces. You'll make 24 equilateral triangles, edge them, form pyramids and sew them together to create the moving toy. The instructions include shaping rows, edging, and clear assembly steps so you can reproduce the toy exactly.

Crochet Flexagon Amigurumi Pattern crochet pattern - detailed view of completed project

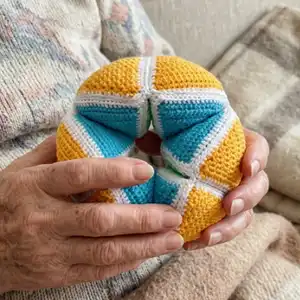
Perfect for makers who like small projects with assembly and hand-sewing. The finished toy is approximately 15 cm across using the recommended materials.

Why You'll Love This Crochet Flexagon Amigurumi Pattern

I absolutely love this pattern because it turns small simple crochet triangles into a clever, interactive toy you can twist and transform. I love how bright colors and a little edging turn basic pieces into a polished object. I enjoyed designing the assembly so each seam contributes to the final movement of the flexagon. I hope you feel the same delight when your piece starts to flex and fold — it is very satisfying to finish.

Crochet Flexagon Amigurumi Pattern step 1 - construction progress Crochet Flexagon Amigurumi Pattern step 2 - assembly progress Crochet Flexagon Amigurumi Pattern step 3 - details and accessories Crochet Flexagon Amigurumi Pattern step 4 - final assembly and finishing

Switch Things Up

I love how easy it is to change the character of this toy by swapping yarn colors — try a monochrome scheme or bold contrasting colors for different moods.

You can make the flexagon larger or smaller by changing yarn weight and hook size; bulky yarn with a larger hook yields a chunky, tactile version and fine yarn makes a mini keychain-sized flexagon.

I often add embroidered symbols or small appliques on each triangle to personalize faces or patterns for kids and friends.

Try a variegated yarn for the triangle body and a solid contrasting edge for a marbled effect that still reads clearly when assembled.

Use a cotton yarn for a firmer, more stable toy or a softer acrylic for a squishier feel and easier washing.

Experiment with adding a small loop and metal keyring to make a portable mini flexagon keychain version for jackets and backpacks.

You can change the edge stitch color to white for contrast or to match the body for a seamless, understated finish.

For a special sensory version, stitch tiny seed beads into the edge (securely) or use textured yarn for one color to introduce more tactile interest.

I sometimes add light stuffing variations — very firm for stable pyramids or slightly soft for a more squeezable toy depending on the recipient.

When sewing pieces, try different seams (invisible mattress stitch vs half cross) to see which gives the best movement and cleanest look for your materials.

Common Mistakes & How to Fix Them

✗ Not keeping consistent tension across rows; this can make triangle sides uneven, so maintain even tension and practice on a small swatch before making all pieces. ✗ Skipping stitch counts during shaping leads to misshapen triangles; count your stitches after each row and mark key points to ensure accuracy. ✗ Understuffing or overstuffing pyramids causes poor shape and instability; stuff gradually and use small amounts until the pyramid holds shape without bulging. ✗ Rushing the edge row or changing hook size will affect final size and fit when joining; use the recommended hook and finish all triangles with the same tension to ensure consistent seams. ✗ Failing to pin or align pieces before sewing results in misaligned seams; always pin or hold pieces in the intended position and check alignment before stitching.

Crochet Flexagon Amigurumi Pattern

Make a playful crochet flexagon — a handheld, twistable fidget toy made from small crocheted pyramids. This pattern guides you through crocheting equilateral triangle pieces, edging them, assembling pyramids and joining the parts into a working flexagon. It is a fun project that builds fine motor skills and makes a delightful gift or desk toy.

Intermediate 5-7 Hours

Materials Needed for Crochet Flexagon Amigurumi Pattern

— Main Fabric

  • 01
    YarnArt Jeans 33 (blue)
  • 02
    YarnArt Jeans 77 (orange)
  • 03
    YarnArt Jeans 60 (light green)
  • 04
    YarnArt Jeans 35 (yellow)
  • 05
    Alize Cotton Gold 55 (white)

— Tools Required

  • 01
    Crochet hook No 2 (approx 2.0 mm)
  • 02
    Holofiber filler (polyester stuffing)
  • 03
    Sewing needle / yarn needle
  • 04
    Blunt-end needle (tapestry needle) for assembly
  • 05
    Scissors

Progress Tracker

0% Complete

— Equilateral triangle :

Info :

Note! How to make a single crochet decrease: Insert hook into the indicated stitch. Yarn over and pull up a loop. (2 loops on the hook.) Insert hook into the next stitch. Yarn over and pull up a loop. (3 loops on the hook.) Yarn over, pull through all 3 loops on the hook.

Info :

Make 6 triangles of yellow, orange, light green and blue. You should have 24 triangles in total.

Round 1 :

17 ch, from the second stitch from the hook - 16 sc, ch, turn (16)

Round 2 :

dec, 12 sc, dec, ch, turn (14)

Round 3 :

14 sc, ch, turn (14)

Round 4 :

dec, 10 sc, dec, ch, turn (12)

Round 5 :

12 sc, ch, turn (12)

Round 6 :

dec, 8 sc, dec, ch, turn (10)

Round 7 :

10 sc, ch, turn (10)

Round 8 :

dec, 6 sc, dec, ch, turn (8)

Round 9 :

8 sc, ch, turn (8)

Round 10 :

dec, 4 sc, dec, ch, turn (6)

Round 11 :

6 sc, ch, turn (6)

Round 12 :

dec, 2 sc, dec, ch, turn (4)

Round 13 :

4 sc, ch, turn (4)

Round 14 :

2 dec, ch, turn (2)

Round 15 :

dec (1)

Info :

Fasten off, cut the thread.

Info :

Attach the white thread to any of the sides of the triangle and work with sc along the edge, in the tops of the triangle - 3 sc in one stitch. Finish with a needle (see photo) and fasten the thread from the inside. You should have - (14 sc - on the side, 3 sc - at the top) *3 (51)

— Pyramids :

Info :

Now you need to assemble the pyramids from the triangles. To do this, take a needle with a blunt end (or another one that is convenient for you), and sew 3 (!!!!) pyramids with white (or the color that you worked with) yarn according to the following schemes.

Info :

Sew with an Half Cross stitch seam for the back half-loops. Fill with filler.

Info :

You should get 3 of pyramids A and 3 of pyramids B.

Item Name (P1) :

PYRAMID A: assemble 3 triangles as shown in the photo to form one filled pyramid (see pictures for color arrangement).

Item Name (P2) :

PYRAMID B: assemble 3 triangles as shown in the photo to form one filled pyramid (see pictures for color arrangement).

— Assembly :

Round 1 :

You should get 3 of pyramids A and 3 of pyramids B. Now you can start assembling the flexagon.

Round 2 :

Connect pyramid A and pyramid B (see photo) - sew in the place indicated by a stroke.

Round 3 :

Use the seam formed when sewing the pyramids. Make 3 parts, each part consists of 2 pyramids.

Round 4 :

Assembly the parts in the way as shown in the next photo and sew along the line that is indicated by a stroke.

Round 5 :

If you look from above, the seams are located where the arrows indicate.

Info :

Done! Let's twist and turn!! And also to develop imagination, fine motor skills and simply distract yourself from the outside world and calm down. I hope you enjoyed the process! Happy crocheting!

Assembly Instructions

  • Attach the white thread to any side of each triangle and work single crochet along the edge; place 3 sc at each triangle tip so final edging is (14 sc - side, 3 sc - top) x3 (51).
  • Sew three edged triangles together to form a filled pyramid using a blunt-end needle; use a Half Cross stitch seam catching the back loops for a neat ridge and fill the pyramid with holofiber filler before fully closing.
  • Make three Pyramid A sets and three Pyramid B sets following the color arrangement photos, so you have 6 pyramids total.
  • Pair one Pyramid A with one Pyramid B and sew them together along the seam indicated in the photo, using the seam formed when sewing the pyramids to guide placement.
  • Create three parts total (each part is two sewn pyramids), then sew these three parts together along the indicated lines to form the flexagon ring.
  • Pin pieces and check seam alignment from above to ensure the seams line up with the arrows shown before final stitching.

Important Notes

  • 💡You can use any yarn and a suitable hook, but keep the same yarn type and hook across pieces for consistent size and fit.
  • 💡The size of the finished toy from the indicated materials is approximately 15 cm.
  • 💡Write down color swaps if you change the palette to remember which triangle belongs to which pyramid during assembly.
  • 💡Sew seams using a blunt-end tapestry needle and a Half Cross stitch for back loop seams to get a clean, durable join.

This delightful crochet flexagon combines geometry, color and playful motion into a compact handmade toy. It is a wonderful little gift and a calming fidget toy for kids and adults alike. Twist, flip and enjoy the tactile satisfaction — happy crocheting! 🧶😊

You ask,

we answer.

FAQs

What size will the finished piece be?

The size of the finished toy from the indicated materials is approximately 15 cm across.

Can I use different yarn weights for this pattern?

Yes, you can use a different yarn weight but the final size will change; choose an appropriate hook for the yarn and keep the same yarn and hook across all triangles for consistent results.

Do I need prior crochet experience for this pattern?

This pattern is rated intermediate — basic knowledge of single crochet, decreases and sewing pieces together is recommended for best results.

How long does this project typically take to complete?

Most makers finish this project in about 5-7 hours depending on experience, color changes and assembly time.