๐Ÿงถ Beautiful โœจ Detailed ๐Ÿ’ Adorable

Crochet Emotional Support Pickle Amigurumi Pattern

Crochet Emotional Support Pickle Amigurumi Pattern
4.5โ˜… Rating
2-4 Hours Time Needed
3.6K Made This
โœ‚๏ธ

Intermediate Level

Ideal for those with basic crochet experience, featuring slightly more advanced stitches and techniques to expand your skills.

โฑ๏ธ

Bite-Sized Project

Finishes in 2-4 hoursโ€”perfect for an afternoon of creative relaxation.

๐Ÿงธ

Cute Companion

An adorable friend to cherish, handcrafted with love to bring comfort and joy for years to come.

About This Crochet Emotional Support Pickle Amigurumi Pattern

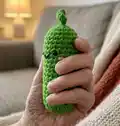
This pattern creates a tiny Emotional Support Pickle amigurumi approximately 12 cm tall, complete with a curled stem, safety eyes, embroidered mouth, and tiny hands. It uses continuous rounds worked in the round from a magic ring, with shaping by increases and invisible decreases. The pattern includes clear photos and step-by-step guidance for sewing the face and closing the body neatly.
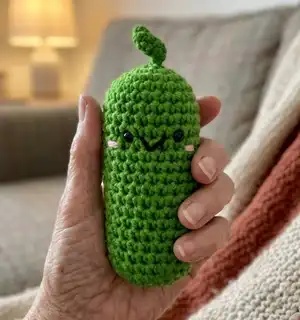
Crochet Emotional Support Pickle Amigurumi Pattern crochet pattern - detailed view of completed project

Perfect as a small gift or pocket companion, the finished pickle is compact and cheerful. You get full stitch instructions, placement notes for eyes and mouth, and a printable sign template suggestion.

Why You'll Love This Crochet Emotional Support Pickle Amigurumi Pattern

I absolutely love this pattern because it turns a few simple stitches into a character with so much personality. The curled stem and tiny hands give the pickle a playful charm that always makes me smile. I enjoy the balance of shaping and simple finishing techniquesโ€”it is satisfying to see the piece take shape quickly. This design is also wonderfully portable to make on the go and makes a heartfelt handmade gift in just a few hours.

Crochet Emotional Support Pickle Amigurumi Pattern step 1 - construction progress Crochet Emotional Support Pickle Amigurumi Pattern step 2 - assembly progress Crochet Emotional Support Pickle Amigurumi Pattern step 3 - details and accessories Crochet Emotional Support Pickle Amigurumi Pattern step 4 - final assembly and finishing

Switch Things Up

I love how easily you can customize this pattern by changing colors; try pastel greens for a softer look or variegated yarn for a fun textured effect.

I sometimes make a tiny keyring loop before finishing to turn the pickle into a portable charm you can carry on bags or keys.

If you want a larger version, use a bulkier cotton yarn and a larger hook which will give you a plush, huggable pickle.

To make a mini version for charms, use finer yarn and a smaller hook for a delicate, pocket-sized friend.

I like to add embroidered freckles or different mouth shapes to change the pickleโ€™s expression and personality.

Try sewing tiny felt accessories like a tiny bow or hat for seasonal variations and playful gifting options.

For a sturdier poseable friend, insert a short length of craft wire inside the stem or hands so they hold a pose.

Swap the safety eyes for embroidered eyes if you are making a toy for very small children and want a fully soft toy option.

I sometimes pair a different colored hand for a quirky lookโ€”one bright yellow hand can be a whimsical accent.

For gifting, print different sign messages or handwrite notes and glue them on small cardstock to change the sentiment.

If you want an extra glossy finish on the eyes, add a tiny dab of clear craft varnish to safety eyes to make them pop.

Experiment with different stuffing levels to make your pickle firmer or softer depending on how squishy you want it to be.

Common Mistakes & How to Fix Them

โœ— Skipping a stitch marker when working continuous rounds causes you to lose the start of the round; place a marker at the start of each round and move it up after each round to stay oriented. โœ— Forgetting to stuff gradually results in lumps or a collapsed shape; add stuffing little by little, shaping as you go to keep even distribution and a smooth finish. โœ— Not counting increases and decreases precisely will make the body shape uneven; count your stitches after every shaping round and check totals against the pattern table. โœ— Pulling the slip stitch too tight when closing the magic ring can distort the stem; follow the guide to pull the two strings on the hook tight so the sl st is small but do not crush the stem, allowing it to curl naturally. โœ— Using the wrong loop for invisible decreases will leave obvious seams; learn and practice the front-loop-only invisible decrease method shown so decreases sit neatly and invisibly.
Crochet Emotional Support Pickle Amigurumi Pattern

Make a sweet, squeezable Emotional Support Pickle you can gift or keep for comfort. This compact amigurumi uses simple rounds and small pieces to create a friendly pickle complete with a curled stem, embroidered smile, and tiny hands. The pattern gives clear step-by-step instructions, placement guides for eyes and mouth, and finishing tips to help you get a neat, professional result.

Intermediate 2-4 Hours

Materials Needed for Crochet Emotional Support Pickle Amigurumi Pattern

โ€” Main Fabric

  • 01
    5 Ply Cotton Yarn (Green) - main color for body and stem
  • 02
    Black yarn (2-ply recommended) - for sewing mouth
  • 03
    Pink yarn - small amount for cheeks
  • 04
    Additional scrap yarn for hands and small details

โ€” Tools Required

  • 01
    3.5 mm crochet hook
  • 02
    Stuffing (polyester fiberfill)
  • 03
    Hot melt glue
  • 04
    Yarn needle for sewing and weaving in ends
  • 05
    Stitch marker
  • 06
    Scissors
  • 07
    6mm diameter safety eyes (2 pieces)
  • 08
    Printer and 5"x7" card to print the sign

Progress Tracker

0% Complete

โ€” Stem and Body :

Info :

Start with a magic circle Ch7 in MR(pic.1). Grab the top loop of the 2nd chain to make a sc(pic.2). Continue making 5sc (pic.3). Donโ€™t press the stem. Make it curl naturally. Make a sl st in MR and pull the two strings on the hook tight, so that the sl st will be smaller. (page 4) Ch1 as turning chain (pic.4) The sl st and turning ch do not count as stitches. Then making the body.

Round 1 :

MR of 6sc (6)

Round 2 :

6 inc (12)

Round 3 :

(sc, inc)*6 (18)

Round 4 :

(sc, inc, sc)*6 (24)

Round 5-11 :

24sc (24)

Info :

Place eyes and sew mouth & cheeks. (page 7-9) Body Part 2 in page 9.

โ€” Body :

Round 12-21 :

24sc (24)

Info :

Stuff the body as you work; begin stuffing before the decrease rounds to hold shape.

Round 22 :

(sc, dec, sc)*6 (18)

Round 23 :

(sc, dec)*6 (12)

Round 24 :

3 dec (9)

Info :

Make a sl st. Stuffing a little more. Leave about 15cm (5.9inches) and cut yarn. Pass the needle through the front loops of all 9 stitches and pull tight to close the hole, then weave in the tail end.

โ€” Place eyes, sew mouth and cheek :

Item Name (P1) :

Eyes are placed between R8-R9. There are 3 holes between the eyes.

Item Name (P2) :

Use 2 ply black yarn to sew mouth.

Item Name (P3) :

Needle out from the first hole between eyes.

Item Name (P4) :

Needle in from the 3rd hole between eyes.

Item Name (P5) :

Needle out from the middle hole of 1 row below.

Item Name (P6) :

Needle under the black yarn to secure shape of mouth.

Item Name (P7) :

Pull the yarn down to a โ€œVโ€ shape.

Item Name (P8) :

Needle in from the same middle hole of 1 row below. Use yarn tails to tie a double knots inside.

Item Name (P9) :

Use pink yarn to sew cheeks on both sides.

โ€” Hand*2 :

Item Name (P1) :

Ch 8, go into the 3rd stitch from the hook and do 6dc, ch1, leave long tail and cut yarn. Sew them on the body.

Info :

Print sign on card and glue it on the body. I print the sign file on 5"*7" card and cut each sign.

Assembly Instructions

  • Place eyes between rounds 8-9, leaving three holes between them, and insert 6mm safety eyes securely before stuffing further.
  • Sew the mouth with 2-ply black yarn following the needle path: out from the first hole between the eyes, into the third hole, out from the middle hole one row below, then secure with knots inside.
  • Sew the two hands to the sides of the body, positioning them so they hold the printed sign; use the long tails from the hands to secure them tightly.
  • Close the bottom hole by passing a needle through the front loops of all 9 remaining stitches, pull tight to close, tie securely and weave in the tail ends.
  • Print the sign on 5" x 7" card, cut each sign, then glue the card sign to the body and use a small dab of hot melt glue if needed for extra hold.

Important Notes

  • ๐Ÿ’กWhen working in the round, start with a magic circle and crochet continuously without joining with a slip stitch to avoid an inaeesthetic seam; use a stitch marker to track the beginning of the round.
  • ๐Ÿ’กUse the front-loop invisible decrease method shown in the photos for a neat finish; practice on a small swatch if you are unfamiliar with front-loop decreases.
  • ๐Ÿ’กDo not press the stem flat as you crochet it; allow it to curl naturally so the final stem has a nice spiral shape.
  • ๐Ÿ’กStuff gradually and adjust stuffing before finishing decreases to maintain a smooth shape and prevent lumps.

This little Emotional Support Pickle is made to bring smiles and a bit of comfort in your pocket. Handmade with simple stitches and a cheerful face, it makes an easy, meaningful gift. Keep one for yourself or make a batch to share smiles with friends and family. ๐Ÿงถ๐Ÿ˜Š

You ask,

we answer.

FAQs

What size will the finished piece be?

The finished amigurumi measures approximately 12 cm (4.7 inches) in height and about 5 cm (1.96 inches) in diameter using the recommended yarn and 3.5 mm hook.

Can I use different yarn weights for this pattern?

Yes, you can use a different yarn weight but the finished size will change; choose a suitable hook for your yarn and expect a larger or smaller pickle accordingly.

Do I need to know how to make invisible decreases?

You should be comfortable with an invisible decrease technique; the pattern includes photo instructions and guidance for making front-loop invisible decreases for a neat finish.

How long does this project typically take?

Most crocheters complete this project in 2-4 hours, though time may vary based on experience level and whether you sew on details carefully.