🧢 Beautiful ✨ Detailed πŸ’ Adorable

Crochet Beret Pattern

Crochet Beret Pattern
4.0β˜… Rating
1-2 Hours Time Needed
3.6K Made This
βœ‚οΈ

Beginner Friendly Level

Perfect for those just starting their crochet journey, with clear instructions and simple techniques

⏱️

Quick Make

Complete in under 2 hoursβ€”lightning fast fun for instant gratification and quick gifts.

πŸ‘•

Casual Chic

Relaxed style with a modern twist, perfect for everyday wear while maintaining that handcrafted uniqueness.

About This Crochet Beret Pattern

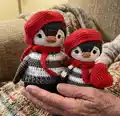
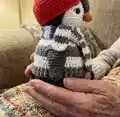
This pattern creates a small crocheted beret intended to fit the big penguin in the matching amigurumi set. It uses simple single crochet rounds with increases and decreases to form the beret shape. The instructions are worked in continuous rounds and include a small finishing loop made from the starting tail.

Crochet Beret Pattern crochet pattern - detailed view of completed project

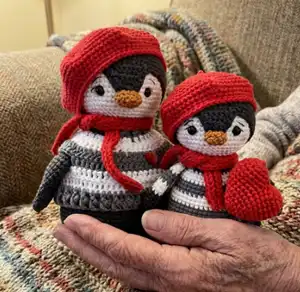
Worked in YarnArt Jeans with a 2 mm hook, the beret is quick to crochet and makes a sweet accessory. Clear round-by-round instructions and finishing tips are included for an easy make.

Why You'll Love This Crochet Beret Pattern

I absolutely love this pattern because it turns a few simple rounds into a charming, wearable accessory that adds instant personality to your penguin. I enjoy how quickly the beret comes together β€” you can see progress fast and finish in one sitting. The finishing loop made from the starting tail is a clever little detail I personally find very satisfying. I also love that this pattern uses basic stitches, making it accessible yet rewarding for newer crocheters.

Crochet Beret Pattern step 1 - construction progress Crochet Beret Pattern step 2 - assembly progress Crochet Beret Pattern step 3 - details and accessories Crochet Beret Pattern step 4 - final assembly and finishing

Switch Things Up

I love customizing this beret by changing colors; try bright reds, pastels, or even striped combinations to match your penguin's outfit.

If you want a larger beret, I change yarn weight and use a bigger hook; switching to a bulkier yarn and a larger hook creates a fluffier, oversized look.

I sometimes add a tiny pompom to the top by using leftover yarn for a playful finishing touch that children adore.

For a sleeker finish, I block the beret lightly and steam it into shape so the brim sits perfectly around the head.

I also enjoy embroidering small motifs, like hearts or stars, onto the beret for seasonal variation or to personalize gifts.

To make a mini beret for a keychain or small toy, I use thinner yarn and a smaller hook and follow the same rounds until the desired size is reached.

I experiment with textured stitches in place of plain sc to give the beret a different fabric feelβ€”try a puff or shell stitch for variety.

If I want the beret to stay on more securely, I sew a couple of tiny stitches into the penguin's head lining to anchor it discreetly.

I sometimes add a small decorative button or ribbon at the brim for a vintage-inspired look that adds character.

Don't be afraid to mix techniques: adding a crocheted flower, small tassel, or contrasting trim can turn a simple beret into a signature accessory I love gifting.

Common Mistakes & How to Fix Them

βœ— Not leaving a long starting tail; make sure to leave a long tail at the beginning so you can make the finishing loop and weave in ends easily. βœ— Missing stitch counts after increases can cause sizing issues; count your stitches at the end of each round to ensure you match the totals listed. βœ— Working in joined rounds instead of continuous rounds can create a visible seam; use continuous rounds as instructed to keep the fabric seamless and neat. βœ— Using the wrong hook size for the beret will affect the fit; use a 2 mm hook for the beret and use a size up from your main penguin hook if required.

Crochet Beret Pattern

Make a charming crochet beret designed especially for the big penguin in this pattern. You will work in continuous rounds using simple single crochet increases and decreases to shape the classic beret silhouette. This quick, satisfying project uses YarnArt Jeans and a 2 mm hook for a neat, tidy finish. Perfect for adding a handmade hat to your amigurumi collection or gifting a tiny wardrobe upgrade.

Beginner Friendly 1-2 Hours

Materials Needed for Crochet Beret Pattern

β€” Main Fabric

  • 01
    YarnArt Jeans (160 m / 50 g), color 90 (red) - one 50 g skein (small amount required)

β€” Tools Required

  • 01
    Crochet hook 2 mm
  • 02
    Needle
  • 03
    Stitch marker
  • 04
    Scissors

Progress Tracker

0% Complete

β€” Materials :

Info :

Yarn: YarnArt Jeans (160 m/50 g) color 90 (red). Crochet hook 2 mm. Needle, stitch marker, scissors.

β€” Abbreviations :

Infos :

mr - magic ring. sc - single crochet. inc - increase. dec - decrease. st, sts - stitch, stitches. ch - chain. sl st - slip stitch. (..) - total number of stitches in round. (..) x times - repeat the instruction in brackets x times. In this pattern we use US terminology.

β€” Notes :

Info :

Work in continuous rounds. For the penguins and berets you will need 2 different hook sizes. Use a size up from the main hook you are using, i.e. if you are using a 1.75 mm hook for the penguins, use a 2 mm hook for the berets. I have used the 'x' stitch.

β€” Beret for big penguin :

Info :

Leave a long starting tail

Round 1 :

6 sc in mr (6)

Round 2 :

6 inc (12)

Round 3 :

(1 sc, inc) x 6 (18)

Round 4 :

(2 sc, inc) x 6 (24)

Round 5 :

(3 sc, inc) x 6 (30)

Round 6 :

(4 sc, inc) x 6 (36)

Round 7 :

(5 sc, inc) x 6 (42)

Round 8 :

(6 sc, inc) x 6 (48)

Round 9 :

(7 sc, inc) x 6 (54)

Round 10 :

(8 sc, inc) x 6 (60)

Round 11 :

(9 sc, inc) x 6 (66)

Round 12 :

(10 sc, inc) x 6 (72)

Round 13 :

(11 sc, inc) x 6 (78)

Round 14-16 :

(78) 3 rounds

Round 17 :

(11 sc, dec) x 6 (72)

Round 18 :

(10 sc, dec) x 6 (66)

Round 19 :

(9 sc, dec) x 6 (60)

Round 20 :

(18 sc, dec) x 3, sl st (57)

Info :

Cut the thread, weave it in.

Info :

Using a long starting tail make ch6 and starting in the 2nd ch from the hook crochet 5 sl st along the chain. Weave the thread in (see pic. 1-3).

Assembly Instructions

  • Leave a long starting tail at the beginning of the beret as instructed; this tail is used to make the small finishing loop and to help secure the top.
  • Using the long starting tail make ch6 and starting in the 2nd ch from the hook crochet 5 sl st along the chain to form the small loop; weave the thread in securely.
  • After completing Round 20, cut the thread and weave in the ends thoroughly so the beret sits neat and tidy on the penguin's head.
  • Use a 2 mm hook for the beret as recommended and, if making for the penguin, choose a slightly larger hook than used for the penguin body so the beret fits comfortably.

Important Notes

  • πŸ’‘Work in continuous rounds to avoid visible seams and ensure a smooth look on the beret.
  • πŸ’‘Leave a long starting tail so you can create the finishing chain loop and weave in ends as described in the instructions.
  • πŸ’‘Use a hook one size larger for the beret than for the penguin body to ensure the hat fits over the head smoothly.
  • πŸ’‘Count stitches at the end of each round to ensure you match the stitch totals provided and maintain the correct shape.

This sweet little beret adds instant charm to your penguin amigurumi and is quick to crochet! 🧢 Worked in simple rounds with clear stitch counts, it is perfect for a last-minute handmade finishing touch. πŸŽ€ Have fun personalizing colors and small details to make each beret special. 😊

You ask,

we answer.

FAQs

What size will the finished beret be?

The finished beret is sized to fit the big penguin from the matching pattern; exact measurements depend on your tension and yarn, but it is designed using YarnArt Jeans and a 2 mm hook for the intended fit.

Can I use a different yarn or hook size?

Yes, you can change yarn and hook size, but this will affect the final size; if you want a larger beret use a thicker yarn and larger hook, and adjust rounds if necessary.

Do I need experience to make this beret?

This pattern is beginner friendly and uses basic stitches (single crochet, increases, decreases); familiarity with working in continuous rounds is helpful.

How long does it typically take to crochet the beret?

This is a quick make and typically finishes within 1-2 hours depending on your speed and familiarity with the stitches.