🧢 Beautiful ✨ Detailed πŸ’ Adorable

Crochet beret Pattern

Crochet beret Pattern
4.3β˜… Rating
1-2 Hours Time Needed
2.2K Made This
βœ‚οΈ

Beginner Friendly Level

Perfect for those just starting their crochet journey, with clear instructions and simple techniques

⏱️

Quick Make

Complete in under 2 hoursβ€”lightning fast fun for instant gratification and quick gifts.

πŸ‘•

Casual Chic

Relaxed style with a modern twist, perfect for everyday wear while maintaining that handcrafted uniqueness.

About This Crochet beret Pattern

This pattern creates a small crocheted beret designed to fit the big penguin from the same collection. It uses simple single crochet rounds with increases and decreases to shape the crown and brim. The pattern is compact and quick to work up, making it perfect for adding a cute hat to your amigurumi.
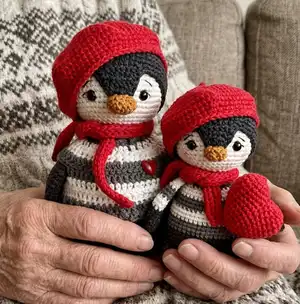
Crochet beret Pattern crochet pattern - detailed view of completed project

Follow the clear round-by-round instructions and finish with a small chain loop and slip stitch finishing. Ideal for crocheters looking for a fast, satisfying accessory project.

Why You'll Love This Crochet beret Pattern

I absolutely love this pattern because it turns a few simple rounds into a charming accessory that instantly gives personality to the penguin. I love how quick it is to make β€” you can finish a beret in a short sitting and still feel proud of the result. The shaping is elegant yet straightforward, so I can customize colors and sizes easily. I also enjoy that the finishing (a short chain and slip stitches) gives a cute top loop that looks professional and handmade.

Crochet beret Pattern step 1 - construction progress Crochet beret Pattern step 2 - assembly progress Crochet beret Pattern step 3 - details and accessories Crochet beret Pattern step 4 - final assembly and finishing

Switch Things Up

I love customizing this beret by changing yarn colors to match holidays or characters; swapping red for pastels creates a completely different mood.

I sometimes make the beret larger or smaller by using a different hook size and adding or removing rounds to adjust the circumference.

I often add a small pompom or embroidered star on top for a playful touch that makes each beret unique.

I recommend trying textured yarn or a boucle for a fluffy, cozy beret β€” it creates a lovely surface contrast with smooth amigurumi bodies.

For a snugger fit, I make the brim a couple of rounds tighter or work fewer increases near the edge so the beret hugs the head more.

I like to embroider tiny motifs or sew on buttons to match outfits, which turns a simple beret into a themed accessory.

If I want a more vintage look, I lengthen the brim and add a decorative edge with reverse single crochet or picot stitches.

I sometimes line the beret with a small felt circle glued inside for extra shape and stability if I want a very structured hat.

To make matching sets, I crochet a scarf or mittens in the same yarn and color, which makes a lovely gift bundle for the penguin family.

I also experiment with combining two yarn colors held together for a marled effect, giving the beret a richer, deeper appearance.

Common Mistakes & How to Fix Them

βœ— Skipping the instruction to leave a long starting tail can make finishing and creating the top loop difficult; always leave a generous starting tail to use for the chain and finishing. βœ— Not working in continuous rounds can create visible seams and misaligned stitches; use a stitch marker and work continuously to maintain an even surface. βœ— Changing hook sizes mid-project without adjusting tension will affect the final size; use the recommended larger hook for the beret if your main project uses a smaller hook. βœ— Forgetting to weave in the ends and trim them properly can cause the beret to unravel or look untidy; cut the thread and weave it in securely as the pattern instructs.
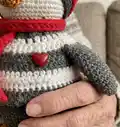
Crochet beret Pattern

Make a charming little beret perfect for the big penguin in this free crochet pattern. You will enjoy a quick, focused project that adds personality to your amigurumi. The pattern uses simple rounds and clear finishing instructions so you can complete it with confidence. Ideal for gift-making or to match your handmade penguin collection.

Beginner Friendly 1-2 Hours

Materials Needed for Crochet beret Pattern

β€” Main Fabric

  • 01
    YarnArt Jeans (160 m/50 g), color 90 (red)

β€” Tools Required

  • 01
    Crochet hook 2 mm
  • 02
    Smaller hook for penguins 1.75 mm (if making penguins as noted)
  • 03
    Needle
  • 04
    Stitch marker
  • 05
    Scissors

Progress Tracker

0% Complete

β€” Materials :

Info :

1. Yarn: YarnArt Jeans (160 m/50 g) color 90 (red). 2. Crochet hook 2 mm. 3. Needle, stitch marker, scissors.

β€” Abbreviations :

Infos :

mr - magic ring. sc - single crochet. inc - increase. dec - decrease. st, sts - stitch, stitches. ch - chain. sl st - slip stitch. (..) - total number of stitches in round. (..) x times - repeat the instruction in brackets x times. In this pattern we use US terminology.

β€” Notes :

Info :

Work in continuous rounds. For the penguins and berets you will need 2 different hook sizes. Use a size up from the main hook you are using, i.e. if you are using a 1.75 mm hook for the penguins, use a 2 mm hook for the berets. I have used the 'x' stitch.

β€” Beret for big penguin :

Info :

Leave a long starting tail

Round 1 :

6 sc in mr

Round 2 :

6 inc (12)

Round 3 :

(1 sc, inc) x 6 (18)

Round 4 :

(2 sc, inc) x 6 (24)

Round 5 :

(3 sc, inc) x 6 (30)

Round 6 :

(4 sc, inc) x 6 (36)

Round 7 :

(5 sc, inc) x 6 (42)

Round 8 :

(6 sc, inc) x 6 (48)

Round 9 :

(7 sc, inc) x 6 (54)

Round 10 :

(8 sc, inc) x 6 (60)

Round 11 :

(9 sc, inc) x 6 (66)

Round 12 :

(10 sc, inc) x 6 (72)

Round 13 :

(11 sc, inc) x 6 (78)

Round 14-16 :

(78) 3 rounds

Round 17 :

(11 sc, dec) x 6 (72)

Round 18 :

(10 sc, dec) x 6 (66)

Round 19 :

(9 sc, dec) x 6 (60)

Round 20 :

(18 sc, dec) x 3, sl st (57)

Info :

Cut the thread, weave it in.

Info :

Using a long starting tail make ch6 and starting in the 2nd ch from the hook crochet 5 sl st along the chain. Weave the thread in (see pic. 1-3).

Assembly Instructions

  • Leave a long starting tail at the beginning of the beret to create the finishing chain and loop as shown in the pattern.
  • After completing round 20, cut the thread and weave it in securely to finish the hat neatly.
  • Using the long starting tail make ch6 and starting in the 2nd ch from the hook crochet 5 sl st along the chain, then weave the thread in (see pictures 1-3 for reference).
  • When making the penguins and berets together use two hook sizes: use a slightly larger hook (for example 2 mm) for the beret if your penguin body uses a smaller hook (for example 1.75 mm) to ensure fit and proportion.

Important Notes

  • πŸ’‘Work in continuous rounds to avoid visible seams and to maintain consistent stitch flow.
  • πŸ’‘For the penguins and berets you will need 2 different hook sizes; use a size up for the beret compared to the penguin body hook.
  • πŸ’‘Leave a long starting tail to create the short chain loop and finishing slip stitches for a neat top detail.
  • πŸ’‘Weave in ends neatly after finishing to secure the beret and prevent unravelling.

This sweet little beret adds instant charm to your handmade penguin and makes a delightful finishing touch. 🎩 Handy, quick to crochet, and endlessly customizable, it is a great small project for gifting or matching your amigurumi set. 🧢 Enjoy crafting and styling your penguin with this cosy accessory β€” happy crocheting! ✨

You ask,

we answer.

FAQs

What size will the finished piece be?

The beret is sized to fit the big penguin from the same pattern collection; final size depends on yarn and hook tension but is designed for the amigurumi shown.

Can I use different yarn weights for this pattern?

Yes, but changing yarn weight will alter the final size and drape; choose an appropriate hook and expect the beret to be larger or smaller accordingly.

Do I need prior crochet experience for this pattern?

This pattern is beginner friendly and uses basic stitches (sc, inc, dec, sl st); basic knowledge of crochet in the round is helpful for best results.

What hook sizes should I use for the penguin and beret?

The pattern suggests using a size up for the beret compared to the penguin; for example, if you use 1.75 mm for the penguin, use 2 mm for the beret to achieve the correct fit.