🧢 Beautiful ✨ Detailed πŸ’ Adorable

Cozy Snake Amigurumi Pattern

Cozy Snake Amigurumi Pattern
4.2β˜… Rating
5-7 Hours Time Needed
2.7K Made This
βœ‚οΈ

Intermediate Level

Ideal for those with basic crochet experience, featuring slightly more advanced stitches and techniques to expand your skills.

⏱️

Weekend Treat

Takes 5-7 hours, making it an enjoyable project to finish over a couple of days.

πŸ₯

Charming Critter

Delightful animal designs with sweet details that capture the essence of your favorite woodland and farmyard friends.

About This Cozy Snake Amigurumi Pattern

This pattern creates a soft plush snake worked in continuous rounds using plush yarn for a cuddly finish. It includes clear round-by-round instructions, simple increases and decreases, and striped color changes for a playful look. The long, flexible body is stuffed as you go so it keeps its shape and can be posed.
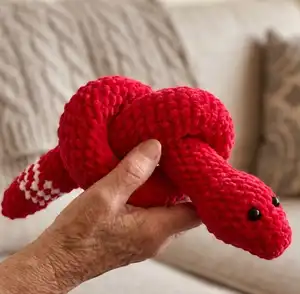
Cozy Snake Amigurumi Pattern crochet pattern - detailed view of completed project

You will learn to change colors for stripes and place safety eyes for the face. The pattern is written in rounds with helpful notes about stuffing and finishing.

Why You'll Love This Cozy Snake Amigurumi Pattern

I absolutely love this pattern because it turns simple stitches into a delightful, tactile toy that both kids and adults adore. I enjoy how the plush yarn creates a luxurious, squishy texture with very little effort. The striped color sections add personality, and I always find the color-play relaxing and fun to plan. Sewing the final hole closed and shaping the head gives such a satisfying finish that makes me proud to gift these little snakes.

Cozy Snake Amigurumi Pattern step 1 - construction progress Cozy Snake Amigurumi Pattern step 2 - assembly progress Cozy Snake Amigurumi Pattern step 3 - details and accessories Cozy Snake Amigurumi Pattern step 4 - final assembly and finishing

Switch Things Up

I love customizing this snake by changing the stripe colors to match holidays or room decor; it makes each version feel special and unique.

I sometimes make a mini keychain version by using thinner yarn and a smaller hook to create a tiny pocket pal with the same rounds scaled down.

For a chunkier, cuddlier snake I use a thicker chenille yarn and a larger hook; this gives a plush, huggable friend that is great for toddlers (with embroidered eyes instead of safety eyes).

I often add a felt tongue or small embroidered nostrils to give the snake more character without changing the construction at all.

Try adding wire along the core inside the snake for posable shaping if you want the snake to coil or hold poses on display.

If you prefer a more realistic look, use gradient colors or variegated yarn to create scale-like variations along the body.

I recommend testing eye placements before fastening them permanently; moving eyes a stitch or two can dramatically change the expression.

Experiment with different stuffing levelsβ€”less stuffing gives a floppy snake, while more stuffing gives a firmer, stick-like shape, so I adjust based on my intended use.

I also create sets of snakes in coordinated colors for gift bundles; each snake can have slightly different stripe spacing to make them distinct.

Finally, you can embroider small patterns or add tiny crocheted accessories like a scarf or hat to personalize your snake as a memorable handmade gift.

Common Mistakes & How to Fix Them

βœ— Not stuffing as you go can result in lumps or warped shaping; stuff gradually (a little at a time) while working so the body stays smooth and even. βœ— Skipping the eye placement step leads to misplaced eyes; insert safety eyes between rounds 5 and 6 as instructed before the head becomes too full to adjust. βœ— Pulling your tension too tight with plush yarn makes rounds stiff and uneven; maintain a relaxed, consistent tension to preserve the toy's squishy texture. βœ— Forgetting to close the final hole properly leaves a visible gap; use a yarn needle to pull the remaining stitches tight and weave in the tail securely.
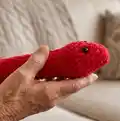
Cozy Snake Amigurumi Pattern

Make a soft, cuddly plush snake using plush chenille yarn and simple amigurumi techniques. This pattern guides you through rounds, color changes, and stuffing tips so your snake comes out smooth and shapely. Perfect as a handmade gift or a playful room accent, the snake features easy stripes and a friendly face. Follow the step-by-step rounds and assembly notes for a satisfying crochet project.

Intermediate 5-7 Hours

Materials Needed for Cozy Snake Amigurumi Pattern

β€” Main Fabric

  • 01
    Plush yarn (chenille or velvet plush) - main color (pink/red) approximately 50-100g depending on desired length
  • 02
    Plush yarn - contrasting white for stripe sections, small amount approximately 10-20g
  • 03
    Note: pattern uses alternating pink and white stripes as shown in rounds 85-89 and 90-96

β€” Tools Required

  • 01
    Crochet hook (size appropriate for plush chenille yarn - check yarn label)
  • 02
    Stuffing (polyester fiberfill)
  • 03
    Stitch Marker
  • 04
    Scissors

Progress Tracker

0% Complete

β€” Snake :

Info :

rnd = round Snake Pattern 4 ch, rotare, from second chain crochet:

Round 1 :

1 . 1 inc, sc, 2 inc, sc, inc (10)

Round 2 :

2. 10 sc

Round 3 :

3. (1 sc, inc, 1 sc, inc, 1 sc)*2 (14)

Round 4 :

4. 14 sc

Round 5 :

5. (1 sc, inc)*7 (21)

Round 6-9 :

6-9. 21 sc

Info :

Incert eyes between 5 and 6 rows

Round 10 :

10.(1 sc, 1 dec)*7 (14)

Info :

Stuff the snake as you go along

Round 11-84 :

11- 84. 14sc (14)

Round 85 :

85. white 14 sc (14)

Round 86 :

86. pink 14sc (14)

Round 87 :

87. white 14sc (14)

Round 88 :

88. pink 14sc (14)

Round 89 :

89. white 14sc (14)

Info :

Pink:

Round 90-91 :

90-91. 14 sc

Round 92 :

92. (5 sc, 1 dec)*2(12)

Round 93 :

93. 12 sc

Round 94 :

94. (2 sc, dec)*3 (9)

Round 95 :

95. 9 sc

Round 96 :

96. (1 sc, dec)*3 (6)

Info :

pull the hole tight

Assembly Instructions

  • Insert safety eyes between rounds 5 and 6, positioning them evenly on the head and securing according to the eye manufacturer instructions.
  • Stuff the snake gradually as you work, stuffing firmly but evenly from the head down through the body to maintain shape and avoid lumps.
  • Change colors for stripes at the rounds indicated (85-89 and 90-96) and weave in color change tails neatly inside the body to avoid loose ends.
  • Close the final opening by pulling the remaining stitches tight and using a yarn needle to sew the hole closed securely, then weave in the tail.
  • Adjust and shape the head and neck after stuffing to create the desired posture, smoothing the plush yarn surface with your hands.

Important Notes

  • πŸ’‘Do not forget to fill the inside of the toy tightly while making the toy; the filling process affects the final shape of the snake.
  • πŸ’‘Place safety eyes before the head becomes too full so you can position them correctly between rounds 5 and 6.
  • πŸ’‘Stuff the snake gradually as you go along to keep an even, smooth shape and prevent lumps or an overfilled long stick form.
  • πŸ’‘Use stitch markers to mark the beginning of each round when working in continuous rounds to keep track of stitch counts.

This soft plush snake pattern is perfect for cozy cuddles and playful decor, crafted in plush chenille for an irresistibly squishy feel. The striped color accents add personality while remaining easy to crochet with basic stitches. Make one as a gift or keep it as a cheerful handmade companion. 🐍🧢

You ask,

we answer.

FAQs

What size will the finished piece be?

The finished amigurumi measures approximately 20-30 cm long depending on how tightly you stuff it and the length you choose to crochet.

Can I use different yarn weights for this pattern?

Yes, you can use different yarn weights, but this will affect the final size and texture; choose an appropriate hook for your yarn and expect changes in proportion.

Do I need prior crochet experience for this pattern?

This pattern is rated intermediate, so basic knowledge of single crochet, increases, decreases, and working in rounds is recommended for best results.

How long does this project typically take to complete?

Most crocheters complete this project in 5-7 hours, though time may vary based on experience level, yarn choice, and stuffing pace.