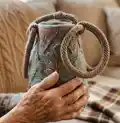
Make a stylish Corfu Bag with this detailed crochet pattern by Natalia Kononova. You will learn embossed front-post motifs, fish stripes and spiral cord handles to create a sturdy, decorative tote. The pattern includes charts, step-by-step photos and helpful notes so you can follow along confidently and create a beautiful handmade bag.
Progress Tracker
0% Complete
— Bag bottom :
Inc Rnd 1 :
With Yarn2 ch4, ss in 1st ch, ch2 (counts as dc), 8 dc in ch4-ring, ss in 2nd ch of beg ch-2. (9dc)
Inc Rnd 2 :
ch2 (doesn't count as st throughout bag bottom), F2i (in beg ch-2 from pr), 8 F2i, sk ch-2 (throughout bag bottom), ss (in 1st F throughout bottom). (18F)
Inc Rnd 3 :
ch2, F2i (in 1st F from pr (ignore ch-2) throughout bottom), F, [F2i, F]x8, ss. (27sts)
Inc Rnd 4 :
ch2, [2F, F2i]x9, ss. (36sts)
Inc Rnd 5 :
ch2, [F2i, 3F]x9, ss. (45sts)
Inc Rnd 6 :
ch2, 2F, [F2i, 4F]x8, F2i, 2F, ss. (54 sts)
Inc Rnd 7 :
ch2, 4F, [F2i, 5F]x8, F2i, F, ss. (63sts)
Inc Rnd 8 :
ch2, [6F, F2i]x9, ss. (72sts)
Inc Rnd 9 :
ch2, [F2i, 7F]x9, ss. (81sts)
Inc Rnd 10 :
ch2, 2F, [F2i, 8F]x8, F2i, 6F, ss. (90sts)
Inc Rnd 11 :
ch2, 4F, [F2i, 14F]x5, F2i, 10F, ss. (96sts)
Inc Rnd 12 :
ch2, 6F, [F2i, 15F]x5, F2i, 9F, ss. (102sts)
Inc Rnd 13 :
ch2, 8F, [F2i, 16F]x5, F2i, 8F, ss. (108sts)
Inc Rnd 14 :
ch2, 10F, [F2i, 17F]x5, F2i, 7F, ss. (114sts)
Inc Rnd 15 :
ch2, 12F, [F2i, 18F]x5, F2i, 6F, ss. (120sts)
Inc Rnd 16 :
ch2, 14F, [F2i, 19F]x5, F2i, 5F, ss. (126sts)
Inc Rnd 17 :
ch2, 16F, [F2i, 20F]x5, F2i, 4F, ss. (132sts)
Inc Rnd 18 :
ch2, 18F, [F2i, 21F]x5, F2i, 3F, ss. (138sts)
Inc Rnd 19 :
ch2, 20F, [F2i, 22F]x5, F2i, 2F, ss. (144sts)
Inc Rnd 20 :
ch2, 22F, [F2i, 23F]x5, F2i, F, ss. (150sts)
Inc Rnd 21 :
ch2, [24F, F2i]x6, ss. (156sts)
Inc Rnd 22 :
ch2, [F2i, 38F]x4, ss. (160sts)
Inc Rnd 23 :
ch2, 2F, [F2i, 39F]x3, F2i, 37F, ss. (164sts)
Inc Rnd 24 :
ch2, 4F, [F2i, 40F]x3, F2i, 36F, ss. (168sts)
Inc Rnd 25 :
ch2, 6F, [F2i, 41F]x3, F2i, 35F, ss. (172sts)
Inc Rnd 26 :
ch2, 8F, [F2i, 42F]x3, F2i, 34F, with Yarn1 ss. (176sts)
Info :
Mark stitches for making B3i: pm in 1st F of Rnd 26, [sk 21F, pm in next F]x7 (21F rem to 1st F). (176sts)
— Bag sides :
Info :
Chart 2 on next page. Written instructions do not remind you to switch yarn; make highlighted stitches with Yarn2, all other stitches with Yarn1. See special stitches and general rules for embossed crochet.
Rnd 27 :
(RS) With Yarn1 ch2 (counts as 1st B of B3i), shallow B2i in 1st F from pr (counts as 2nd and 3rd B of B3i), [*F2t, 17F, F2t*, B3i]x7, rep bet *'s, ss in 2nd ch of beg ch-2.
Rnd 28 :
ch2 (counts as 1st B of B2i), B in same st (in ch-2 from pr; counts as 2nd B of B2i), [*B, B2i, F2t, 15F, F2t*, B2i]x7, rep bet *'s, ss in 2nd ch of beg ch-2.
Rnd 29 :
ch2 (counts as 1st B of B2i), B in ch-2 from pr (counts as 2nd B of B2i), [*3B, B2i, F2t, 13F, F2t*, B2i]x7, rep bet *'s, ss in 2nd ch of beg ch-2.
Rnd 30 :
ch2 (counts as 1st B of B2i), B in ch-2 from pr, [*2B, F, 2B, B2i, F2t, 11F, F2t, B2i, 5B, B2i, F2t, 11F, F2t*, B2i]x3, rep bet *'s, ss in 2nd ch of beg ch-2.
Rnd 31 :
ch2 (counts as 1st B of B2i), B in ch-2 from pr, [*3B, F, 3B, B2i, F2t, 9F, F2t, B2i, 7B, B2i, F2t, 9F, F2t*, B2i]x3, rep bet *'s, ss in 2nd ch of beg ch-2.
Rnd 32 :
ch2 (counts as B), [*4B, F3i, 5B, F2t, 7F, F2t, B2i, 9B, B2i, F2t, 7F, F2t*, B]x3, rep bet *'s, ss in 2nd ch of beg ch-2.
Rnd 33 :
ch2 (counts as B), [*2B, B2t, F2i, hdc bet F's, F, hdc in bet F's, F2i, B2t, 3B, F2i, 3B, F2i, F2t, B2i, F, 9B, F, B2i, F2t, 5F, F2t*, B]x3, rep bet *'s, ss in 2nd ch of beg ch-2.
Rnd 34 :
ch2 (counts as B), [*B, B2t (2nd leg in 2 posts), 2 F2i, B in hdc, F, B in hdc, 2 F2i, B2t (1st leg in 2 posts), 2B, F2t, 3F, F2t, B2i, B, F2i, B2t, 5B, B2t, F2i, B, B2i, F2t, 3F, F2t*, B]x3, rep bet *'s, ss in 2nd ch of beg ch-2.
Rnd 35 :
ch2 (counts as B), [*B2t (2nd leg in 2 posts), F2i, 3F, B2i, F, B2i, 3F, F2i, B2t (1st leg in 2 posts), B, F2t, F, F2t, B2i, 2B, 2 F2i, B2t (1st leg in 2 posts), B3t, B2t (2nd leg in 2 posts), 2 F2i, 2B, B2i, F2t, F, F2t*, B]x3, rep bet *'s, ss in 2nd ch of beg ch-2.
Info :
Shift beg of rnd next to the embossed element to minimize visibility of ch-2 at the beg of each round: turn to WS, 7 ss (in prev 7sts: F, 4B, B2i), turn.
Rnd 36 :
ch2 (counts as B), [*B (in 2 posts), 5F, B2i, B, F, B, B2i, 5F, 2 B (1st in 2 posts), F3t (1st and 3rd legs in 2 posts), B2i, 3B, F2i, 3F, B3t (1st and 3rd legs in 2 posts; 2nd leg in 3 posts), 3F, F2i, 3B, B2i, F3t (1st and 3rd legs in 2 posts)*, B]x3, rep bet *'s, ss in 2nd ch of beg ch-2.
Rnd 37 :
ch2 (counts as B), [*B, F2t, F, F2t, B2i, 2B, F3i, 2B, B2i, F2t, F, F2t, 2B (finish with Yarn1), with Yarn2 F (in 3 posts of F3t) and finish with Yarn1, 4B, B2i, 4F, F3t (2nd leg in 3 posts), 4F, B2i, 4B (finish last B with Yarn1), with Yarn2 F (in 3 posts); finish with Yarn1]*, B]x3, rep bet *'s, ss in 2nd ch of beg ch-2.
Info :
Video Part 7 shows Rnds 35 and 37 technique: https://youtu.be/7JA8oI7lNzU. The written rounds continue building embossed elements — follow charted repeats for exact placement.
Rnd 38 :
ch2 (counts as 1st B of B2i), B in same st (in 1st B after F from pr; counts as 2nd B of B2i), [*8B (6th in F; finish last B with Yarn1), with Yarn2 F3t (1st and 3rd legs in 2 posts; finish with Yarn1), 4B, F2i, hdc in bet F's, F, hdc in bet F's, F2i, 4B (finish last B with Yarn1), with Yarn2 F3t (1st and 3rd legs in 2 posts)]x3, rep bet *'s, ss in 2nd ch of beg ch-2.
Rnd 39 :
ch2 (counts as 1st B of B2i), B in same st (in ch-2 from pr; counts as 2nd B of B2i), [*B2i, 9B (last is shallow B in F3t), 2B2t, 2F2i, B in hdc, F, B in hdc, 2 F2i*, repeat bet *'s], ss in 2nd ch of beg ch-2.
Rnd 40 :
ch2 (counts as 1st B of B2i), B in same st (in ch-2 from pr), [*10B, B2t, B2t (both legs in 2 posts), F2i, 3F, B2i, F, B2i, 3F, F2i, B2t (both legs in 2 posts), 10B, B2i, F3t (1st and 3rd legs in 2 posts; 2nd leg in 3 posts)*, B2i]x3, rep bet *'s, ss in 2nd ch of beg ch-2.
Rnd 41 :
ch2 (counts as 1st leg of B2t), B in 1st B after ch-2 from pr (counts as 2nd leg of B2t), [*10B, B2t (both legs in 2 posts), 5F, B2i, B, F, B, B2i, 5F, B2t (both legs in 2 posts), 10B, B2t, F3i (in 3 posts)*, B2t]x3, rep bet *'s, sk ch-2, ss in 1st B.
Rnd 42 :
ch2 (counts as 1st leg of B2t), B in 2nd B after ch-2 from pr (counts as 2nd leg of B2t), [*10B (last in 2 posts), F2t, F, F2t, B2i, 2B, F3i, 2B, B2i, F2t, F, F2t, 10B]*x3, rep bet *'s, ss in 1st B.
Rnd 43 :
ch2 (counts as 1st leg of B2t), B in 2nd B after ch-2 from pr (counts as 2nd leg of B2t), [*9B and finish last st with Yarn1, with Yarn2 F3t (1st and 3rd legs in 2 posts) and finish with Yarn1, 4B, F2i, hdc in bet F's, F, hdc in bet F's, F2i, 4B, finish last st with Yarn1]*, B]x3, rep bet *'s, ss in 2nd ch of beg ch-2.
Rnd 44 :
ch2 (counts as 1st leg of B2t), B in 2nd B after ch-2 from pr (counts as 2nd leg of B2t), [*9B (last is shallow B in F3t), 2 B2t, 2 F2i, B in hdc, F, B in hdc, 2 F2i, 2 B2t]*x3, rep bet *'s, ss in 1st B.
Rnd 45 :
ch2 (counts as 1st leg of B2t), B in 2nd B after ch-2 from pr (counts as 2nd leg of B2t), [*6B, B2t, B2t (both legs in 2 posts), F2i, 3F, B2i, F, B2i, 3F, F2i, B2t (both legs in 2 posts), 6B]*x3, rep bet *'s, ss in 1st B.
Rnd 46 :
ch2 (counts as B), [*6B, B2t (both legs in 2 posts), 5F, B2i, B, F, B, B2i, 5F, B2t (both legs in 2 posts), 7B (last in 2 posts), F and finish with Yarn1, fish stripe: with Yarn1 9F and finish with Yarn2, F*, B (in 2 posts)]x3, rep bet *'s, ss in 2nd ch of beg ch-2.
Info :
Shift beg of round: with RS facing, 5 ss (in prev 5B), turn.
Rnd 47 :
ch2 (counts as B), [*2B (2nd in 2 posts), F2t, F, F2t, B2i, 2B, F3i, 2B, B2i, F2t, F, F2t, 3B (1st in 2 posts), F2i, 2 B2t, F2i, 9F, F2i, 2 B2t, F2i*], B]x3, rep bet *'s, ss in 2nd ch of beg ch-2.
Rnd 48 :
ch2 (counts as B), [*2B and finish last B with Yarn1, with Yarn2 F3t (1st and 3rd legs in 2 posts) and finish st with Yarn1, 4B, F2i, hdc in bet F's, F, hdc in bet F's, F2i, 4B and finish last B with Yarn1, with Yarn2 F3t (1st and 3rd legs in 2 posts) and finish st with Yarn1, 3B, F2i, F, B2t (both legs in 2 posts), F, F2i*, B]x3, rep bet *'s, ss in 2nd ch of beg ch-2. fish stripe: with Yarn1 11F and finish with Yarn2, F, B2t (both legs in 2 posts), F, F2i*, B]x3, rep bet *'s, ss in 2nd ch of beg ch-2.
Rnd 49 :
ch2 (counts as B), [*3B (last is shallow B in F3t), 2 B2t, 2 F2i, B in hdc, F, B in hdc, 2 F2i, 2 B2t, 4B (1st is shallow B in F3t), F2i, F, F2t (1st leg in next F, sk B2t, 2nd leg in next F), F in same st as 2nd leg of prev F2t, 12F, F2t (1st leg in same st as last of 12F, sk B2t, 2nd leg in next F), F, F2i*, B]x3, rep bet *'s, ss in 2nd ch of beg ch-2.
Rnd 50 :
ch2 (counts as B), [*B, B2t, B2t (both legs in 2 posts), F2i, 3F, B2i, F, B2i, 3F, F2i, B2t (both legs in 2 posts), B2t, 2B, F2i, F, F2t*, B]x3, rep bet *'s, ss in 2nd ch of beg ch-2.
Info :
Continue following Chart 2 and the written rounds through Rnd 66 as shown on pages and charts. The pattern alternates embossed elements and fish stripes; highlighted stitches are made with Yarn2 (all front post sts except fish stripes).
— Upper edge backing :
Dec Rnd 70 :
ch1 (doesn't count as st), sc blo in same st, [*3sc blo, sc2tog blo, 8sc blo, sc2tog blo*, 5sc blo]x7, rep bet *'s, 4sc blo, ss blo in 1st sc. (144sts)
Rnd 71-86 :
ch1 (doesn't count as st), sc blo in same st, 143 sc blo, ss blo in 1st sc. Fasten off after Rnd 86. (144sts)
— Reinforcing upper edge backing with buckram :
Infos :
To determine size of strip for upper edge backing unfold and measure width, multiply by 2 and add 2cm for overlap. Approx strip 7cm x 80cm. Turn bag inside out and apply buckram interfacing to wrong side of upper edge backing. Basting and stitching recommended. Use zig-zag to secure edges. Fold backing in and hand-stitch edge to wrong side if not lining.
— Spiral cord handles (x2) :
Info :
Video: https://youtu.be/Th1hfMbRoAQ. Step pictures on p. 15. With Yarn2 leave 30cm/12" tail, make 78cm / 30 3/4" long 8-sts spiral cord, starting with one 4sc-row (video and pictures show 10 rows but make only 1 for Corfu bag). Fasten off leaving 30cm/12" tail. The spiral cord has stretchability; insert narrow non-stretchable tape inside the cord after creating approx 1cm of the cord to prevent excessive stretch. Sew tape ends to beginning and end to secure.
— Loop seam cover (x4) :
Info :
With Yarn2 ch14 and work 9 rows of slip stitch rib. Fasten off leaving 30cm/12" tail. Thread tapestry needle with the tail and position the strip over the loop seam. Ensure short edges face inner side of bag. Use invisible stitches to secure seam and overcast short edges. Weave in ends.
— Handle attaching strip (x4) :
Row 1 (RS) :
Locate 8 middle sts of Round 69 positioned above any fish. Join Yarn2 in front loop, ch5, sc in 2nd ch from hook, 3sc, turn (4sc). For this bag make only 1 row of the flat part; pictures show 10 rows for other projects.
Info :
Fold strip to WS and sew each stitch at edge of strip securely to both loops of one of the 8 stitches from which the strip was started. Secure seam by tying off thread and weave in loose tail.
— Attach handles to the bag (x4) :
Step 1 :
Insert handle attaching strip into the loop at the end of the handle, ensuring loop seam cover is facing the inner side of the bag. Thread tapestry needle with 30cm/12" tail from the handle attaching strip.
Step 2 :
Fold strip to WS and sew each stitch at the edge of the strip securely to both loops of one of the 8 stitches from which the strip was started. Remember the upper edge backing stitches were made in the same back loops.
Step 3 :
Secure the seam by tying off the thread and weave in loose tail. Repeat for the remaining handles. Make sure handles are equally spaced and attached securely.
— Optional lining :
Info :
Measure finished bag and cut lining accordingly. Length: measure from folded upper edge backing to bottom center and add 5cm/2" for seam allowances. Width: measure bag width, multiply by 2, add 3cm/1 1/8" for seam allowance. Stitch sides together from upper edge to 5cm/2" mark. Overcast upper edge and press. Insert drawstring into 2cm/3/4" slit at bottom if desired. Tuck 2cm/3/4" of lining under bag's upper edge backing and baste/hand-stitch lining to bag's wrong side using small invisible stitches.
— Finishing and Care :
Info :
Weave in all ends. Hand-wash in lukewarm water with a bit of mild detergent, rinse, use towel to squeeze out excess moisture, lay flat to dry.
This Corfu Bag pattern brings textured, embossed crochet to a useful everyday accessory with a beautifully finished edge and sturdy spiral handles. The combination of charted motifs, detailed step photos, and construction notes will guide you through every stage of the project. Enjoy the process of creating a unique bag that is both decorative and durable. 🧶✨