🧢 Beautiful ✨ Detailed πŸ’ Adorable

Claude the Cloud Amigurumi Pattern

Claude the Cloud Amigurumi Pattern
4.4β˜… Rating
2-3 Hours Time Needed
1.3K Made This
βœ‚οΈ

Beginner Friendly Level

Perfect for those just starting their crochet journey, with clear instructions and simple techniques

⏱️

Bite-Sized Project

Finishes in 2-4 hoursβ€”perfect for an afternoon of creative relaxation.

🎁

Tiny Treasure

Small, sweet, and gift-worthy creations that fit perfectly in the palm of your hand with detailed charm.

About This Claude the Cloud Amigurumi Pattern

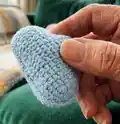
This pattern creates Claude the Cloud, a small no-sew amigurumi cloud crocheted in rows and joined to form a plush three-dimensional shape. The design uses simple single crochet shaping and requires no sewing of major pieces. It's ideal for quick handmade gifts and beginner practice with shaping and assembly.

Claude the Cloud Amigurumi Pattern crochet pattern - detailed view of completed project

Two identical pieces are crocheted and then worked together with single crochet to form the finished cloud. The pattern includes detailed row-by-row instructions, materials and assembly notes.

Why You'll Love This Claude the Cloud Amigurumi Pattern

I absolutely love this pattern because it's quick to make and produces an instantly lovable tiny companion. I enjoy how the simple row shaping creates such a charming three-dimensional cloud without complicated techniques. It is perfect for using small amounts of leftover DK yarn and makes great little gifts. I always smile when I see the finished face details β€” a few embroidered stitches and safety eyes bring Claude to life.

Claude the Cloud Amigurumi Pattern step 1 - construction progress Claude the Cloud Amigurumi Pattern step 2 - assembly progress Claude the Cloud Amigurumi Pattern step 3 - details and accessories Claude the Cloud Amigurumi Pattern step 4 - final assembly and finishing

Switch Things Up

I love how easy it is to customize Claude β€” try changing the yarn color to create a whole cloud family of different shades.

You can make a mini keychain version by using fingering weight yarn and a smaller hook for a tiny portable cloud.

If you want a chunkier, cuddlier cloud, use bulky yarn with a larger hook and keep the same shaping rows for a larger plushie.

I often add tiny accessories like a felt heart or a little bow sewn onto one corner to personalize gifts.

Try embroidering different facial expressions β€” a smile, surprised O, or sleepy eyes completely change the personality.

I sometimes embroider stars or raindrops on the cloud for a whimsical nursery theme.

For safety eyes alternatives, you can embroider the eyes using black yarn for a fully child-safe toy.

I also experiment with adding a small hanging loop at the top to turn Claude into an ornament.

To create a weather set, make several clouds in graduated sizes and pair with a sun or raindrop shapes using leftover yarn.

I recommend trying different stuffing amounts to find the firmness you prefer β€” firmer stuffing makes the cloud hold shape better, softer stuffing makes it squishier.

Common Mistakes & How to Fix Them

βœ— Skipping the turning chain counts can change your stitch total and distort the shape; always follow the pattern notes that the turning chains are not counted and keep your row counts accurate. βœ— Forgetting to place or move stitch markers will cause you to lose track of the last stitch each row; use a stitch marker in the last stitch and move it up as you turn to keep consistent edges. βœ— Not stuffing gradually results in lumps or misshapen corners; stuff the cloud firmly while you crochet the joining rounds and add extra stuffing to the three corners for the round shape. βœ— Placing safety eyes too late or unevenly will make them misaligned; add safety eyes between rows 11 and 12 (and between 17 and 18) on one piece and check vertical alignment before fastening them. βœ— Cutting yarn too early on the back piece will make joining more difficult; do not cut the yarn at the end of the back-piece so you can begin crocheting the two pieces together without sewing.

Claude the Cloud Amigurumi Pattern

Make an adorable Claude the Cloud amigurumi with this easy, no-sew crochet pattern. You will crochet two identical pieces and join them while stuffing for a three-dimensional, cuddly cloud. Perfect for gifting or decorating nurseries, this quick project gives you a charming handmade keepsake you'll love.

Beginner Friendly 2-3 Hours

Materials Needed for Claude the Cloud Amigurumi Pattern

β€” Main Fabric

  • 01
    DK / light worsted yarn (number 3 yarn) in desired color (blue / white / rose or any color you want) - recommended 120-150m / 50g skeins
  • 02
    Accent yarn: black for mouth and rose/pink for cheeks (embroidery floss or small amounts of yarn)
  • 03
    Safety eyes 9 mm (2 pieces)
  • 04
    Polyester stuffing (enough to firmly stuff a 7 cm x 13 cm cloud)

β€” Tools Required

  • 01
    Crochet hook size 3 mm
  • 02
    Stitch markers (use a stitch marker in the last stitch of each round, moving it up as you go)
  • 03
    Safety eyes 9 mm (2 pieces)
  • 04
    Embroidery needle
  • 05
    Yarn needle for weaving in ends
  • 06
    Scissors
  • 07
    Polyester stuffing

Progress Tracker

0% Complete

β€” Cloud Front-Piece :

Round 1 :

Ch 9, turn (9)

Round 2 :

Inc, 7 sc, turn (9)

Round 3 :

Ch 1, 8 sc, inc, turn (10)

Round 4 :

Ch 1, inc, 9, turn (11)

Round 5 :

Ch 1, 10 sc, inc, turn (12)

Round 6 :

Ch 1, 12 sc, turn (12)

Round 7 :

Ch 1, 12 sc, turn (12)

Round 8 :

Ch 1, inc, 11 sc, turn (13)

Round 9 :

Ch 1, 13 sc, ch 6, turn (19)

Round 10 :

1 sc, in second ch from hook, and next 17 sc (18)

Round 11 :

Ch 1, 17 sc, inc, turn (19)

Round 12-18 :

Ch 1, 19 sc, turn (19)

Round 19 :

Ch 1, 17 sc, dec turn (18)

Round 20 :

Ch 1, dec, 16 sc (17)

Round 21 :

Ch 1, 13 sc, keeping the last 4 stitches unstitched (13)

Round 22 :

Ch 1, dec, 11 sc, turn (12)

Round 23 :

Ch 1, 12 sc, turn (12)

Round 24 :

Ch 1, dec, 10 sc, turn (11)

Round 25 :

Ch 1, 9 sc, dec, turn (10)

Round 26 :

Ch 1, dec, 8 sc, turn (9)

Round 27 :

no chain, 7 sc, dec, turn (8)

Round 28 :

no chain, dec, 6 sc (7)

Info :

Cut yarn. Hide yarn ends.

β€” Cloud Back-Piece :

Info :

Make the back-piece the same way as the front-piece, but don't cut the yarn.

Info :

Once the second piece is finished, hide the other yarn end.

Info :

Add the safety eyes in one of the pieces, between row 11 and 12 and 17 and 18. Check that the eyes are on the same height and vertically in the middle of the piece.

Info :

Lay the pieces flat onto each other. Now crochet them together with a sc. We begin where we made the last stitch. Continue to stuff the cloud while crocheting along.

Info :

Make sure, the cloud is very firmly stuffed, especially add stuffing at the three corners. This way the cloud gets the cute round three-dimensional shape that we want.

Info :

Cut a piece of black yarn or embroidery-floss and embroider on the mouth. Then embroider on the cheeks with a few stitches.

Assembly Instructions

  • Attach the safety eyes to one piece between rows 11 and 12 and between rows 17 and 18, checking that both eyes are at the same height and centered vertically.
  • Lay the two pieces flat together and crochet around the edges with single crochet to join them, beginning where you made the last stitch on the back piece.
  • Continue to stuff the cloud firmly as you crochet the pieces together, paying special attention to the three corners to create the rounded three-dimensional shape.
  • Before closing completely, make sure the cloud is evenly and firmly stuffed; add extra stuffing in corners for the correct shape.
  • Cut a short piece of black yarn or embroidery floss and embroider the mouth, then add small stitches of rose yarn or floss for the cheeks.

Important Notes

  • πŸ’‘The turning chains are not counted as a stitch; follow row instructions accordingly to maintain correct stitch counts.
  • πŸ’‘Crochet two identical pieces and join them with single crochet; no sewing is needed for the main assembly.
  • πŸ’‘Use stitch markers in the last stitch of each row and move the marker up when turning to keep consistent edges.
  • πŸ’‘Place safety eyes before joining the pieces and test their position for symmetry and vertical alignment.
  • πŸ’‘Stuff the cloud firmly but evenly; overstuffing can distort shape while under-stuffing will flatten the cloud.

Claude the Cloud is a tiny, huggable creation that brings a smile to any room. Create one in pastel blue, rosy pink, or your favorite color to make a sweet handmade gift. Share your finished Claude and tag the maker to spread the crochet joy! 🧢 ☁️

You ask,

we answer.

FAQs

What size will the finished piece be?

The finished amigurumi measures approximately 7 cm x 13 cm when using DK (number 3) yarn and a 3 mm hook, as specified in the pattern notes.

Can I use different yarn weights for this pattern?

Yes, you can use different yarn weights, but this will change the final size; using a thicker yarn and larger hook will make a bigger cloud while thinner yarn and a smaller hook will make a mini version.

Do I need prior crochet experience for this pattern?

This pattern is beginner friendly and uses basic stitches like single crochet, increases and decreases, so beginners who know these basics should be comfortable following it.

How long does this project typically take to complete?

Most crocheters finish this project in about 2-3 hours, though time may vary depending on experience and how quickly you stuff and join the pieces.

Where should I place the safety eyes?

Place safety eyes in one piece between rows 11 and 12 (and between 17 and 18) and check they are at the same height and centered vertically before securing.