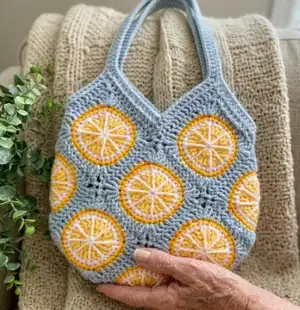
Make a bright, summery Citrus Tote Bag using fun citrus granny squares. This pattern walks you through making the citrus motif squares, embroidering the segments, joining the squares, and creating sturdy straps. Perfect for gifting or a colorful everyday bag, you will love the playful design and texture.
Progress Tracker
0% Complete
— Citrus Granny Square :
Round 1 :
Color - light yellow Begin with a magic circle, ch 2 (this counts as first dc). Dc 11 in magic circle. Pull tight. Sl st to join round with original ch 2. (12 stitches total)
Round 2 :
Ch 2 then 1 dc in the same stitch. Make 2 dc in each dc of the previous round until you reach the beginning. After the final stitch, use a sl st to join with the first ch 2 in the round. (24 stitches total)
Round 2 :
Cut yellow yarn leaving a 6 inch tail to sew in. Pull the end through the slip stitch and pull tight.
Round 3 :
New color - white Create a slip knot and place it on the crochet hook. Join on the last stitch in round 2 with a sl st, then ch 1. Make 2 sc in the next stitch. In the next stitch, make 1 sc. Continue alternating between 2 sc and 1 sc per stitch all the way around. Join with a sl st to first ch 1 in the round. (36 stitches total)
Round 3 :
Cut white yarn leaving a 6 inch tail to sew in. Pull the end through the slip stitch and pull tight.
Round 4 :
New color - dark yellow Create a slip knot and place it on the crochet hook. Join on the last stitch in round 3 with a sl st, then ch 1. Make 1 sc in each st all the way around. Finish the round with a sl st to first ch 1 in the round.(36 stitches total)
Round 4 :
Cut dark yellow yarn leaving a 6 inch tail to sew in. Pull the end through the slip stitch and pull tight.
Round 5 :
Color - light blue Create a slip knot and place it on the crochet hook. Join on the last stitch in round 4 with a sl st, then ch 2. Make 1 dc in the next stitch. Make hdc in the next four stitches, then dc in the next two stitches. To make the corner in the next stitch make 2 edc, ch 1, then 2 edc. *Make dc in the next 2 stitches, hdc in the next 4 stitches, then dc in the next 2 stitches. Make another corner in the next stitch with 2 edc, ch 2, then 2 edc*
Round 5 :
Repeat steps in * 2 more times creating 4 corners. Finish the round with a sl st to the first ch 2 in the round.
Round 5 :
Cut light blue yarn leaving a 6 inch tail to sew in. Pull the end through the slip stitch and pull tight.
Info :
Please see the last page for instructions on how to complete each stitch!
— Embroidery :
Info :
To make the lines, cut a piece of white yarn about 14 inches long. Tie off one end on the wrong side of square near the center. Using the yarn needle, pull the white yarn through the center of the square and push it back through between the white and dark yellow rounds. Continue weaving the white yarn through the square in between the white and dark yellow rounds and coming up through the middle at the four corners, top, bottom, and sides. Tie off the white yarn on the wrong side when done.
Info :
To finish the square, weave in the tails using the yarn needle.
— Assemble the bag :
Info :
Make 13 Granny Squares
Info :
Position two squares together with the right side facing each other. Create a slip knot and place it on the hook. Insert the crochet hook through the corners of both squares, make a sl st, and ch 1. Make a sc in each stitch along the side of the square, inserting the hook through stitches in both squares each time.
Info :
Attach 11 squares in this configuration. I recommend continuing along the red line then the blue line. However, any order will work if this shape is the end result.
Info :
Once all the squares are attached, fold it in half to align the top and the bottom. The remaining two squares will be the sides of the bag (folded in half in this diagram). Stitch along the red and blue lines.
Info :
Now that the main part of the bag is complete, it is time to make the straps!
— Straps :
Info :
To avoid gaps, the ch 1 that creates the corner are counted as a st when creating the straps. Times when crocheting in this space is noted in each row.
Part One :
In this part, we will be creating the boarder on the top of the bag in the middle section.
Row 1 :
Create a slip knot and place it on the crochet hook. Lay bag flat with right side out. Join using a slip stitch onto the corner (made by the ch 1) on the right side. Make one double crochet in the next 10 st. Next, dc6tog including the ch 1 that creates the corner of each square (you will be inserting your hook in the 2 edc and ch 1 from the first granny square and then the ch 1 and 2 edc in the next granny square). Continue up the next granny square making a dc in each of the next 11 st (the last dc will be in the ch 1 creating the corner. Ch 2 and turn work.
Row 2 :
Skip the first st (ch 2 counts as first dc in this row) and make dc in the next 8 st. Next, dc5tog. Make one dc in the next 9 st. To finish the row, ch 1, cut yarn leaving 6 in to weave in, and pull the end through the loop and pull tight.
Info :
Flip over and repeat part one on the other side.
Part Two :
In this part the straps of the bag are created. Choose one side of the bag to be Side A and the other will be Side B. This will determine the number each granny square will be referred to. This portion will be created in one continuous round demonstrated by the red portion in the diagram.
Round 1 :
Create a slip knot and place it on the crochet hook. Lay bag flat with side A facing up. Join using a slip stitch onto the ch 1 space of the top corner of granny square 1*. Make one double crochet in the next 10 st. Next, dc6tog (including the ch 1 forming corners). You are now working on side B.
Round 1 :
On granny square 4 make one dc in the next 11 st (ending in the ch 1 space in the corner). Make 2 dc in each row from part one (4 total).
Round 1 :
Make 2 dc in each row from part one (4 total) on granny square 3*. Make one dc in the next 11 st (the first will be the ch 1 forming the first corner of granny square 3). Next, dc6tog (including the ch 1 forming corners). You have now returned to side A.
Round 1 :
On granny square 2 make one dc in the next 11 st (ending in the ch 1 space in the corner). Make 2 dc in each row from part one (4 total).
Round 1 :
Make 2 dc in each row from part one on square 1. Use a slip st to join the round. Ch 2
Round 2 :
Skip the first st (ch 2 counts as first dc in this row) and make dc in the next 8 st. **Next, dc5tog. Make one dc in the next 13 st. Continue with one dc in each ch creating the strap (60). Make one dc in the next 13 st.**
Round 2 :
Repeat steps within ** one more time across the second strap.
Round 2 :
Finish the row with one dc in the next 4 stitches, then use a sl st to join the round. Cut the yarn leaving 6 in to weave in, pull the end through the loop and pull tight.
Info :
Turn the bag inside out and weave in all the ends using a tapestry needle.
— Stitch Guide :
Info :
SLIP STITCH - Insert hook, yarn over, pull through all loops on hook
Info :
SINGLE CROCHET - Insert hook into stitch, yarn over, pull through stitch, yarn over, pull through 2 loops on hook
Info :
HALF DOUBLE CROCHET - Yarn over, insert hook into stitch, yarn over, pull through stitch, yarn over, pull through 3 loops on hook
Info :
DOUBLE CROCHET - Yarn over, insert hook into stitch, yarn over, pull through stitch, yarn over, pull through 2 loops on hook, yarn over, pull through last two loops on hook
Info :
EXTENDED DOUBLE CROCHET - Yarn over, insert hook into stitch, yarn over, pull through stitch, yarn over, pull through first loop on hook, yarn over, pull through 2 loops on hook, yarn over, pull through last two loops on hook
Info :
DOUBLE CROCHET FIVE TOGETHER - Yarn over, *insert hook into stitch, yarn over, pull through stitch, yarn over, pull through 2 loops on hook* Repeat between * 4 more times (inserting in 5 stitches total) Yarn over and pull through 6 loops on hook
Info :
DOUBLE CROCHET SIX TOGETHER - Yarn over, *insert hook into stitch, yarn over, pull through stitch, yarn over, pull through 2 loops on hook* Repeat between * 5 more times (inserting in 6 stitches total) Yarn over and pull through 7 loops on hook
Bright, sunny, and full of personality, this Citrus Tote Bag brings a splash of summer to your day. Create a stack of citrus squares, embroider the segments, and assemble into a cheerful tote that makes a perfect gift or market bag. Make one for yourself or a friend and enjoy handmade style all season long! 🧶🍋🧵