🧢 Beautiful ✨ Detailed πŸ’ Adorable

Cinnamon Beret Pattern

Cinnamon Beret Pattern
4.0β˜… Rating
2-4 Hours Time Needed
1.8K Made This
βœ‚οΈ

Beginner Friendly Level

Perfect for those just starting their crochet journey, with clear instructions and simple techniques

⏱️

Bite-Sized Project

Finishes in 2-4 hoursβ€”perfect for an afternoon of creative relaxation.

✨

Stylish Touch

An elegant detail to elevate any look, combining traditional techniques with contemporary design sensibilities.

About This Cinnamon Beret Pattern

This pattern creates a classic beret crocheted from the center outwards using single crochet. It is constructed with simple, evenly spaced increases and decreases to form the crown and slouch. The pattern is fast to make and ideal for using Aran weight yarn for a structured, cozy finish.

Cinnamon Beret Pattern crochet pattern - detailed view of completed project

One size is provided (28 cm width, 52 cm head contour) and the sample uses approximately 113 g of yarn. Full gauge and materials are listed so you can reproduce the same fit or adjust as needed.

Why You'll Love This Cinnamon Beret Pattern

I absolutely love this pattern because it turns a few basic stitches into a timeless beret with beautiful shape. I enjoy how quickly the crown grows when worked in rounds β€” progress is visible fast which keeps me motivated. The design is versatile and forgiving, so I can customize yarn and color for different looks. Making this beret always feels satisfying because the blocking at the end brings out a polished, professional result.

Cinnamon Beret Pattern step 1 - construction progress Cinnamon Beret Pattern step 2 - assembly progress Cinnamon Beret Pattern step 3 - details and accessories Cinnamon Beret Pattern step 4 - final assembly and finishing

Switch Things Up

I love experimenting with color changes to give the beret a unique twist; try a contrasting brim or a gradual ombre from the crown outwards.

You can easily make a smaller or larger size by stopping increases earlier or continuing a few more rounds; measure against a head circumference as you go.

If you want a chunkier, more structured beret use a bulkier yarn and a larger hook for a thicker fabric and more pronounced slouch.

For a daintier, vintage-style beret use fingering or DK weight yarn with a smaller hook to create a lightweight, delicate hat.

I sometimes add a simple surface crochet border around the edge for decoration and to firm the brim slightly.

Try incorporating textured stitches in place of plain single crochet for a different surface β€” seed stitch or moss stitch work nicely on the brim area.

I recommend trying a lining with a soft knit fabric if you want extra warmth and a smoother interior finish.

Consider adding a small crocheted flower, button, or brooch at the side for personalization and a focal accent.

If you prefer a firmer brim, add an internal crocheted chain or a narrow i-cord worked and slipped into the inner edge before blocking.

I enjoy using hand-dyed yarns for one-of-a-kind colorways that make each beret feel special and unique.

For a retro look, try crocheting shorter rounds at the start and use a tighter gauge near the crown, allowing the outer rounds to flare more for extra slouch.

You can create matching sets by making a beret in the same yarn as a scarf or fingerless mitts, using the beret colorway as inspiration.

Common Mistakes & How to Fix Them

βœ— Skipping the stitch marker after Round 1 causes you to lose the round start; place a marker after Round 1 and move it each round to keep accurate counts. βœ— Closing rounds inconsistently with slip stitch can twist your work and change gauge; always close rounds with a slip stitch and keep the top of stitch tension consistent. βœ— Not checking gauge before starting leads to wrong finished size; make a 10 cm swatch of 18 sts x 18 rows in single crochet, wash and block it, then adjust hook size if necessary. βœ— Pulling increases too tightly creates puckers in the crown; work increases with the same tension as your single crochets and loosen slightly if the fabric draws in. βœ— Forgetting to weave in ends before blocking makes finishing harder; weave in ends securely before washing and blocking to give the beret a clean edge.

Cinnamon Beret Pattern

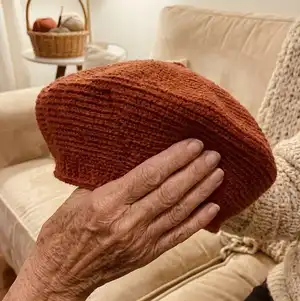
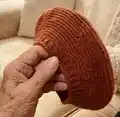
Make a classic Cinnamon Beret worked from the center outwards β€” a quick, stylish crochet project you can finish in a weekend. This pattern uses single crochet in the round with simple increases and decreases to shape the beret. Perfect for a confident beginner, it includes full round-by-round instructions, materials and finishing tips so you can create a polished, wearable hat.

Beginner Friendly 2-4 Hours

Materials Needed for Cinnamon Beret Pattern

β€” Main Fabric

  • 01
    Cisne Cetim yarn, 100g/170m, composition: 70% acrylic, 30% wool, Aran (8 wpi)
  • 02
    Approximately 113 g of Cisne Cetim used for one beret (final weight 113 g)

β€” Tools Required

  • 01
    Crochet hook 3.5 mm (or size needed to obtain gauge)
  • 02
    Stitch marker
  • 03
    Tapestry needle for weaving in ends
  • 04
    Scissors
  • 05
    Measuring tape or ruler to check gauge
  • 06
    Blocking surface and pins (for washing and blocking)

Progress Tracker

0% Complete

β€” Materials :

Infos :

Yarn: Cisne Cetim, 100g/170m, composition: 70% acrylic, 30% wool, Aran (8 wpi). Approximate measurements: Size: One size - 28 cm overall width and 52 cm head contour. Final weight: 113 g. Needle: 3.5 mm crochet hook, or to obtain gauge. Notions: marker, tapestry needle to weave in ends. Gauge, washed and blocked: 18 sts and 18 rows per 10 cm / 4" in Single crochet (sc). Terms: standard US.

β€” Abbreviations :

Infos :

sc - single crochet. ch - chain. sl st - slip stitch. st - stitch. sts - stitches. inc - increase: Crochet two sts in the same stitch. sc2tog - decrease: Loop first and second st and crochet two sts together.

β€” The Pattern :

Info :

Start: Crochet a Magic Loop. Note: Close all rounds with sl st.

Round 1 :

6 sc, sl st. Then insert the marker.

Round 2 :

6 inc, sl st. Total 12 sc.

Round 3 :

*1 inc, 1 sc*, repeat from * to * across, sl st. Total 18 sts.

Round 4 :

*1 inc, 2 sc*, repeat from * to * across, sl st. Total 24 sts.

Round 5 :

*1 inc, 3 sc*, repeat from * to * across, sl st. Total 30 sts.

Round 6 :

*1 inc, 4 sc*, repeat from * to * across, sl st. Total 36 sts.

Round 7 :

*1 inc, 5 sc*, repeat from * to * across, sl st. Total 42 sts.

Round 8 :

*1 inc, 6 sc*, repeat from * to * across, sl st. Total 48 sts.

Round 9 :

*1 inc, 7 sc*, repeat from * to * across, sl st. Total 54 sts.

Round 10 :

*1 inc, 8 sc*, repeat from * to * across, sl st. Total 60 sts.

Round 11 :

*1 inc, 9 sc*, repeat from * to * across, sl st. Total 66 sts.

Round 12 :

*1 inc, 10 sc*, repeat from * to * across, sl st. Total 72 sts.

Round 13 :

*1 inc, 11 sc*, repeat from * to * across, sl st. Total 78 sts.

Round 14 :

*1 inc, 12 sc*, repeat from * to * across, sl st. Total 84 sts.

Round 15 :

*1 inc, 13 sc*, repeat from * to * across, sl st. Total 90 sts.

Round 16 :

*1 inc, 14 sc*, repeat from * to * across, sl st. Total 96 sts.

Round 17 :

*1 inc, 15 sc*, repeat from * to * across, sl st. Total 102 sts.

Round 18 :

*1 inc, 16 sc*, repeat from * to * across, sl st. Total 108 sts.

Round 19 :

*1 inc, 17 sc*, repeat from * to * across, sl st. Total 114 sts.

Round 20 :

*1 inc, 18 sc*, repeat from * to * across, sl st. Total 120 sts.

Round 21 :

*1 inc, 19 sc*, repeat from * to * across, sl st. Total 126 sts.

Round 22 :

*1 inc, 20 sc*, repeat from * to * across, sl st. Total 132 sts.

Round 23 :

*1 inc, 21 sc*, repeat from * to * across, sl st. Total 138 sts.

Round 24 :

*1 inc, 22 sc*, repeat from * to * across, sl st. Total 144 sts.

Round 25 :

*1 inc, 23 sc*, repeat from * to * across, sl st. Total 150 sts.

Round 26 :

*1 inc, 24 sc*, repeat from * to * across, sl st. Total 156 sts.

Info :

Total 26 Rounds with increases.

Round 27 :

*sc2tog, 24 sc*, repeat from * to * across, sl st. Total 150 sts.

Round 28 :

*sc2tog, 23 sc*, repeat from * to * across, sl st. Total 144 sts.

Round 29 :

*sc2tog, 22 sc*, repeat from * to * across, sl st. Total 138 sts.

Round 30 :

*sc2tog, 21 sc*, repeat from * to * across, sl st. Total 132 sts.

Round 31 :

*sc2tog, 20 sc*, repeat from * to * across, sl st. Total 126 sts.

Round 32 :

*sc2tog, 19 sc*, repeat from * to * across, sl st. Total 120 sts.

Round 33 :

*sc2tog, 1 sc, sc2tog, 15 sc*, repeat from * to * across, sl st. Total 108 sts.

Round 34 :

*sc2tog, 1 sc, sc2tog, 13 sc*, repeat from * to * across, sl st. Total 96 sts.

Round 35 :

*sc2tog, 1 sc, sc2tog, 11 sc*, repeat from * to * across, sl st. Total 84 sts.

Last Round :

*1 sl st, ch1*, repeat from * to * across, sl st.

Info :

To Finish: Weave in all ends. Wash and block.

Assembly Instructions

  • Weave in all loose ends securely using a tapestry needle so they are hidden and will not come undone during wear.
  • Wash and block the beret on a flat surface to set the stitches and shape the crown; pin lightly to maintain the desired slouch and brim shape.
  • Shape the beret while damp to achieve the classic slouch: center the crown and smooth the outer rounds, then allow to dry completely before removing pins.
  • When wearing, fold the inner edge slightly to create a neat brim and position the beret on the head so the slouch falls to the side for a classic look.

Important Notes

  • πŸ’‘Use a stitch marker after Round 1 and move it each round to keep track of the beginning of rounds.
  • πŸ’‘Close every round with a slip stitch as directed to maintain even edges and consistent stitch height.
  • πŸ’‘Make a 10 cm/4" gauge swatch in single crochet, wash and block it to check tension before starting the beret.
  • πŸ’‘Weave in ends before washing and blocking to make finishing neater and easier.

This Cinnamon Beret pattern creates a timeless, wearable accessory you can complete quickly and proudly. It is elegant, cozy and perfect for gifting or wearing on chilly days. Enjoy making something beautiful and unique with simple stitches and thoughtful finishing. 🧢✨

You ask,

we answer.

FAQs

What size will the finished piece be?

The finished beret measures approximately 28 cm overall width with a 52 cm head contour using the recommended yarn and 3.5 mm hook.

Can I use different yarn weights for this pattern?

Yes, you can use a different yarn weight but the final size and drape will change; make a gauge swatch and adjust hook size to achieve the recommended 18 sts and 18 rows per 10 cm in single crochet.

Do I need prior crochet experience for this pattern?

This pattern is rated Beginner Friendly; basic knowledge of single crochet, working in rounds, increases and decreases is helpful for best results.

How long does this project typically take to complete?

Most crocheters complete this beret in 2-4 hours, though time may vary based on experience level, yarn choice and finishing steps like blocking.