🧢 Beautiful ✨ Detailed πŸ’ Adorable

Christmas Reindeer Slippers Pattern

Christmas Reindeer Slippers Pattern
4.8β˜… Rating
5-7 Hours Time Needed
1.8K Made This
βœ‚οΈ

Intermediate Level

Ideal for those with basic crochet experience, featuring slightly more advanced stitches and techniques to expand your skills.

⏱️

Weekend Treat

Takes 5-7 hours, making it an enjoyable project to finish over a couple of days.

🧣

Snug Essential

Everyday comfort with practical charm, designed for both functionality and style through changing seasons.

About This Christmas Reindeer Slippers Pattern

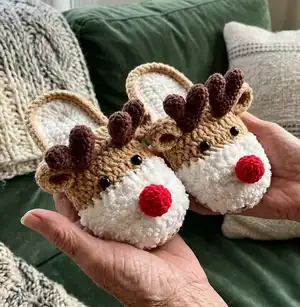
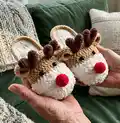
This pattern creates a charming pair of Christmas reindeer slippers in adult size approximately 30cm x 12cm (~11.8 x 4.7 in). It combines plush Bernat Blanket yarn for the body and super bulky yarn for details like the nose and horns to achieve a cozy, tactile finish. The instructions include every piece: sole, strap, horns, ears and muzzle with clear row-by-row directions and photos to guide assembly.

Christmas Reindeer Slippers Pattern crochet pattern - detailed view of completed project

You will learn to join two sole pieces, work in back loops for the strap, and sew on facial details for a professional look. Perfect for gift-making or holiday decor, the slippers are comfortable and soft.

Why You'll Love This Christmas Reindeer Slippers Pattern

I absolutely love this pattern because it turns simple materials into a delightful holiday accessory that feels like a warm gift. I enjoy how the plush Bernat Blanket yarn creates an ultra-cozy texture that makes these slippers irresistible. The pattern is versatile so I can easily change colors or size to suit family members. Sewing the horns and ears in place always gives me a sense of satisfaction when the reindeer face comes to life. I adore gifting these because they are both pretty and practical, and recipients always love the handmade touch.

Christmas Reindeer Slippers Pattern step 1 - construction progress Christmas Reindeer Slippers Pattern step 2 - assembly progress Christmas Reindeer Slippers Pattern step 3 - details and accessories Christmas Reindeer Slippers Pattern step 4 - final assembly and finishing

Switch Things Up

I love recommending color swapsβ€”try soft pastels for a nursery-friendly pair or deep jewel tones for a grown-up festive look.

I often change the yarn weight and hook size to make mini keychain versions by using fingering yarn and a smaller hook.

I sometimes add non-slip fabric or stitched dots to the sole for extra grip if the slippers will be worn on smooth floors.

I enjoy embroidering simple faces or adding tiny felt accessories like bows or glasses to personalize each pair.

I recommend swapping the red muzzle for a pompom nose made from the same yarn for a playful look.

I like to experiment with different horn shapes β€” make them longer, shorter, or flatter to alter the personality of the reindeer.

I will occasionally add a wrist strap or ankle strap to convert the slippers into a more secure house shoe for children.

I also try swapping safety eyes for embroidered eyes if the slippers are for babies to keep them toy-safe.

I sometimes use bulky cotton for a washable pair and recommend testing a small sample to check washability and durability.

I encourage making matching family pairs by adjusting the foundation chain length and counting rows to scale up or down while keeping the same shaping ratios.

Common Mistakes & How to Fix Them

βœ— Skipping stitch markers during the sole construction causes miscounts and uneven shaping; place markers at the start and key points and recount after each row. βœ— Joining the two sole pieces incorrectly will distort the slipper shape; place the left sides inward, align edges carefully and crochet the 72 Slst evenly to join. βœ— Forgetting to change to the correct yarn or hook size will affect fit and texture; always switch to the specified yarn and hook (6.0mm for blanket yarn, 3.5mm for details) for consistent results. βœ— Not stuffing horns or muzzle adequately leads to floppy pieces; stuff lightly but firmly and finish stuffing before closing to keep shape. βœ— Crocheting the strap without working in the back loop only (BLO) will hide the intended ridge; make sure to work entirely in BLO for the strap section for the right look.

Christmas Reindeer Slippers Pattern

Make cozy, adorable reindeer slippers for the holidays with this complete crochet pattern. You will be guided step-by-step through the sole, strap, ears, horns and muzzle to create a 30cm x 12cm pair. The pattern uses Bernat Blanket and super bulky yarns to give a plush, warm result perfect for gifting or keeping. Clear photos and assembly notes help you place features like eyes, horns, and ears for a polished finish.

Intermediate 5-7 Hours

Materials Needed for Christmas Reindeer Slippers Pattern

β€” Main Fabric

  • 01
    Bernat Blanket Yarn: Jumbo Weight / Category 7 - Colors: White and Light Brown (used for sole and strap) - hook 6.0 mm (J)
  • 02
    Yarn Super Bulky / Category 6 - Colors: Red and Brown (used for muzzle and horns) - hook 3.5 mm (C)
  • 03
    Assorted small yarn for details and sewing tails
  • 04
    Fiberfill for stuffing horns and muzzle
  • 05
    Hot gun glue (optional for securing small details)
  • 06
    Plastic safety eyes 16mm (2 pieces)

β€” Tools Required

  • 01
    Crochet hook size 6.0mm (J) for Bernat Blanket Yarn
  • 02
    Crochet hook size 3.5mm (C) for details (horns, muzzle)
  • 03
    Scissors
  • 04
    Sewing needle (yarn needle) for sewing pieces together
  • 05
    Stitch markers
  • 06
    Polyester stuffing (fiberfill)
  • 07
    Hot glue gun (optional)
  • 08
    Plastic safety eyes 16mm (2 pieces)
  • 09
    Pins for assembly (optional)

Progress Tracker

0% Complete

Info :

This is the instruction for crocheting slippers with a size 30cm x 12cm ( ~11.8x 4.7inch)

Infos :

MATERIAL: (1) Bernat Blanket Yarn: Jumbo Weight / Category 7. Color: White, light brown and 6.0 mm ( J) Hook. (2) Yarn Super Bulky / Category 6. Color: Red, Brown and 3.5mm (C) Hook. Stitch maker. Sewing needle. Scissors. Fiberfill. Hot gun glue. Plastic safety eyes (16mm).

Infos :

ABBREVIATIONS: MR: Magic Ring. st(s): stitch(es). slst: slip stitch. ch: Chain. SC: Single crochet. DC: Double crochet. INC: INCrease. DEC: Decrease. FLO: Front loop only. BLO: Back loop only. Sk: Skip st.

β€” Sole Slippers (MAKE 2) :

Row 1 :

Ch 24, start in the second chain from the hook. Working on both sides of a chain (working on the foundation chain): INC, 21 SC, 6 SC in one st, 21 SC, INC, Slst (52)

Row 2 :

2 Ch, 2 DC-INC, 21 DC, 6 DC-INC, 21 DC, 2 DC-INC, Slst (62)

Row 3 :

Ch, (SC, INC) 2 times, 6 SC, 6 HDC, 9 DC, (DC, DC-INC) 6 times, 9 DC, 6 HDC, 6 SC, (INC, SC) 2 times, Slst (72)

Info :

Make one more piece like this with White yarn

Info :

After crocheting two pieces, join the two sole pieces together using slip stitches, place the left side inward, and proceed to crochet 72 Slst

Info :

Cut the yarn

β€” Strap for Slippers :

Info :

Begin with white yarn, use Bernat Blanket Yarn and a 6.0mm hook. After joining the sole pieces, there will be a row of slip stitches on the top. Proceed to work stitches in the slip stitch row, working entirely in the back loop only (BLO). Counting back from the last stitch of the row, work 31 stitches. Join the yarn and start crocheting from this point.

Row 1 :

10 SC, Slst, turn (11)

Row 2 :

Skip 1 st, 10 SC, (SC, Slst join and crochet into the sole of the slippers), turn (12)

Row 3 :

Sk 1 st, 11 SC, (SC, Slst join and crochet into the sole of the slippers), turn (13)

Row 4 :

Sk 1 st, 12 SC, (SC, Slst join and crochet into the sole of the slippers), turn (14)

Row 5 :

Sk 1 st, 13 SC, (SC, Slst join and crochet into the sole of the slippers), turn (15)

Row 6 :

Sk 1 st, 14 SC, (SC, Slst join and crochet into the sole of the slippers), turn (16)

Row 7 :

Sk 1 st, 15 SC, (SC, Slst join and crochet into the sole of the slippers), turn (17)

Row 8 :

Sk 1 st, 16 SC, (SC, Slst join and crochet into the sole of the slippers), turn (18)

Info :

Change to Light brown yarn

Row 9 :

Sk 1 st, 17 SC, (SC, Slst join and crochet into the sole of the slippers), turn (19)

Row 10 :

Sk 1 st, 18 SC, (SC, Slst join and crochet into the sole of the slippers), turn (20)

Row 11 :

Sk 1 st, 19 SC, (SC, Slst join and crochet into the sole of the slippers), turn (21)

Row 12 :

Sk 1 st, 20 SC, (2 Slst join and crochet into the sole of the slippers), turn (22)

Row 13-15 :

Skip 2 st, 20 SC, (2 Slst join and crochet into the sole of the slippers), turn (22)

Row 16 :

Skip 2 st, 20 SC (20)

Row 17 :

Continue crocheting the SC into the remaining part of the sole BLO, SLST

Info :

Cut the yarn

β€” Horn: (MAKE 4) :

Info :

Use Brown yarn - Hook: 3.5mm

Row 1 :

6 SC in an MR (6)

Row 2 :

(SC, INC) 3 times (9)

Row 3-5 :

9 SC (9)

Info :

Make one more piece until round 4 but DO NOT cut the yarn.

Row 6 :

9 SC of the first piece, 9 SC of the second piece (18)

Row 7 :

(4 SC, DEC) 3 times (15)

Row 8 :

15 SC (15)

Row 9 :

(3 SC, DEC) 3 times (12)

Row 10 :

12 SC (12)

Row 11 :

(2 SC, DEC) 3 times (9)

Info :

*Stuffing* Fasten off and leave a long tail for sewing the horn to the strap for slippers in R14, apart 4 stitch

β€” Ears: (MAKE 4) :

Info :

Use Light brown yarn - Hook: 6mm

Row 1 :

6 SC in an MR (6)

Row 2 :

Turn, CH, 6 INC (12)

Row 3 :

Turn, CH, 12 SC (12)

Info :

Sew two sides together. Fasten off and leave a long tail for sewing. Sew the ears in R14-R15, next to the horn.

β€” Muzzle: (MAKE 2) :

Info :

Use Red yarn - Hook: 3.5mm

Row 1 :

6 SC in an MR (6)

Row 2 :

6 INC (12)

Row 3 :

(3 SC, INC) 3 times (15)

Row 4 :

15 SC (15)

Row 5 :

(3 SC, DEC) 3 times (12)

Row 6 :

6 DEC (6)

Info :

*Stuffing* Fasten off and leave a long tail for sewing in the middle of row 5. Attach the eyes in R10, apart 4 SC.

Assembly Instructions

  • Join the two sole pieces together by placing the left sides inward and crochet 72 Slst around the edge to join the soles securely; cut the yarn and weave in ends.
  • Work the strap by counting back 31 stitches from the last slip-stitch row, join yarn and crochet rows 1-17 as instructed, working in BLO where specified; this forms the top strap that attaches to the sole.
  • Sew the horns to the strap at round 14 (R14), spacing them so the horns sit apart by 4 stitches; use the long tails left from the horns to secure them firmly.
  • Sew the ears with two sides together and attach the ears at rounds R14-R15 next to the horns using yarn tails and a yarn needle for a neat finish.
  • Attach the muzzles to the front of each slipper aligning them in the center front and sew through the middle of row 5 using the long tail left from finishing; place the safety eyes in R10, apart by 4 SC before final sewing.
  • Pin all parts in place before final sewing to check symmetry, then sew everything securely and weave in ends. Optionally use hot glue to reinforce small details like the nose inside the muzzle.

Important Notes

  • πŸ’‘Use stitch markers to mark the beginning of each row and critical join points, especially when joining the sole pieces and when working the strap in BLO.
  • πŸ’‘Work the strap entirely in the back loop only (BLO) to create the correct ridge and appearance for the strap section.
  • πŸ’‘Stuff small pieces like horns and muzzle firmly but not overstuffed to keep the proper shape without bursting stitches.
  • πŸ’‘Change yarn color where indicated (make one sole in white) and use the recommended hook sizes to maintain gauge and fit for the finished 30cm x 12cm slipper.
  • πŸ’‘Leave long yarn tails when fastening off small parts so you can sew them securely into place without extra knots or visible joining.

These Reindeer Slippers bring festive cheer and cozy comfort to your holidays. Make a matching pair for gifting or treat yourself to a handmade winter essential. Follow the full pattern for easy assembly and charming details. πŸ§ΆπŸŽ„

You ask,

we answer.

FAQs

What size will the finished piece be?

The finished slippers are approximately 30cm x 12cm (~11.8 x 4.7 inches) using the recommended yarn and hook sizes.

Can I use different yarn weights for this pattern?

Yes, but using different yarn weights will change the final size and texture; adjust hook sizes accordingly and make a gauge test before committing to a full pair.

Do I need prior crochet experience for this pattern?

This pattern is rated intermediate and requires familiarity with basic stitches, working in BLO, joining pieces, and simple shaping techniques.

How long does this project typically take to complete?

Most crocheters complete this project in 5-7 hours, though time may vary depending on experience, interruptions, and assembly complexity.

How are the soles joined together?

Place the two sole pieces with left sides inward and work 72 slip stitches around the edge to join them, then cut and weave in the yarn.