๐Ÿงถ Beautiful โœจ Detailed ๐Ÿ’ Adorable

Christmas Minion Amigurumi Pattern

Christmas Minion Amigurumi Pattern
4.4โ˜… Rating
5-7 Hours Time Needed
1.5K Made This
โœ‚๏ธ

Intermediate Level

Ideal for those with basic crochet experience, featuring slightly more advanced stitches and techniques to expand your skills.

โฑ๏ธ

Weekend Treat

Takes 5-7 hours, making it an enjoyable project to finish over a couple of days.

๐Ÿงธ

Cute Companion

An adorable friend to cherish, handcrafted with love to bring comfort and joy for years to come.

About This Christmas Minion Amigurumi Pattern

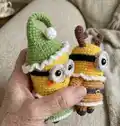
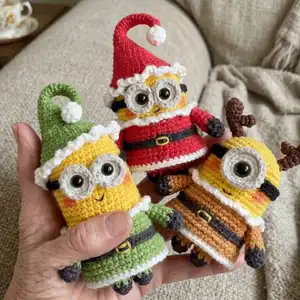
This pattern creates three tiny Christmas-themed minions with hats, collars, glasses and optional horns for Stuart. The toy is made in sport-weight yarn with simple color changes and small details for a festive finish. Youll get complete round-by-round instructions to crochet each body, hat, arm, leg, glasses and accessories.

Christmas Minion Amigurumi Pattern crochet pattern - detailed view of completed project

Perfect for gift making or holiday decor, the finished minions are small and portable. The pattern includes tips for sewing pieces together and hiding yarn tails for a clean finish.

Why You'll Love This Christmas Minion Amigurumi Pattern

I absolutely love this pattern because it turns a simple amigurumi shape into three charming holiday characters with minimal extra techniques. I enjoy the color-change rows and the way a small collar and hat completely change the personality of each minion. The pattern is compact enough for making several as gifts but detailed enough to produce neat, lasting results. I love seeing people personalize the hats and accessories to match their own holiday palette.

Christmas Minion Amigurumi Pattern step 1 - construction progress Christmas Minion Amigurumi Pattern step 2 - assembly progress Christmas Minion Amigurumi Pattern step 3 - details and accessories Christmas Minion Amigurumi Pattern step 4 - final assembly and finishing

Switch Things Up

I love how easy it is to customize these minions by changing shirt and hat colors โ€” you can make them match your holiday decor or make a whole family set.

I often swap the sport yarn for a slightly thicker yarn and a larger hook to create a chunkier, more cuddly version that works well as a small plush.

I sometimes embroider different mouths or add freckles for personality; a few simple stitches can change the expression dramatically.

Try sewing felt shapes instead of crocheted glasses for a softer, flatter look that still pops against the yellow face.

If you want a keychain, add a small jump ring and keychain hardware at the top of the hat before closing the final rounds.

I like to add tiny crocheted scarves or a miniature gift prop to one hand to turn each minion into a themed character.

You can make matching sets in birthday colors, not just Christmas โ€” change the trims and hat shape to suit any season.

For a posable option, I sometimes insert thin wire into the arms to bend them into different poses, then cover with yarn and sew in place.

I recommend trying different eye sizes and placements; moving the eyes slightly up or down alters the personality of each minion.

If you enjoy texture, replace the collar trim with a picot or bobble stitch to create a more decorative edge.

Common Mistakes & How to Fix Them

โœ— Skipping stitch markers when working continuous rounds causes you to lose the round start; place a marker at the first stitch of each round to stay oriented. โœ— Not changing colors at the correct stitch can shift stripes or bands; count carefully and switch yarn when the instruction shows exactly where to change. โœ— Under-stuffing the body makes the minion look floppy and uneven; stuff firmly and evenly as you go, especially before closing the final rounds. โœ— Pulling yarn tails too short prevents neat sewing and closing; leave long tails for sewing and weaving in, then hide them securely after assembly.

Christmas Minion Amigurumi Pattern

Make a trio of festive mini minions dressed for the holidays โ€” perfect as ornaments, gifts, or pocket pals. This pattern guides you through detailed rounds and color changes so you can crochet Bob, Kevin and Stuart in seasonal hats and outfits. Youll work small pieces like glasses, horns and hats with clear step-by-step rounds to get neat, professional results.

Intermediate 5-7 Hours

Materials Needed for Christmas Minion Amigurumi Pattern

โ€” Main Fabric

  • 01
    Sport weight yarn (size suitable for 1.5-2mm needles) in the following colors: Yellow (main body) - approx 25-40g per minion
  • 02
    Mini shirt colors: Red - 15-20g (Bob), Green - 15-20g (Kevin), Brown/Orange - 15-20g (Stuart)
  • 03
    Black yarn for boots, gloves, straps and decorations - small amount (10g)
  • 04
    White yarn for glasses and trims - small amount (10g)
  • 05
    Gray yarn for glasses rim - small amount (5g)
  • 06
    Dark brown yarn for horns - small amount (5g)
  • 07
    Fiberfill stuffing - small bag
  • 08
    Optional embroidery thread for mouth and details

โ€” Tools Required

  • 01
    Crochet hook size 2.0mm - 2.5mm (use hook to obtain gauge)
  • 02
    Safety eyes 8mm (2 pieces) or 8-10mm as desired
  • 03
    Scissors
  • 04
    Yarn needle for sewing and weaving ends
  • 05
    Stitch markers
  • 06
    Glue for fixing eyes (optional)
  • 07
    Pins for assembly (optional)

Progress Tracker

0% Complete

โ€” Materials :

Info :

Yarn: sport yarn size 1.5-2mm. Crochet hook: 2.0mm - 2.5mm sport yarn or any size to obtain gauge. Gauge: 9 single crochet and 9 rows yield a square with 1 inch sides for 2.0mm hook. Black safety eyes size 8-10mm (i used 8mm eyes). Black yarn or black embroidery thread for decorating. Fiberfill. Yarn needle. Stitch markers (if you need).

โ€” Abbreviations :

Infos :

MR: magic ring. Ch: chain. Slst: slip stitch. Sc: single crochet. Inc: increase (2 single crochet in one stitch). Dec: decrease (use invisible decrease). Hdc: half double crochet. Hdc-inc: half double crochet increase (2 half double crochet in one stitch). Dc: double crochet. Dc-dec: double crochet decrease. Dc-inc: double crochet increase. BLO: back loop only. FLO: front loop only. Rnds: rounds. Sts: stitch.

โ€” Bob's Body :

Round 1 :

7sc in MR (7)

Round 2 :

7 - inc (14)

Round 3 :

(sc, inc) * 7 (21)

Round 4 :

(inc, 2sc) * 7 (28)

Round 5 :

(3sc, inc) * 7 (35)

Round 6-14 :

(9 rnds) 35sc (35)

Info :

Switch to red yarn

Round 15 :

BLO (4sc, inc) * 7 (42)

Round 16-17 :

(2 rnds) 42sc (42)

Info :

Switch to black yarn

Round 18-19 :

(2 rnds) 42sc (42)

Info :

Switch to red yarn

Round 20 :

BLO 42sc (42)

Round 21 :

42sc (42)

Round 22 :

(4sc, dec) * 7 (35)

Round 23 :

(3sc, dec) * 7 (28)

Info :

Stuff the body tight with fiberfill

Round 24 :

(2sc, dec) * 7 (21)

Round 25 :

(sc, dec) * 7 (14)

Round 26 :

7 - dec (7)

Info :

Cut the yarn. Invisible fasten off. Thread a needle with your yarn tail and close the ramaining gap.

โ€” Kevin's Body :

Round 1 :

7sc in MR (7)

Round 2 :

7 - inc (14)

Round 3 :

(sc, inc) * 7 (21)

Round 4 :

(inc, 2sc) * 7 (28)

Round 5 :

(3sc, inc) * 7 (35)

Round 6-21 :

(16 rnds) 35sc (35)

Info :

Switch to green yarn

Round 22 :

BLO (4sc, inc) * 7 (42)

Round 23-24 :

(2 rnds) 42sc (42)

Info :

Switch to black yarn

Round 25-26 :

(2 rnds) 42sc (42)

Info :

Switch to green yarn

Round 27 :

BLO 42sc (42)

Round 28 :

42sc (42)

Round 29 :

(4sc, dec) * 7 (35)

Round 30 :

(3sc, dec) * 7 (28)

Info :

Stuff the body tight with fiberfill

Round 31 :

(2sc, dec) * 7 (21)

Round 32 :

(sc, dec) * 7 (14)

Round 33 :

7 - dec (7)

Info :

Cut the yarn. Invisible fasten off. Thread a needle with your yarn tail and close the ramaining gap.

โ€” Stuart's Body :

Round 1 :

7sc in MR (7)

Round 2 :

7 - inc (14)

Round 3 :

(sc, inc) * 7 (21)

Round 4 :

(inc, 2sc) * 7 (28)

Round 5 :

(3sc, inc) * 7 (35)

Round 6-17 :

(12 rnds) 35sc (35)

Info :

Switch to brown yarn

Round 18 :

BLO (4sc, inc) * 7 (42)

Round 19-20 :

(2 rnds) 42sc (42)

Info :

Switch to black yarn

Round 21-22 :

(2 rnds) 42sc (42)

Info :

Switch to brown yarn

Round 23 :

BLO 42sc (42)

Round 24 :

42sc (42)

Round 25 :

(4sc, dec) * 7 (35)

Round 26 :

(3sc, dec) * 7 (28)

Info :

Stuff the body tight with fiberfill

Round 27 :

(2sc, dec) * 7 (21)

Round 28 :

(sc, dec) * 7 (14)

Round 29 :

7 - dec (7)

Info :

Cut the yarn. Invisible fasten off. Thread a needle with your yarn tail and close the ramaining gap.

โ€” Arms :

Info :

With black and minion shirt's yarn (make two)

Round 1 :

start with black 4sc in MR (4)

Round 2 :

4 - inc (8)

Info :

Switch color

Round 3-8 :

(6 rnds) 8sc (8)

Info :

Cut the yarn. Leave a long tail. Thread a needle with your yarn tail and sew to the body at the round you switch to minion shirt's color yarn.

โ€” Legs :

Info :

With black and minion shirt's yarn.

Round 1 :

start with black 7sc in MR (7)

Round 2 :

inc, 6sc (8)

Info :

Switch color

Round 3-4 :

8sc (8)

Info :

Cut the yarn. Leave a long tail. Thread a needle with your yarn tail and sew the legs to bottom of the body.

โ€” Bob's and Kevin's Glasses :

Info :

With white and gray.

Round 1 :

start with white 7sc in MR (7)

Round 2 :

7 - inc (14)

Info :

Switch to gray

Round 3 :

FLO 14sc, slst(14)

Info :

Cut the yarn. Leave a long tail. Thread a needle with your yarn tail and sew the glasses to the body. Place the eyes on glasses and use glue to stick them to the body.

โ€” Stuart's Glasses :

Info :

With white and gray.

Round 1 :

start with white 7sc in MR (7)

Round 2 :

7 - inc (14)

Round 3 :

(sc, inc) * 7 (21)

Info :

Switch to gray

Round 4 :

FLO 21sc, slst (21)

Info :

Cut the yarn. Leave a long tail. Thread a needle with your yarn tail and sew the glasses to the body. Place the eye on the glasses and use glue to stick it to the body.

โ€” Black trap for Bob and Kevin glasses :

Item Name (P1) :

Start with black yarn, ch32, 31 - slst on chain. Cut the yarn. Leave a long tail. Thread a needle with your yarn tail and sew it to the body of minion.

โ€” Black trap for Stuart glasses :

Item Name (P1) :

Start with black yarn, ch37, 36sc on chain. Cut the yarn. Leave a long tail. Thread a needle with your yarn tail and sew it to the body of minion.

โ€” Piece of shirt :

Info :

With minion shirt's yarn. Insert your hook to FLO stitches of the second BLO round on the body,

Round 1 :

ch1, (5sc, inc) * 7, slst (49)

Round 2-3 :

(2 rnds) ch1, 49sc, slst (49)

Info :

Switch to white yarn

Round 4 :

49sc, slst (49)

Info :

Cut the yarn. Invisible fasten off. Hide your yarn tail.

โ€” Collar :

Info :

With white yarn. Insert your hook to FLO stitches of the first BLO round on the body, (ch 3, slst to the next stitch) * end round

Info :

Cut the yarn. Invisible fasten off. Hide your yarn tail.

โ€” Bob's and Kevin's hat :

Info :

With minion shirt's yarn

Round 1 :

4sc in MR (4)

Round 2-4 :

(3 rnds) 4sc (4)

Round 5 :

3sc, inc (5)

Round 6-8 :

(3 rnds) 5sc (5)

Round 9 :

4sc, inc (6)

Round 10-12 :

(3 rnds) 6sc (6)

Round 13 :

(sc, inc) * 3 (9)

Round 14 :

9sc (9)

Round 15 :

(2sc, inc) * 3 (12)

Round 16-17 :

(2 rnds) 12sc (12)

Round 18 :

(sc, inc) * 6 (18)

Round 19 :

18sc (18)

Round 20 :

(2sc, inc) * 6 (24)

Round 21 :

24sc (24)

Round 22 :

(3sc, inc) * 6 (30)

Round 23 :

(4sc, inc) * 6 (36)

Round 24 :

2sc, inc, (5sc, inc) * 5, 3sc (42)

Round 25 :

42sc (42)

Info :

Switch to white yarn

Round 26 :

42sc (42)

Round 27 :

(Ch 3, slst to the next stitch) * end round

Info :

Cut the yarn. Invisible fasten off. Hide your yarn tail.

โ€” Stuart's horn :

Info :

With dark brown yarn. Make two.

Big piece - Round 1 :

6sc in MR (6)

Big piece - Round 2 :

(2sc, inc) * 2 (8)

Big piece - Round 3 :

8sc (8)

Big piece - Round 4 :

2sc, 2 - dec, 2sc (6)

Big piece - Round 5 :

2sc, dec, 2sc (5)

Big piece - Round 6-7 :

(2 rnds) 5sc (5)

Big piece - Round 8 :

3sc, dec, slst (4)

Info :

Cut the yarn. Leave a long tail for sewing.

Small piece - Round 1 :

4sc in MR (4)

Small piece - Round 2-3 :

(2 rnds) 4sc (4)

Info :

Cut the yarn. Leave a long tail. Thread a needle with your yarn tail. Sew small piece to big piece spanning rounds 5&6. Sew the horn to the top of minion spanning rounds 4&5.

Assembly Instructions

  • Sew arms to the body at the round you switched to the minion shirt color, using the long tail left when you cut the yarn and secure with a few tight stitches.
  • Sew legs to the bottom of the body evenly spaced so the minion stands upright; use the long tails and reinforce with backstitches for stability.
  • Attach glasses to the front by sewing through the white band and gluing or securing safety eyes onto the glasses before fixing them to the face.
  • Sew hats and collars in place after positioning them; hide yarn tails inside the body and reinforce attachment points with a few extra stitches.
  • Sew horns to the top of Stuart by aligning the horn base to rounds 4 and 5 on the head and stitching securely from the inside for a neat finish.

Important Notes

  • ๐Ÿ’กUse stitch markers to mark the beginning of rounds, especially when working continuous rounds and color changes.
  • ๐Ÿ’กStuff the body firmly but evenly; overstuffing can distort shaping and understuffing makes the toy floppy.
  • ๐Ÿ’กChange colors neatly by finishing the last loop of the stitch with the new color to avoid loose floats and visible joins.
  • ๐Ÿ’กLeave long yarn tails when you cut pieces so you can sew them in place easily and hide ends inside the body for a clean finish.

These little Christmas Minions are a lovely, handmade way to celebrate the season and share a smile. Make a set in different colors for a festive display or giveaway to friends and family. Small, portable and full of personality โ€” theyre perfect for tree decorations or pocket-sized gifts. ๐ŸŽ„๐Ÿงถ

You ask,

we answer.

FAQs

What size will the finished piece be?

The finished amigurumi measures approximately 8-12 cm tall depending on yarn and hook; using the recommended sport yarn and 2.0mm-2.5mm hook yields a small palm-sized minion.

Can I use different yarn weights for this pattern?

Yes, you can use different yarn weights but your finished size will change; use a larger hook with bulkier yarn for a chunkier minion or thinner yarn and a smaller hook for a tiny version.

Do I need prior crochet experience for this pattern?

This pattern is rated intermediate, so basic knowledge of single crochet, increases, decreases and working in the round is recommended for best results.

How long does this project typically take to complete?

Most crocheters complete one minion in about 5-7 hours, depending on experience and how many accessories you add; making all three may take a weekend.