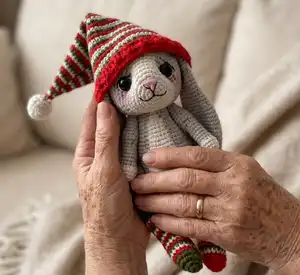
Make a sweet handmade Christmas Bunny to gift or decorate this season. This pattern guides you through crocheting a soft bunny with a striped hat and matching stockings. Youll find clear round-by-round instructions, color-change jacquard tips, and step-by-step assembly notes to complete a charming amigurumi. Perfect for gifting or holiday displays.
Progress Tracker
0% Complete
— Arms :
Info :
Place row marker here. Stuff with fiberfill in the process.
Round 2 :
(1sc, inc) *3 (9)
Round 3 :
(2sc, inc) *3 (12)
Round 5 :
Change color to Gray. BLO (2sc, dec) *3 (9)
Round 6-11 :
9sc (6 rounds) (9)
Round 12 :
3sc, 3inc, 3sc (12)
Round 13-19 :
12sc (7 rounds) (12)
Info :
Fasten off, cut the yarn, weave in the yarn ends.
— Tail :
Info :
Place row marker here.
Round 3 :
(1sc, inc) *6 (18)
Round 5 :
(1sc, dec) *6 (12)
Info :
Stuff with fiberfill. Leave a long tail for sewing.
— Legs :
Info :
Place row marker here.
Round 4 :
Change color to Gray. 12sc (12)
Round 5-9 :
12sc (5 rounds) (12)
Info :
Stuff with fiberfill in the process.
Heel (P1) :
1. 5sc, turn (5). 2. ch1, 5sc, turn (5). 3. ch1, 5sc, turn (5). 4. ch1, 5sc, turn (5).
Round 10 :
Return to crochet the legs. Work in a spiral: dec, sc, 3dec, 5sc, 2dec (12)
Round 12 :
(2sc, dec) *3 (9)
Round 13-14 :
9sc (2 rounds) (9)
Round 15 :
(2sc, inc) *3 (12)
Round 17 :
(3sc, inc) *3 (15)
Round 18-20 :
15sc (3 rounds) (15)
Round 21 :
(4sc, inc) *3 (18)
Round 22-27 :
18sc (6 rounds) (18)
Round 28 :
(1sc, dec) *6 (12)
Info :
Stuff the legs with fiberfill. Fasten off, cut the yarn, weave in the ends.
— Body :
Info :
Place row marker here.
Round 3 :
(1sc, inc) *6 (18)
Round 4 :
(2sc, inc) *6 (24)
Round 5 :
(3sc, inc) *6 (30)
Round 6 :
(4sc, inc) *6 (36)
Round 7 :
(5sc, inc) *6 (42)
Round 8 :
(6sc, inc) *6 (48)
Round 9 :
(7sc, inc) *6 (54)
Info :
Attention! Crochet in jacquard technique from Rnd 11 to 27. Add White yarn (these stitches are highlighted in red)
Round 11 :
10sc, 8sc, 36sc (54)
Round 12 :
9sc, 10sc, 35sc (54)
Round 13 :
8sc, 12sc, 34sc (54)
Round 14 :
8sc, 12sc, 34sc (54)
Round 15 :
8sc, 12sc, 9sc, (2sc, dec) *6, 1sc (48)
Round 16 :
9sc, 10sc, 29sc (48)
Round 17 :
9sc, 10sc, 29sc (48)
Round 18 :
9sc, 10sc, 29sc (48)
Round 19 :
6sc, dec, 2sc, 8sc, 1sc, dec, 1sc, dec, (6sc, dec) *3 (42)
Round 20 :
9sc, 8sc, 25sc (42)
Round 21 :
9sc, 8sc, 25sc (42)
Round 22 :
9sc, 8sc, 25sc (42)
Round 23 :
5sc, dec, 3sc, 6sc, dec, 1sc, dec, (5sc, dec) *3 (36)
Round 24 :
9sc, 6sc, 21sc (36)
Round 25 :
9sc, 6sc, 21sc (36)
Round 26 :
4sc, dec, 4sc, 2dec, (dec, 4sc) *3, 4sc (30)
Round 27 :
9sc, 2sc, 19sc (30)
Info :
Stuff the body with fiberfill. Leave a long tail for sewing.
— Head :
Info :
Place row marker here.
Round 3 :
3inc, 3sc, 3inc, 3sc (18)
Round 4 :
(2sc, inc) *6 (24)
Round 5 :
(3sc, inc) *6 (30)
Round 6 :
(4sc, inc) *6 (36)
Round 7-9 :
36sc (3 rounds) (36)
Round 10 :
Change color to Gray. Attention! Crochet in jacquard technique from Rnd 10 to 13. Add white yarn (these stitches are highlighted in red)
Round 10 (cont) :
(5sc, inc) *2, 1sc, inc, 8sc, inc, 1sc, (5sc, inc) *2 (42)
Info :
Insert the eyes between rounds 7-8 at a distance of 10-12 stitches.
Round 11 :
(6sc, inc) *2, 3sc, inc, 6sc, inc, 3sc, (6sc, inc) *2 (48)
Round 12 :
(7sc, inc) *2, 5sc, inc, 4sc, inc, 5sc, (7sc, inc) *2 (54)
Round 13 :
(8sc, inc) *2, 7sc, inc, 2sc, inc, 7sc, (8sc, inc) *2 (60)
Round 14-21 :
With Gray yarn 60sc (8 rounds) (60)
Round 22 :
(8sc, dec) *6 (54)
Round 23 :
(7sc, dec) *6 (48)
Round 24 :
(6sc, dec) *6 (42)
Round 25 :
(5sc, dec) *6 (36)
Round 26 :
(4sc, dec) *6 (30)
Round 27 :
(3sc, dec) *6 (24)
Info :
Stuff the head with fiberfill.
Round 28 :
(2sc, dec) *6 (18)
Round 29 :
(1sc, dec) *6 (12)
Info :
Fasten off, cut the yarn, weave in the ends.
— Ears :
Info :
Place row marker here.
Round 4 :
(1sc, inc) *6 (18)
Round 6 :
(2sc, inc) *6 (24)
Round 8 :
(3sc, inc) *6 (30)
Round 9-18 :
30sc (10 rounds) (30)
Round 19 :
(3sc, dec) *6 (24)
Round 20-26 :
24sc (7 rounds) (24)
Round 27 :
(2sc, dec) *6 (18)
Round 28-31 :
18sc (4 rounds) (18)
Round 32 :
(1sc, dec) *6 (12)
Round 33-34 :
12sc (2 rounds)
Info :
Do not stuff. Leave a long tail for sewing.
— Assembly :
Info :
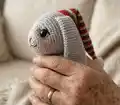
Sew the head to the body. Tighten cheeks following the pictures provided.
Info :
Fasten the legs and the arms to the body with a button mount as shown in the photos.
Info :
Sew the ears to the head in position shown. Sew the tail to the body.
Info :
Embroider the nose with pink thread. Embroider the eyelids, outline of the nose and mouth with black thread.
Info :
Embroider the inside of the ears and cheeks with black thread with pink pastel. Embroider claws on the legs with black thread.
— Stockings :
Right stocking (P1) :
With Red yarn. 1. 6sc in MR. Place row marker here. 2. 6inc (12). 3. (1sc, inc) *6 (18). 4. 18sc (18). 5. Change color to Minty. 18sc (18). 6. Change color to Green. 18sc (18). 7. Change color to Red. 18sc (18). 8. Change color to Minty. 18sc (18). 9. Change color to Green. 18sc (18). 10. Change color to Red. 18sc (18). 11. Change color to Minty. 18sc (18).
Right stocking heel (P1) :
Change color to Red. Crochet the heel in rows with Red yarn: 1. (do not turn) 8sc, turn (8). 2. ch1, 8sc, turn (8). 3. ch1, 8sc, turn (8). 4. ch1, 8sc, turn (8).
Right stocking continued :
12. Change color to Green. Return to crochet the stocking. Work in a spiral: dec, 4sc, 4dec, 6sc, 3dec (18). 13. Change color to Red. 18sc (18). 14. Change color to Minty. 18sc (18). 15. Change color to Green. 18sc (18). 16. Change color to Red. 18sc (18). 17. Change color to Minty. 18sc (18). 18. Change color to Green. 18sc (18). 19. Change color to Red. 18dc, sl st (18). 20. ch2, (FPdc, BPdc ) *9, sl st. Fasten off, cut the yarn, weave in the yarn ends.
Left stocking (P1) :
With Green yarn. 1. 6sc in MR. Place row marker here. 2. 6inc (12). 3. (1sc, inc) *6 (18). 4. 18sc (18). 5. Change color to Red. 18sc (18). 6. Change color to Minty. 18sc (18). 7. Change color to Green. 18sc (18). 8. Change color to Red. 18sc (18). 9. Change color to Minty. 18sc (18). 10. Change color to Green. 18sc (18). 11. Change color to Red. 18sc (18).
Left stocking heel (P1) :
Change color to Green. Crochet the heel in rows with Green yarn: 1. (do not turn) 8sc, turn (8). 2. ch1, 8sc, turn (8). 3. ch1, 8sc, turn (8). 4. ch1, 8sc, turn (8).
Left stocking continued :
12. Change color to Minty. Return to crochet the stocking. Work in a spiral: dec, 4sc, 4dec, 6sc, 3dec (18). 13. Change color to Green. 18sc (18). 14. Change color to Red. 18sc (18). 15. Change color to Minty. 18sc (18). 16. Change color to Green. 18sc (18). 17. Change color to Red. 18sc (18). 18. Change color to Minty. 18sc (18). 19. Change color to Green. 18dc, sl st (18). 20. ch2, (FPdc, BPdc) *9, sl st. Fasten off, cut the yarn, weave in the yarn ends.
— Cap :
Round 1 :
With White yarn (Alize Softy). 6sc in MR (6)
Info :
Place row marker here.
Round 3 :
(1sc, inc) *6 (18)
Round 4-5 :
18sc (2 rounds) (18)
Round 6 :
(1sc, dec) *6 (12)
Round 8 :
Change color to Green. 6sc (6)
Round 9 :
Change color to Red. 6sc (6)
Round 10 :
Change color to Minty. (1sc, inc) *3 (9)
Round 11 :
Change color to Green. 9sc (9)
Round 12 :
Change color to Red. (2sc, inc) *3 (12)
Round 13 :
Change color to Minty. 12sc (12)
Round 14 :
Change color to Green. (3sc, inc) *3 (15)
Round 15 :
Change color to Red. 15sc (15)
Round 16 :
Change color to Minty. (4sc, inc) *3 (18)
Round 17 :
Change color to Green. 18sc (18)
Round 18 :
Change color to Red. (5sc, inc) *3 (21)
Round 19 :
Change color to Minty. 21sc (21)
Round 20 :
Change color to Green. (6sc, inc) *3 (24)
Round 21 :
Change color to Red. 24sc (24)
Round 22 :
Change color to Minty. (7sc, inc) *3 (27)
Round 23 :
Change color to Green. 27sc (27)
Round 24 :
Change color to Red. (8sc, inc) *3 (30)
Round 25 :
Change color to Minty. 30sc (30)
Round 26 :
Change color to Green. (9sc, inc) *3 (33)
Round 27 :
Change color to Red. 3sc (33)
Round 28 :
Change color to Minty. (10sc, inc) *3 (36)
Round 29 :
Change color to Green. 36sc (36)
Round 30 :
Change color to Red. (11sc, inc) *3 (39)
Round 31 :
Change color to Minty. 39sc (39)
Round 32 :
Change color to Green. (12sc, inc) *3 (42)
Round 33 :
Change color to Red. 42sc (42)
Round 34 :
Change color to Minty. (13sc, inc) *3 (45)
Round 35 :
Change color to Green. 45sc (45)
Round 36 :
Change color to Red. (14sc, inc) *3 (48)
Round 37 :
Change color to Minty. 48sc (48)
Round 38 :
Change color to Green. (15sc, inc) *3 (51)
Round 39 :
Change color to Red. 51sc (51)
Round 40 :
Change color to Minty. (16sc, inc) *3 (54)
Round 41 :
Change color to Green. 54sc (54)
Round 42 :
Change color to Red. 54sc (54)
Round 43 :
Change color to Minty. (17sc, inc) *3 (57)
Round 44 :
Change color to Green. 57sc (57)
Round 45 :
Change color to Red. 57sc (57)
Round 46 :
Change color to Minty. (18sc, inc) *3 (60)
Round 47 :
Change color to Green. 60sc (60)
Round 48 :
Change color to Red. 60sc (60)
Round 49 :
Change color to Minty. 60sc (60)
Round 50 :
Change color to Green. (19sc, inc) *3 (63)
Round 51 :
Change color to Red. 63sc (63)
Round 52 :
Change color to Minty. 63sc (63)
Round 53 :
Change color to Red. 63sc (63)
Round 54 :
ch2, 62dc, sl st, turn (63)
Round 55 :
ch2, (FPdc, BPdc, FPdc ) *21. Fasten off, cut the yarn, weave in the yarn ends.
This Christmas Bunny is a heartfelt handmade gift ready to spread holiday cheer and cozy charm. Make one in festive stripes or soft pastels to match your style. Every tiny embroidered detail brings personality and warmth to this little companion. 🧶🎁