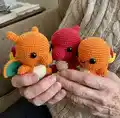
๐Ÿงถ Beautiful โœจ Detailed ๐Ÿ’ Adorable

Charmander Family Amigurumi Pattern

Charmander Family Amigurumi Pattern
4.8โ˜… Rating
5-7 Hours Time Needed
2.4K Made This
โœ‚๏ธ

Beginner Friendly Level

Perfect for those just starting their crochet journey, with clear instructions and simple techniques

โฑ๏ธ

Weekend Treat

Takes 5-7 hours, making it an enjoyable project to finish over a couple of days.

๐Ÿงธ

Cute Companion

An adorable friend to cherish, handcrafted with love to bring comfort and joy for years to come.

About This Charmander Family Amigurumi Pattern

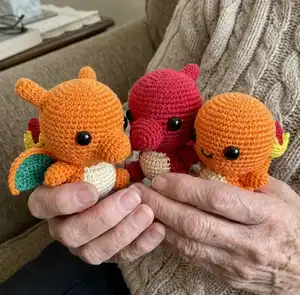
This pattern creates three small amigurumi Pokemon: Charmander, Charmeleon and Charizard, each with the same basic body and unique head/tail details. The instructions include full rounds for head, body, limbs, tail and accessories, with color guidance for each character. You will learn simple shaping, attaching safety eyes, embroidery for facial features and how to insert wire for a posable tail.

Charmander Family Amigurumi Pattern crochet pattern - detailed view of completed project

Clear abbreviations and step-by-step photos are included to help you visualise each stage. Suitable for crocheters who want an easy, result-driven amigurumi project.

Why You'll Love This Charmander Family Amigurumi Pattern

I absolutely love this pattern because it turns a handful of yarn into three instantly recognisable, huggable characters with personality. I enjoy how the same basic pieces can be customized by changing small details like horns, wings and tail flame to create Charmeleon or Charizard. The instructions are intentionally straightforward so I can relax while crocheting and still get professional-looking results. Every finished piece feels rewarding and makes a lovely gift or desk buddy.

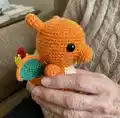
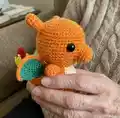
Charmander Family Amigurumi Pattern step 1 - construction progress Charmander Family Amigurumi Pattern step 2 - assembly progress Charmander Family Amigurumi Pattern step 3 - details and accessories Charmander Family Amigurumi Pattern step 4 - final assembly and finishing

Switch Things Up

I love how easy it is to customize this pattern by changing yarn colors โ€” try pastel shades for a softer, kawaii look or variegated yarn for a playful texture.

If you want a bigger version, I often use a bulkier yarn and increase hook size to make a chunky, cuddle-friendly amigurumi; conversely, finer yarn and a smaller hook create tiny keychain versions.

I frequently add embroidered freckles, stitched eyebrows or tiny felt accessories like hats or scarves to give each character extra personality.

For a posable tail, I sometimes use a thicker gauge wire or bundle multiple pipe cleaners inside the tail before stuffing for stronger shaping.

Try swapping safety eyes for hand-embroidered eyes to make the toy fully washable and safe for very young children.

To make a scene, I create a small stand or base using felt or crochet a tiny platform so the amigurumi can be displayed upright without tipping.

You can also create themed outfits โ€” a tiny crocheted cape, scarf or backpack works wonderfully and is a fun way to practice small accessory techniques.

Mix yarn textures by using plush yarn for the body and regular yarn for details like the flame to create interesting contrasts.

I sometimes add a loop at the top of the head and keyring to turn a mini version into a bag charm or ornament for gifting.

When gifting, I like to package multiples as a family set โ€” one Charmander, one Charmeleon and one Charizard โ€” and vary yarn shades slightly for a cohesive but unique collection.

Common Mistakes & How to Fix Them

โœ— Skipping stitch markers at the start of rounds will make counting increases difficult; place a stitch marker at the beginning of each round and move it after finishing the round. โœ— Overstuffing the head or body creates gaps and distorts shaping; stuff gradually, checking shape frequently and add small amounts to achieve a smooth finish. โœ— Not inserting safety eyes at the recommended rounds causes positioning problems; mark and count the stitches at rounds 13 and 13 positions as instructed and insert eyes before continuing. โœ— Forgetting to leave yarn tails for sewing will make assembly harder; leave long yarn tails when fastening off pieces intended for sewing so you can close and attach easily.

Charmander Family Amigurumi Pattern

Make your own adorable Charmander, Charmeleon and Charizard amigurumis with this friendly crochet pattern. You will find clear step-by-step rounds, helpful photos and assembly notes to guide you through every piece. Perfect for gifting or collecting, this pattern gives you the flexibility to create three classic Pokemon characters with simple color changes and small details. Grab your yarn and hook and start crocheting a cute companion!

Beginner Friendly 5-7 Hours

Materials Needed for Charmander Family Amigurumi Pattern

โ€” Main Fabric

  • 01
    Charmander: Orange yarn 100m / 110yd
  • 02
    Charmander: Light Yellow yarn 10m / 11yd
  • 03
    Charmander: Yellow yarn 10m / 11yd
  • 04
    Charmander: Red yarn 10m / 11yd
  • 05
    Charmander: Black - a strand for the mouth
  • 06
    Charmeleon: Red yarn 110m / 120yd
  • 07
    Charmeleon: Light Yellow yarn 10m / 11yd
  • 08
    Charmeleon: Yellow yarn 10m / 11yd
  • 09
    Charizard: Orange yarn 120m / 130yd
  • 10
    Charizard: Light Yellow yarn 10m / 11yd
  • 11
    Charizard: Yellow yarn 10m / 11yd
  • 12
    Charizard: Red yarn 10m / 11yd
  • 13
    Charizard: Teal yarn 15m / 16yd

โ€” Tools Required

  • 01
    Crochet hook: Use the recommended size for your yarn
  • 02
    Safety eyes: I recommend a size close to 20mm or 4/5 inch for worsted weight yarns
  • 03
    Polyester fiberfill
  • 04
    Stitch markers
  • 05
    Tapestry needles
  • 06
    Scissors
  • 07
    Wire or pipe cleaners for shaping the tails

Progress Tracker

0% Complete

โ€” Head & Body :

Info :

Orange Yarn for Charmander & Charizard. Red Yarn for Charmeleon.

Round 1 :

MR with 6sc (6)

Round 2 :

6inc (12)

Round 3 :

(1inc 1sc) x6 (18)

Round 4 :

(1sc 1inc 1sc) x6 (24)

Round 5 :

(1inc 3sc) x6 (30)

Round 6 :

(2sc 1inc 2sc) x6 (36)

Round 7 :

(1inc 5sc) x6 (42)

Round 8 :

(3sc 1inc 3sc) x6 (48)

Round 9-17 :

9 rounds of 48sc

Info :

At round 13, mark the 18th and 29th stitches for the pair of eyes that will be inserted later.

Round 18 :

(3sc 1dec 3sc) x6 (42)

Round 19 :

(1dec 5sc) x6 (36)

Round 20 :

(2sc 1dec 2sc) x6 (30)

Info :

Insert the eyes in the marked stitches.

Info :

Next, we will do the mouth for Charmander. Skip this step if you're making Charmeleon or Charizard.

Info :

Using a black yarn and tapestry needle, insert it from the inside of the head to the outside, at the round right below the eyes, with about 3 stitches of distance from each eye. Embroider a mouth with a "u" shape over the surface. You can also use glue to have a smoother mouth. Next, hide the remaining yarn inside the head. Continue with round 21.

Round 21 :

(1dec 3sc) x6 (24)

Round 22 :

(2sc 1dec 2sc) x4 (20)

Info :

Crochet the yellow instructions with the light yellow yarn.

Round 23 :

8inc 4inc 8inc (40)

Round 24-28 :

15sc 10sc 15sc (40)

Info :

Fill the head with stuffing.

Round 29 :

4sc 1dec 8sc 1dec 8sc 1dec 4sc (36)

Round 30 :

2sc 1dec 4sc 1dec 4sc 1dec 4sc 1dec 1sc 3sc 1dec 4sc 1dec 2sc (30)

Round 31 :

(1dec 3sc) x2, 1dec 3sc 1dec 3sc 1dec 2sc 1sc (1dec 3sc) x2 (24)

Round 32 :

1sc (1dec 2sc) x2 1dec 2sc 1dec (2sc 1dec) x2 1sc (18)

Info :

Keep adding more stuffing, and finally add some more before closing the body.

Round 33 :

(1dec 1sc) x6 (12)

Round 34 :

6dec (6)

Info :

F/o with slst and close the body, but don't hide the remaining yarn. Instead, get it to the bottom back of the body, near the area where the tail will be sewn. This yarn will be used to make a knot with the remaining yarn of the tail, and only then we will hide it inside the body.

โ€” Arms :

Info :

Use the matching color of your amigurumi.

Round 1 :

MR with 6sc (6)

Round 2 :

(2inc 1sc) x2 (10)

Round 3-6 :

4 rounds of 10sc

Info :

F/o with slst and leave a yarn tail for sewing. Fill half of each piece with stuffing.

โ€” Legs :

Info :

Use the matching color of your amigurumi.

Round 1 :

MR with 6sc (6)

Round 2 :

6inc (12)

Round 3-5 :

3 rounds of 12sc

Info :

F/o with slst and leave a yarn tail for sewing. Fill with stuffing.

โ€” Tail :

Info :

Use the matching color of your amigurumi.

Round 1 :

MR with 8sc (8)

Round 2-4 :

3 rounds of 8sc

Round 5 :

(1inc 3sc) x2 (10)

Round 6 :

10sc (10)

Round 7 :

(2sc 1inc 2sc) x2 (12)

Round 8 :

12sc (12)

Round 9 :

(1inc 5sc) x2 (14)

Round 10 :

14sc (14)

Round 11 :

(3sc 1inc 3sc) x2 (16)

Round 12 :

16sc (16)

Round 13 :

(1inc 7sc) x2 (18)

Round 14 :

18sc (18)

Round 15 :

(4sc 1inc 4sc) x2 (20)

Info :

F/o with slst and leave a yarn tail for sewing. Stuffing will be added later, after we insert the wire/pipe cleaners.

โ€” Tail Flame :

Info :

Red Yarn

Round 1 :

MR with 6sc (6)

Round 2 :

6inc (12)

Round 3 :

(1inc 1sc) x6 (18)

Round 4 :

BLO 18sc (18)

Round 5-6 :

2 rounds of 18sc

Round 7 :

(1dec 1sc) x6 (12)

Round 8 :

12sc (12)

Info :

Fill with stuffing and add some more before closing the piece.

Round 9 :

(1dec 2sc) x3 (9)

Round 10 :

(1dec 1sc) x3 (6)

Info :

F/o with slst and close the flame. Hide the remaining yarn.

Info :

Yellow Yarn

Round 1 :

MR with 6sc (6)

Round 2 :

6inc (12)

Round 3 :

(1inc 1sc) x6 (18)

Round 4 :

Crochet 18sc by inserting the hook in the front loop of round 4 of the red piece. (18)

Info :

Next, we will make 6 triangle-like shapes. Crochet one small then one big triangle 3x.

Small Triangle :

3ch, skip 1ch and do 1sc 1hdc, skip 1st and do 1slst.

Big Triangle :

6ch, skip 1ch and do 1sc 2hdc 2dc, skip 2st and do 2slst.

Info :

Leave a yarn tail, and with the tapestry needle attach the triangles to the flame.

โ€” Snout (Charmeleon & Charizard) :

Info :

Use the matching color of your amigurumi.

Round 1 :

MR with 6sc (6)

Round 2 :

6inc (12)

Round 3 :

(1inc 3sc) x3 (15)

Round 4 :

(2sc 1inc 2sc) x3 (18)

Round 5 :

18sc (18)

Round 6 :

(4sc 1inc 4sc) x2 (20)

Info :

F/o with slst and leave a yarn tail for sewing. Fill with stuffing.

โ€” Horn (Charmeleon & Charizard) :

Info :

Use the matching color of your amigurumi. 1 horn for Charmeleon, 2 for Charizard.

Round 1 :

MR with 6sc (6)

Round 2 :

(1inc 1sc) x3 (9)

Round 3-4 :

2 rounds of 9sc

Round 5 :

1inc 3sc, 1inc 4sc (11)

Round 6 :

11sc (11)

Round 7 :

1inc 4sc, 1inc 5sc (13)

Round 8 :

13sc (13)

Info :

F/o with slst and leave a yarn tail for sewing. Fill with stuffing.

โ€” Wings (Charizard) :

Info :

3-inc = 3sc in the same stitch.

Teal Yarn - Round 1 :

MR with 6sc (6)

Teal Yarn - Round 2 :

(3-inc 1sc) x3 (12)

Teal Yarn - Round 3 :

1sc 3-inc, (3sc 3-inc) x2, 2sc (18)

Teal Yarn - Round 4 :

2sc 3-inc, 5sc 1inc, 5sc 3-inc, 7sc (24) Go past the end of the round to get to the corner of the triangular piece.

Info :

F/o with slst and hide the remaining yarn on the "wrong" side. Make a 2nd one.

Orange Yarn - Round 1 :

MR with 6sc (6)

Orange Yarn - Round 2 :

(3-inc 1sc) x3 (12)

Orange Yarn - Round 3 :

1sc 3-inc, (3sc 3-inc) x2, 2sc (18)

Orange Yarn - Round 4 :

2sc 3-inc, 5sc 1inc, 5sc 3-inc, 8sc (24) Go past the end of the round to get to the corner of the triangular piece. Make 1ch and turn the piece around.

Round 5 :

8sc, (1sc 3ch-picot 1sc) in the same stitch, 8sc

Info :

F/o with slst and leave a yarn tail for sewing. Make the 2nd wing. Align corners of both pieces when sewing. Leave one wing yarn tail on the right side to ease sewing if desired.

โ€” Assembly :

Legs :

Placed 4 rounds below the head and occupies about 4 rounds of height. Keep about 4 to 5 stitches of distance between the legs.

Arms :

Placed right below the head. It's important that the needle gets through both sides of the arm, closing it during the process.

Snout :

Placed at eye height, and occupies about 7 rounds of height. Add some extra stuffing before you close the opening.

Horns :

Placed after round 6 of the head, and occupies about 4 rounds of height. For Charmeleon, place the horn right at the center of the head's back. For Charizard, place the horns in a diagonal angle similar to the pictures below. Add some extra stuffing before you close the opening.

Tail & Flame :

With the orange yarn, sew the flame to the end of the tail. Next, insert a piece of wire or pipe cleaners inside the tail until it reaches the flame (use as many as you need to have a nice and firm curvature of the tail), and then fill it with stuffing. Bend the tail until the flame gets positioned straight up. Place the tail 4 rounds below the head. Add some extra stuffing before you close the opening. With the remaining yarn tail, pull it out at the same point where we left the body's closing yarn, make a knot, cut the excess yarn and then hide it inside the body.

Wings (Charizard) :

Placed 1 round below the head, near the arms.

Assembly Instructions

  • Attach the legs 4 rounds below the head, spacing them about 4 to 5 stitches apart so the doll sits balanced.
  • Sew the arms just under the head, passing the needle through both sides of each arm to close and secure them while attaching.
  • Place the snout at eye height, stuffing it before closing and sew it centered between the eyes for Charmeleon and Charizard.
  • Sew horns after round 6 of the head; for Charmeleon place one horn at the back center, for Charizard place two horns at a diagonal angle as shown.
  • Sew the flame to the end of the tail, insert wire/pipe cleaners inside the tail to shape it, then stuff and bend so the flame stands upright; attach tail 4 rounds below head.
  • Align and sew both wing layers together, then attach the wings 1 round below the head near the arms, hiding yarn tails neatly.
  • Use the remaining body closing yarn and the tail yarn to tie a knot, hide ends inside the body, and weave in all loose ends.

Important Notes

  • ๐Ÿ’กUse stitch markers to keep track of rounds, especially where increases and placement for eyes are required.
  • ๐Ÿ’กStuff firmly but in small amounts to keep shape smooth; overstuffing can distort stitches and shaping.
  • ๐Ÿ’กAttach safety eyes before closing the head and double-check their placement by counting rounds and stitches.
  • ๐Ÿ’กLeave long yarn tails when fastening off components for easier sewing and neater finishing.

Bring a little piece of the Pokemon world to life with these charming amigurumis! ๐Ÿงถ Each pattern is designed to be approachable and rewarding, whether you're making Charmander, Charmeleon or Charizard. With clear rounds, helpful photos and friendly assembly notes, you'll have a cuddly companion in no time. โœจ Happy crocheting! ๐Ÿพ

You ask,

we answer.

FAQs

What size will the finished piece be?

The finished amigurumi measures approximately 15 cm (6 inches) tall when using the recommended worsted weight yarn and hook suggested in the materials.

Can I use different yarn weights for this pattern?

Yes, you can use different yarn weights but this will affect the final size. Use an appropriate hook for your chosen yarn and be mindful that safety eye sizing and stuffing amounts may need adjusting.

Do I need prior crochet experience for this pattern?

This pattern is rated beginner friendly and is ideal if you know basic stitches like single crochet, increase and decrease, plus how to work in a magic ring.

How long does this project typically take to complete?

Most crocheters complete one character in about 5-7 hours depending on experience, customization and assembly time.