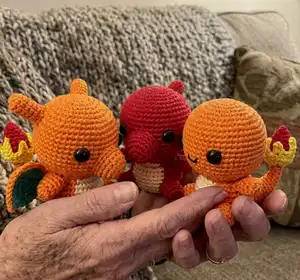
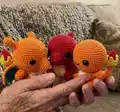
🧢 Beautiful ✨ Detailed πŸ’ Adorable

Charmander Amigurumi Pattern

Charmander Amigurumi Pattern
4.3β˜… Rating
5-7 Hours Time Needed
2.5K Made This
βœ‚οΈ

Beginner Friendly Level

Perfect for those just starting their crochet journey, with clear instructions and simple techniques

⏱️

Weekend Treat

Takes 5-7 hours, making it an enjoyable project to finish over a couple of days.

🧸

Cute Companion

An adorable friend to cherish, handcrafted with love to bring comfort and joy for years to come.

About This Charmander Amigurumi Pattern

This pattern creates a small, charming Charmander amigurumi with optional Charmeleon and Charizard variations. You will crochet separate parts (head, body, arms, legs, tail, flame and details) and sew them together for a neat finish. The instructions include shaping tips, color notes and simple assembly directions to help you complete a polished toy.

Charmander Amigurumi Pattern crochet pattern - detailed view of completed project

Worked in continuous rounds using basic crochet stitches, the pieces are assembled with clear placement guidelines. The pattern also includes options for horns, wings and a flame tail to customize each evolution.

Why You'll Love This Charmander Amigurumi Pattern

I absolutely love this pattern because it captures the personality of Charmander in a compact, huggable form. I enjoy the way the simple shaping creates a very expressive head and body with minimal pieces. The pattern is versatile so I can make Charmander, Charmeleon or Charizard variations without learning a new pattern each time. Sewing and assembly feel satisfying and the finished toy is durable and great for gifting.

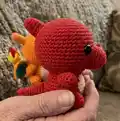
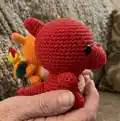
Charmander Amigurumi Pattern step 1 - construction progress Charmander Amigurumi Pattern step 2 - assembly progress Charmander Amigurumi Pattern step 3 - details and accessories Charmander Amigurumi Pattern step 4 - final assembly and finishing

Switch Things Up

I love how easy it is to customize this pattern with different yarns and colors; try pastel tones for a soft, modern take on the character.

I sometimes change yarn weight and hook size to make keychain mini versions or larger cuddle-sized toys depending on the recipient.

I often add embroidered eyebrows or freckles to give each amigurumi a unique expression and personality.

I like to swap the safety eyes for embroidered eyes for a fully baby-safe version if the toy is for small children.

I recommend experimenting with fuzzy or textured yarn for a different finish on the body while keeping smooth yarn for the belly and flame.

I add a small felt accessory, like a scarf or hat, to match seasons or holidays and make the toy gift-ready.

I sometimes stiffen the flame triangles slightly with a tiny bit of craft glue so they hold shape better before sewing them onto the red flame base.

I also like to use metallic or glitter thread sparingly for a sparkly accent on the flame tips for a playful effect.

I adjust eye placement and mouth embroidery to change the expression from shy to smiling, and I pin features first to see how the face looks before securing them.

I sometimes insert wire not only in the tail but also in the arms for posability; just wrap wire ends with tape before inserting to avoid poking through the yarn.

Common Mistakes & How to Fix Them

βœ— Skipping stitch markers during rounds can make increases harder to track; place stitch markers at the start of each round and at key marked stitches to stay aligned. βœ— Stuffing too early or too much will distort shaping; stuff gradually as you crochet and add extra stuffing right before closing to keep the form even. βœ— Not marking eye placement on the correct round leads to misaligned eyes; mark the 18th and 29th stitches at round 13 as instructed to place eyes evenly. βœ— Hiding yarn tails before assembly can make final sewing difficult; leave the closing yarn tail out and use it to tie the tail and hide only after making the knot.

Charmander Amigurumi Pattern

Make your own adorable Charmander amigurumi with clear step-by-step instructions for Charmander, Charmeleon and Charizard variations. This pattern walks you through each piece, from head to tail flame, and includes assembly tips so your toy looks great. Perfect for gifting or keeping as a handmade collectible, the pattern is written in an easy-to-follow style that guides you through shaping and finishing.

Beginner Friendly 5-7 Hours

Materials Needed for Charmander Amigurumi Pattern

β€” Main Fabric

  • 01
    Worsted weight cotton or yarn suitable for a 15 cm / 6 inch amigurumi (use the recommended hook for your yarn)
  • 02
    Charmander: Orange - 100m / 110yd; Light Yellow - 10m / 11yd; Yellow - 10m / 11yd; Red - 10m / 11yd; Black - a strand for the mouth
  • 03
    Charmeleon: Red - 110m / 120yd; Light Yellow - 10m / 11yd; Yellow - 10m / 11yd
  • 04
    Charizard: Orange - 120m / 130yd; Light Yellow - 10m / 11yd; Yellow - 10m / 11yd; Red - 10m / 11yd; Teal - 15m / 16yd
  • 05
    Small amounts of accent colors for details (black for mouth, teal for wings, light yellow for belly)

β€” Tools Required

  • 01
    Crochet hook: use the recommended size for your chosen yarn
  • 02
    Safety eyes approximately 20mm (about 4/5 inch) for worsted weight yarns
  • 03
    Polyester fiberfill for stuffing
  • 04
    Stitch markers
  • 05
    Tapestry/yarn needle for sewing and weaving ends
  • 06
    Scissors
  • 07
    Wire or pipe cleaners for shaping the tail (optional but recommended for tail pose)

Progress Tracker

0% Complete

β€” Head & Body :

Info :

Orange Yarn for Charmander & Charizard. Red Yarn for Charmeleon.

Round 1 :

MR with 6sc (6)

Round 2 :

6inc (12)

Round 3 :

(1inc 1sc) x6 (18)

Round 4 :

(1sc 1inc 1sc) x6 (24)

Round 5 :

(1inc 3sc) x6 (30)

Round 6 :

(2sc 1inc 2sc) x6 (36)

Round 7 :

(1inc 5sc) x6 (42)

Round 8 :

(3sc 1inc 3sc) x6 (48)

Round 9-17 :

9 rounds of 48sc (48)

Info :

At round 13, mark the 18th and 29th stitches for the pair of eyes that will be inserted later.

Round 18 :

(3sc 1dec 3sc) x6 (42)

Round 19 :

(1dec 5sc) x6 (36)

Round 20 :

(2sc 1dec 2sc) x6 (30)

Info :

Insert the eyes in the marked stitches.

Info :

Next, we will do the mouth for Charmander. Skip this step if youre making Charmeleon or Charizard.

Info :

Using a black yarn and tapestry needle, insert it from the inside of the head to the outside, at the round right below the eyes, with about 3 stitches of distance from each eye. Embroider a mouth with a "u" shape over the surface. You can also use glue to have a smoother mouth. Next, hide the remaining yarn inside the head. Continue with round 21.

Round 21 :

(1dec 3sc) x6 (24)

Round 22 :

(2sc 1dec 2sc) x4 (20)

Info :

Crochet the yellow instructions with the light yellow yarn.

Round 23 :

8inc 4inc 8inc (40)

Round 24-28 :

15sc 10sc 15sc (40)

Info :

Fill the head with stuffing.

Round 29 :

4sc 1dec 8sc 1dec 8sc 1dec 8sc 1dec 4sc (36)

Round 30 :

2sc 1dec 4sc 1dec 4sc 1dec 4sc 1dec 1sc 3sc 1dec 4sc 1dec 2sc (30)

Round 31 :

(1dec 3sc) x2, 1dec 3sc 1dec 3sc 1dec 2sc 1sc (1dec 3sc) x2 (24)

Round 32 :

1sc (1dec 2sc) x2 1dec 2sc 1dec (2sc 1dec) x2 1sc (18)

Info :

Keep adding more stuffing, and finally add some more before closing the body.

Round 33 :

(1dec 1sc) x6 (12)

Round 34 :

6dec (6)

Info :

F/o with slst and close the body, but dont hide the remaining yarn. Instead, get it to the bottom back of the body, near the area where the tail will be sewn. This yarn will be used to make a knot with the remaining yarn of the tail, and only then we will hide it inside the body.

β€” Arms :

Info :

Use the matching color of your amigurumi.

Round 1 :

MR with 6sc (6)

Round 2 :

(2inc 1sc) x2 (10)

Round 3-6 :

4 rounds of 10sc (10)

Info :

F/o with slst and leave a yarn tail for sewing. Fill half of each piece with stuffing.

β€” Legs :

Info :

Use the matching color of your amigurumi.

Round 1 :

MR with 6sc (6)

Round 2 :

6inc (12)

Round 3-5 :

3 rounds of 12sc (12)

Info :

F/o with slst and leave a yarn tail for sewing. Fill with stuffing.

β€” Tail :

Info :

Use the matching color of your amigurumi.

Round 1 :

MR with 8sc (8)

Round 2-4 :

3 rounds of 8sc (8)

Round 5 :

(1inc 3sc) x2 (10)

Round 6 :

10sc (10)

Round 7 :

(2sc 1inc 2sc) x2 (12)

Round 8 :

12sc (12)

Round 9 :

(1inc 5sc) x2 (14)

Round 10 :

14sc (14)

Round 11 :

(3sc 1inc 3sc) x2 (16)

Round 12 :

16sc (16)

Round 13 :

(1inc 7sc) x2 (18)

Round 14 :

18sc (18)

Round 15 :

(4sc 1inc 4sc) x2 (20)

Info :

F/o with slst and leave a yarn tail for sewing. Stuffing will be added later, after we insert the wire/pipe cleaners.

β€” Tail Flame (Red Yarn) :

Round 1 :

MR with 6sc (6)

Round 2 :

6inc (12)

Round 3 :

(1inc 1sc) x6 (18)

Round 4 :

BLO 18sc (18)

Round 5-6 :

2 rounds of 18sc (18)

Round 7 :

(1dec 1sc) x6 (12)

Round 8 :

12sc (12)

Info :

Fill with stuffing and add some more before closing the piece.

Round 9 :

(1dec 2sc) x3 (9)

Round 10 :

(1dec 1sc) x3 (6)

Info :

F/o with slst and close the flame. Hide the remaining yarn.

β€” Tail Flame (Yellow Yarn) :

Round 1 :

MR with 6sc (6)

Round 2 :

6inc (12)

Round 3 :

(1inc 1sc) x6 (18)

Round 4 :

Crochet 18sc by inserting the hook in the front loop of round 4 of the red piece. (18)

Info :

Next, we will make 6 triangle-like shapes. Crochet one small then one big triangle 3x.

Small Triangle :

3ch, skip 1ch and do 1sc 1hdc, skip 1st and do 1slst.

Big Triangle :

6ch, skip 1ch and do 1sc 2hdc 2dc, skip 2st and do 2slst.

Info :

Leave a yarn tail, and with the tapestry needle attach the triangles to the flame.

β€” Snout (Charmeleon & Charizard) :

Info :

Use the matching color of your amigurumi.

Round 1 :

MR with 6sc (6)

Round 2 :

6inc (12)

Round 3 :

(1inc 3sc) x3 (15)

Round 4 :

(2sc 1inc 2sc) x3 (18)

Round 5 :

18sc (18)

Round 6 :

(4sc 1inc 4sc) x2 (20)

Info :

F/o with slst and leave a yarn tail for sewing. Fill with stuffing.

β€” Horn (Charmeleon & Charizard) :

Info :

Use the matching color of your amigurumi. 1 horn for Charmeleon, 2 for Charizard.

Round 1 :

MR with 6sc (6)

Round 2 :

(1inc 1sc) x3 (9)

Round 3-4 :

2 rounds of 9sc (9)

Round 5 :

1inc 3sc, 1inc 4sc (11)

Round 6 :

11sc (11)

Round 7 :

1inc 4sc, 1inc 5sc (13)

Round 8 :

13sc (13)

Info :

F/o with slst and leave a yarn tail for sewing. Fill with stuffing.

β€” Wings (Charizard) :

Info :

3-inc = 3sc in the same stitch.

Teal Yarn Round 1 :

MR with 6sc (6)

Teal Yarn Round 2 :

(3-inc 1sc) x3 (12)

Teal Yarn Round 3 :

1sc 3-inc, (3sc 3-inc) x2, 2sc (18)

Teal Yarn Round 4 :

2sc 3-inc, 5sc 1inc, 5sc 3-inc, 7sc (24)

Info :

Go past the end of the round to get to the corner of the triangular piece. F/o with slst and hide the remaining yarn on the "wrong" side. Make a 2nd one.

Orange Yarn Round 1 :

MR with 6sc (6)

Orange Yarn Round 2 :

(3-inc 1sc) x3 (12)

Orange Yarn Round 3 :

1sc 3-inc, (3sc 3-inc) x2, 2sc (18)

Orange Yarn Round 4 :

2sc 3-inc, 5sc 1inc, 5sc 3-inc, 8sc (24)

Info :

Go past the end of the round to get to the corner of the triangular piece. Make 1ch and turn the piece around.

Round 5 :

8sc, (1sc 3ch-picot 1sc) in the same stitch, 8sc

Info :

F/o with slst and leave a yarn tail for sewing. Make the 2nd wing. Now both wings have the yarn tail on the left side, but one of them should be on the right side to make the sewing process easier. To fix this, grab the yarn and go through the orange stitches at the bottom side until you get it to where you want, the opposite end. You can use either crochet hook or tapestry needle to do this.

Assembly Instructions

  • Attach legs: Place the legs 4 rounds below the head so they occupy about 4 rounds of height; keep about 4 to 5 stitches distance between the legs for balance.
  • Attach arms: Position the arms right below the head; make sure the needle goes through both sides of the arm while sewing to close the arm and secure it in place.
  • Attach snout and horns: Place the snout at eye height so it occupies about 7 rounds of height; add extra stuffing before closing. For Charmeleon place one horn at the center back of the head; for Charizard place two horns at a diagonal angle similar to the pictures.
  • Tail & flame: Sew the flame to the end of the tail with the orange yarn. Insert a piece of wire or pipe cleaners inside the tail until it reaches the flame, then fill with stuffing and bend the tail so the flame points up.
  • Wings (Charizard): Place the wings 1 round below the head near the arms; align corners when sewing the teal and orange pieces together and stitch through both pieces to secure.
  • Hide closing yarns: Use the remaining yarn tail from the body closing and the tail to make a knot at the bottom back of the body, cut excess yarn and hide the knot inside the body before finishing.
  • Final finishing: Pin parts in place first to check symmetry, then whipstitch securely. Weave in ends and trim any excess for a clean finish.

Important Notes

  • πŸ’‘Use stitch markers to keep track of the start of rounds and marked eye positions for accurate placement.
  • πŸ’‘Stuff gradually and add extra stuffing just before closing pieces to maintain smooth shaping and avoid lumps.
  • πŸ’‘Pin parts prior to sewing to ensure proper alignment and symmetry while attaching arms, legs, tail and facial features.
  • πŸ’‘Leave closing yarn tails until assembly to make it easier to tie and hide knots; hide ends only after the final knot is secured.
  • πŸ’‘Use wire or pipe cleaners in the tail to position the flame and achieve a stable pose.

This cute Charmander amigurumi pattern includes Charmeleon and Charizard variations so you can make a whole evolution trio. The project is compact, fun to sew together, and perfect for gifting or displaying on a shelf. With simple stitches and clear photos, youll be finished in no time. 🧢πŸ”₯🧡

You ask,

we answer.

FAQs

What size will the finished piece be?

The finished amigurumi measures approximately 15 cm (6 inches) tall when using worsted weight yarn and the recommended hook size.

Can I use different yarn weights for this pattern?

Yes, you can use different yarn weights, but the final size will change. Use an appropriate hook for your yarn and adjust safety eye size accordingly.

Do I need prior crochet experience for this pattern?

This pattern is beginner friendly, so basic knowledge of amigurumi techniques (magic ring, single crochet, increases and decreases) is recommended.

How long does this project typically take to complete?

Most crocheters complete this project in 5-7 hours, though time may vary based on experience level, customization and assembly.