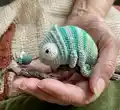
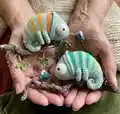
Create a charming chameleon named Conrad with this detailed amigurumi pattern. You will learn short rows, color joins, and an integrated musical pull-string insert. The pattern includes step-by-step photo tutorials and clear assembly directions to guide your stitching. Perfect for a handmade gift or a playful decoration.
Progress Tracker
0% Complete
— Head :
Info :
I highly recommend to use the x-shape sc for this pattern! It creates tight stitches which are standing much more on top of each other, compared to the v-shape sc. Also the shift of the beginning of the rnds will be less. If you use v-shape sc the beginning of the rnds will move much more to the right with every finished round, which will cause an unintentional twist of the body shape.
Instruction :
Using color A (main color / sage), make a magic loop.
Round 01 :
sc 6 into the magic loop (6)
Round 03 :
[°sc 3°, sc 3] 3x (18)
Round 04 :
sc 1, °sc 3°, sc 5, °sc 3°, sc 5, °sc 3°, sc 4 (24)
Round 05 :
sc 10, °sc 3°, sc 13 (26)
Round 06 :
sc 2, °sc 3°, sc 8, °sc 3°, sc 8, °sc 3°, sc 5 (32)
Round 07 :
sc 14, °sc 3°, sc 17 (34)
Round 08 :
sc 3, °sc 3°, sc 11, °sc 3°, sc 11, °sc 3°, sc 6 (40)
Round 09 :
sc 18, °sc 3°, sc 21 (42)
Round 10 :
sc 19, °sc 3°, sc 22 (44)
Round 11 :
sc 20, °sc 3°, sc 23 (46)
Round 13 :
sc 21, [inc] 2x, sc 23 (48)
Round 15 :
sc-blo 23, inc-blo, sc-blo 24 (49)
Round 17 :
sc 23, inc, sc 1, inc, sc 23 (51)
Round 18 :
sc 51 (→ photos 01+02)
Info :
Take the main color loop off the hook and safe it on a stitch marker. Starting in the first stitch of the rnd count 7 stitches forward (→ photo 03).
Round 19 :
(short row) Join color B (orange) with a slip knot (→ Tutorial D) into the 7th stitch (→ photos 04+05), sc 1 into the next stitch (→ photo 06), sc 35, slst 1, cut the yarn and close the row invisibly (→ Tutorial F).
Round 20 :
(short row) Join color B with a slip knot into the 5th stitch of the previous orange row (→ photo 07), sc 27, slst 1, cut the yarn close the row invisibly.
Round 21 :
(short row) Join color B with a slip knot into the 5th stitch of the previous orange row (→ photo 08), sc 18, slst 1, cut the yarn and close the row invisibly.
Info :
Pick up the main color loop.
Round 22 :
sc 6, sc 1 in same stitch as slip knot join (→ photos 10+11), sc 4, sc 1 in same st like slip knot join of 2nd orange row, sc 4, sc 1 in same st like slip knot join of 3rd orange row, sc 19.
Info :
You've reached the first closing stitch of a short row now. Insert the hook into both front loops, the one of the original stitch and the front loop of the sewn closing stitch above the original stitch (→ photos 13+14) and sc-flo 1 into the closing stitch. Work into both front loops only for every closing stitch of a short row here and throughout.
Round 23-24 :
(2 rnds) sc 51
Info :
Take the main color loop off the hook and safe it on a stitch marker. Starting in the first stitch of the rnd count 8 stitches forward.
Round 25 :
(short row) Join color C (yellow 1) with a slip knot into the 8th stitch (→ photo 19), sc 36, slst 1, cut the yarn, close row invisibly (→ Tutorial F).
Round 26 :
(short row) Join color C with a slip knot into the 5th stitch of the previous yellow row, sc 27, slst 1, cut the yarn and close the row invisibly.
Round 27 :
(short row) Join color C with a slip knot into the 5th stitch of the previous yellow row, sc 18, slst 1, cut the yarn and close the row invisibly.
Info :
Pick up the main color loop.
Round 28 :
sc 7, sc 1 in same stitch as slip knot join, sc 4, sc 1 in same st like slip knot join of 2nd yellow row, sc 4, sc 1 in same st like slip knot join of 3rd yellow row, sc 33 (51)
Round 29-30 :
(2 rnds) sc 51
Info :
Take the main color loop off the hook and safe it on a stitch marker. Now, take a short break fit in the music box insert and stuff the body.
— Music Box Insert :
Info :
Put the music box into the head. Use the crochet hook to draw the pull cord of the music box through the center of the magic loop (→ photos 20+21). On the outside, fasten the cord with a safety pin, stitch marker, or knot to stop it from slipping back inside the head.
Info :
Next, stuff the space in front of the music box well (→ photo 22)! Make sure the tip of the head is stuffed well enough to hold the music box back, when you pull the cord to make it play. Inside the body, place the music box with its top side turned towards the bottom of the body (→ photo 23), so that the cord stands in a straight line from where it comes out of the music box to the center of the magic loop. Now, stuff the space all around the music box very well so it can’t move much inside the body and you won’t feel its corners when you squeeze or snuggle the chameleon (→ photo 24). From now on, continue to stuff the body well as you go.
Round 31 :
(short row) Join color D (yellow 2) with a slip knot into the 9th stitch, sc 36, slst 1, cut the yarn and close the row invisibly. (→ photo 25)
Round 32 :
(short row) Join color D with a slip knot into the 5th stitch of the previous yellow row, sc 27, slst 1, cut the yarn and close the row invisibly.
Round 33 :
(short row) Join color D with a slip knot into the 5th stitch of the previous yellow row, sc 7, [dec] 2x, sc 7, slst 1, cut the yarn and close the row invisibly. (49)
Info :
Pick up the main color loop.
Round 34 :
sc 8, sc 1 in same stitch as slip knot join, sc 4, sc 1 in same st like slip knot join of 2nd yellow row, sc 4, sc 1 in same st like slip knot join of 3rd yellow row, sc 7, dec, sc 21 (48)
Round 35 :
sc 24, dec, sc 1, dec, sc 19 (46)
Round 36 :
sc 25, dec, sc 19 (→ photo 25) (45)
Info :
Take the main color loop off the hook and safe it on a stitch marker. Starting in the first stitch of the rnd count 10 stitches forward.
Round 37 :
(short row) Join color E (yellow 3) with a slip knot into the 10th stitch, sc 13, dec, sc 1, dec, sc 12, slst 1, cut the yarn and close the row invisibly (→ Tutorial F). (43)
Round 38 :
(short row) Join color E with a slip knot into the 5th stitch of the previous yellow row, sc 9, dec, sc 8, slst 1, cut the yarn and close the row invisibly. (42)
Round 39 :
(short row) Join color E with a slip knot into the 5th stitch of the previous yellow row, sc 2, dec, sc 1, dec, sc 2, slst 1, cut the yarn and close the row invisibly. (40)
Info :
Pick up the main color loop.
Round 40 :
sc 1, [dec] 2x, sc 4, sc 1 in same stitch as slip knot join, sc 4, sc 1 in same st like slip knot join of 2nd yellow row, sc 4, sc 1 in same st like slip knot join of 3rd yellow row, sc 2, dec, sc 16 (37)
Round 41 :
sc 18, dec, sc 1, dec, sc 14 (35)
Round 42 :
sc 1, dec, sc 15, dec, sc 15 (→ photos 26-28) (33)
Info :
Take the main color loop off the hook and safe it on a stitch marker. Starting in the first stitch of the rnd count 8 stitches forward.
Round 43 :
(short row) Join color F (yellow 4) with a slip knot into the 8th stitch, sc 8, dec, sc 1, dec, sc 8, slst 1, cut the yarn and close the row invisibly (→ Tutorial F). (31)
Round 44 :
(short row) Join color F with a slip knot into the 3rd stitch of the previous yellow row, sc 6, dec, sc 6, slst 1, cut the yarn and close the row invisibly. (30)
Round 45 :
(short row) Join color F with a slip knot into the 3rd stitch of the previous yellow row, sc 2, [dec] 2x, sc 2, slst 1, cut the yarn and close the row invisibly. (28)
Info :
Pick up the main color loop.
Round 46 :
sc 7, sc 1 in same stitch as slip knot join, sc 2, sc 1 in same st like slip knot join of 2nd yellow row, sc 2, sc 1 in same st like slip knot join of 3rd yellow row, sc 1, dec, sc 11 (27)
Info :
TIP: You'll work slip stitches in rnd 47 and throughout. Slip stitches are very tight stitches. You need to take care to crochet them very loosely, so that you can insert the hook easily in following rnds.
Round 47 :
sc 1, inc, sc 11, dec, sc 1, dec, sc 6, slst 3 (26)
Round 48 :
slst 8, sc 7, dec, sc 9 (→ photo 29) (25)
Info :
Take the main color loop off the hook and safe it on a stitch marker. Starting in the first stitch of the rnd count 9 stitches forward.
Round 49 :
(short row) Join color G/G1 (white/violet) with a slip knot into the 9th stitch, sc 4, dec, sc 1, dec, sc 4, slst 1, cut yarn and close the row invisibly (→ Tutorial F). (23)
Round 50 :
(short row) Join color G/G1 with a slip knot into the 3rd stitch of the previous white row, sc 1, [dec] 2x, sc 1, slst 1, cut the yarn and close the row invisibly. (21)
Info :
Pick up the main color loop.
Round 51 :
sc 3, inc, sc 4, sc 1 in same stitch as slip knot join, sc 2, sc 1 in same st like slip knot join of 2nd white row, sc 1, dec, sc 6 (21)
Round 52 :
slst 8, sc 4, [dec] 2x, sc 5
Round 53 :
sc 4, inc, sc 7, dec, sc 5 (→ photo 30) (19)
Round 54 :
(short row) Join color G (white) with a slip knot into the 8th stitch, sc 2, [dec] 2x, sc 2, slst 1, cut the yarn and close the row invisibly (→ Tutorial F). (17)
Round 55 :
(short row) Join color G with a slip knot into the 2nd stitch of the previous white row, sc 1, dec, slst 1, cut the yarn and close the row invisibly. (16)
Info :
Pick up the main color loop.
Round 56 :
slst 7 (pm in 1st slst = new beginning of following rnds), sc 1 in same stitch as slip knot join, sc 1, sc 1 in same st like slip knot join of 2nd white row, dec, sc 4 (15)
Round 57 :
sc 3, inc, sc 5, dec, sc 4
Round 58 :
sc 1, slst 6, sc 3, dec, sc 3 (→ photo 31) (14)
Round 59 :
(short row) Join color G (white) with a slip knot into the 5th stitch, sc 2, dec, sc 2, slst 1, cut the yarn and close the row invisibly (→ Tutorial F). (13)
Round 60 :
(short row) Join color G with a slip knot into the 1st stitch of the previous white row, sc 1, dec, slst 1, cut the yarn and close the row invisibly. (12)
Info :
Pick up the main color loop.
Round 61 :
sc 1, (pm = new beginning of following rnds), inc, sc 2, sc 1 in same stitch as slip knot join, sc 1 in same st like slip knot join of 2nd white row, dec, sc 3, slst 1 (12)
Round 62 :
slst 5, sc 2, dec, sc 3 (11)
Round 63 :
sc 2, inc, sc 4, dec, sc 2
Round 64 :
change to color G (white) (→ Tutorial B), slst 3 (pm in 1st slst = new beginning of following rnds), sc 3, dec, sc 3 (10)
Round 65 :
sc 1, inc, sc 3, dec, sc 3
Round 66 :
slst 1, change to main color, slst 2, sc 2, dec, sc 3 (9)
Round 67 :
sc 1, inc, sc 3, dec, sc 2 (8)
Round 68 :
sc 1, slst 3, sc 1, dec, sc 2
Round 69 :
sc 2, change to color G, inc, sc 2, dec, sc 1
Round 70 :
slst 3 (pm in 1st slst = new beginning of following rnds), sc 1, dec, sc 2 (7)
Round 71 :
sc 1, change to main color and cut yarn G, inc, sc 1, dec, sc 2 (6)
Round 72 :
sc 1, slst 3, sc 1, dec (6)
Round 73 :
sc 1 (pm = new beginning of following rnds), sc 2, dec, sc 1 (5)
Round 74-75 :
(2 rnds) sc 5 (→ photo 33)
Info :
Cut the yarn, leaving a very long tail and close the last rnd invisibly (→ Tutorial F). Thread a yarn needle with the main color yarn tail. Starting at the tip of the tail, roll up the chameleon tail as shown in photos 34+35. Fasten the curled up tail with a sewing stitch every second or third row. When the tail is all curled up, sew in the ends. (→ photo 36)
— Head Shield :
Round 01 :
Holding the body head down, join main color with a standing sc (→ Tutorial E) into the first remaining front loop of rnd 15 (→ photo 37), sc 21, inc, sc 1, inc, sc 22, inc (51)
Round 02 :
slst 1, sc 7, hdc 8, dc 6, [dc-inc] 3x, dc 6, hdc 8, sc 10, dec (53)
Round 03 :
sc 25, inc, sc 27 (54)
Info :
Cut the yarn and close the rnd invisibly (→ Tutorial F). (→ photos 38+39)
— Eyes (Make 2) :
Info :
Using color G (white), make a magic loop.
Round 01 :
sc 7 into a magic loop (7)
Round 03 :
[sc 1, inc] 7x (21)
Round 04-05 :
(2 rnds) sc 21
Info :
Slst 1 into the next stitch, cut the yarn with a very long rest and close the rnd invisibly (→ Tutorial F). Attach a black safety eye in the center of the magic loop. Make another eye the same way.
Info :
Pin the eyes in position between the bottom of rnd 06 and the top of rnd 13. Use the white yarn tail to sew the back loops of the stitches of the last round of the eye onto the body. Before closing the last few stitches, put a little bit of soft stuffing into the eye. Then finish the last stitches and weave in the ends. Sew a border around each eye with main color yarn by sewing around each front loop 3 times. Sew rather loosely and place the stitches evenly.
— Legs (Make 4) :
Piece A - Round 01 :
Using main color (sage), make a magic loop. sc 6 into a magic loop (6)
Piece A - Round 02-03 :
(2 rnds) sc 6
Info :
Slst 1 into the next stitch, cut the yarn and close rnd invisibly (→ Tutorial F).
Piece B :
Repeat instructions as given for piece A until the end of rnd 03. Don’t cut the yarn this time, but hold piece A next to the hook.
Piece B - Round 04 :
On piece A, sc 1 into the next stitch after the closing stitch (→ photo 48 / pm = 1st stitch), sc 4, skip the closing stitch on piece A and one stitch on piece B (→ photo 49), then sc 5 along piece B. (10)
Piece B - Round 05 :
sc 10
Piece B - Round 06 :
sc 1, sc3tog, sc 6 (8)
Piece B - Round 07 :
sc3tog, sc 5 (6)
Info :
Close the open end flat with a row of sc stitches: Fold, so that 2 stitches line each other in 2 layers (→ photo 50). Go through both layers at once: sc 2. Cut the yarn with a long rest to sew the leg onto the body. Make another 3 legs the same way. Pin the legs into place and sew the legs onto the body. Then weave in all ends.
— Fly :
Info :
Using color H (petrol), make a magic loop.
Round 01 :
sc 6 into a magic loop (6)
Info :
Take a break to attach the fly to the pull string of the music box. Draw the end of the pull string through the center of the magic ring and place the fly next to the tip of the snout of the chameleon with a distance of 2-3 cm (approx. 1 inch) between the fly and the tip of the snout (→ photo 53). Knot the end of the pull string near to the surface inside the body of the fly. Make sure the knot is big and fastened enough so it can’t slip back through the center of the magic loop when you pull the fly later to make the music box play.
Round 04-05 :
(2 rnds) sc 12 (12)
Round 06 :
[sc 1, dec] 4x, stuff the body (→ photo 54) (8)
Round 07 :
[inc-flo, sc-flo 1] 4x (12)
Info :
Attach the colored safety eyes (Ø10mm) between rnds 08 and 09 (→ photo 55). This could be a little bit challenging because the opening is very small. Also the shanks of the eyes could be a bit too long to fit into the head, so that you might need to cut off the end once the eye is placed. Now, stuff the head, cut the yarn, close the last rnd through the front loops (→ Tutorial G) and weave in the end. (→ photos 60-62)
— Wings (Make 2) :
Info :
Using color G (white) make a foundation chain of 4 ch. Start in the second ch from hook and crochet along the chain: slst 1, sc 1, sc 4 into the last stitch.
Instruction :
Next, along the other side of the chain: sc 1, slst 1, slst 1 into the first stitch of the rnd, ch 1. Cut the yarn with a long rest (→ photo 63). Make another wing the same way. Using the yarn tails, sew the wings onto the body – on the neck of the fly between rnds 06 and 07 (→ photo 64+65).
This delightful Conrad chameleon comes with a pull-string music box and tiny crochet fly for playful charm. The pattern guides you through short rows, color joins and assembly so you can create a neat, huggable friend. It’s perfect for gifts or nursery decor — a small handmade treasure to cherish. 🧶🎵