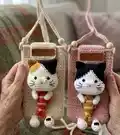
🧢 Beautiful ✨ Detailed πŸ’ Adorable

Cat Phone Pouch Amigurumi Pattern

Cat Phone Pouch Amigurumi Pattern
4.1β˜… Rating
5-7 Hours Time Needed
2.0K Made This
βœ‚οΈ

Intermediate Level

Ideal for those with basic crochet experience, featuring slightly more advanced stitches and techniques to expand your skills.

⏱️

Weekend Treat

Takes 5-7 hours, making it an enjoyable project to finish over a couple of days.

🧸

Cute Companion

An adorable friend to cherish, handcrafted with love to bring comfort and joy for years to come.

About This Cat Phone Pouch Amigurumi Pattern

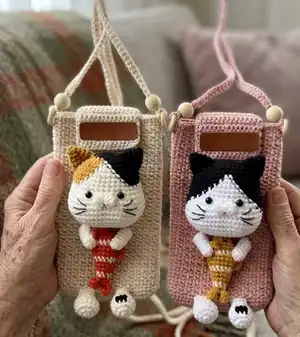
This pattern creates a charming cat phone pouch with a removable amigurumi cat holding a little fish. It includes step-by-step round instructions for the pouch, lid, strap, cat head, ears, muzzle, legs, arms and fish. The finished pouch measures approximately 17 cm long and 10 cm wide when worked with the recommended yarn and hook.

Cat Phone Pouch Amigurumi Pattern crochet pattern - detailed view of completed project

You will work simple single crochet rounds with some color changes and small sewn details. The pattern includes assembly instructions and helpful placement notes for eyes and components.

Why You'll Love This Cat Phone Pouch Amigurumi Pattern

I absolutely love this pattern because it combines practical function with a playful amigurumi character that brings a smile. I enjoy the small, detailed shaping of the cat head and fish β€” they are quick to make and very satisfying. The pouch is versatile and makes a sweet handmade gift that is useful too. I also love how easy it is to customise colors and tiny features to create different personalities.

Cat Phone Pouch Amigurumi Pattern step 1 - construction progress Cat Phone Pouch Amigurumi Pattern step 2 - assembly progress Cat Phone Pouch Amigurumi Pattern step 3 - details and accessories Cat Phone Pouch Amigurumi Pattern step 4 - final assembly and finishing

Switch Things Up

I love how easy this pattern is to customize β€” try different yarn colors to create tuxedo, calico or tabby cats for variety.

I often change the pouch color to a contrasting shade so the cat stands out; pastel pouches make a sweet gift for kids.

To make a mini keychain version I use thinner yarn and a smaller hook, and shorten the strap to a loop.

I sometimes embroider tiny eyebrows or freckles to change the cat's expression and personality.

Swap the fish colors or make a different tiny toy (a mouse or heart) to give the cat a new prop.

I occasionally add a small bell or a tiny crochet collar around the cat's neck for an extra cute detail.

If you want a sturdier pouch, line the inside with lightweight interfacing or fabric before attaching the lining pieces.

For a more polished finish, use buttons and wooden rings to create a detachable strap that you can replace or adjust.

I recommend experimenting with safety eye sizes β€” 6 mm gives a sweet look, while slightly larger eyes make a cuter expression.

Finally, try using a boucle or textured yarn for the pouch body to add visual interest and a cozy feel.

Common Mistakes & How to Fix Them

βœ— Skipping the instruction to start the foundation chain in the second ch can change the pouch width and edge; always start in the second chain from the hook as written. βœ— Not checking stitch counts after increases and decreases will cause shaping problems; count your stitches at the end of each round especially after rounds that include multiple increases or decreases. βœ— Forgetting to switch colors exactly where indicated can distort the face pattern; follow the color change rounds precisely and carry yarn or fasten off and rejoin when necessary. βœ— Overstuffing the head or fish leads to a bulky look that won’t fit the pouch; stuff gradually and stop when the shape is firm but soft so components sit nicely in the pouch.

Cat Phone Pouch Amigurumi Pattern

Make an adorable cat phone pouch with a removable amigurumi cat holding a fish. This pattern walks you through the pouch, strap, cat head, ears, muzzle, legs, arms and tiny fish with clear round-by-round instructions. You will love the playful details and compact size perfect for gifts or everyday use.

Intermediate 5-7 Hours

Materials Needed for Cat Phone Pouch Amigurumi Pattern

β€” Main Fabric

  • 01
    Jeans yarn from YarnArt - beige 05 (main pouch color) - small amount
  • 02
    Jeans yarn from YarnArt - pink 83 (alternative pouch color) - small amount
  • 03
    Jeans yarn from YarnArt - white 01 or cream 03 - small amount for face and details
  • 04
    Jeans yarn from YarnArt - black 53 - small amount for ears and markings
  • 05
    Jeans yarn from YarnArt - yellow 84 - small amount for fish or accents
  • 06
    Jeans yarn from YarnArt - orange 85 - small amount for fish

β€” Tools Required

  • 01
    Crochet hook size 2.3 mm
  • 02
    Two 6 mm safety eyes
  • 03
    Two 15 mm buttons
  • 04
    Polyester fiberfill
  • 05
    Stitch markers
  • 06
    Scissors
  • 07
    Yarn needle for sewing
  • 08
    Fabric glue for attaching head and fish

Progress Tracker

0% Complete

β€” Bag :

Info :

There are 2 ways to make a single crochet: v-stitch (yarn over single crochet) and x-stitch (yarn under single crochet). I use x-stitch (yarn under single crochet).

Info :

Make 24 ch, start in the second ch from hook

Round 1 :

22 sc, 3 sc in the last stitch, continue on the other side of the foundation chain, 21 sc, inc (48)

Round 2 :

inc, 21 sc, 3 inc, 21 sc, 2 inc (54)

Round 3 :

inc, 24 sc, 3 inc, 24 sc, 2 inc (60)

Round 4 :

60 sc (60)

Round 5 :

(1 ch, skip 1 stitch, 1 sc in the next stitch)*30 (60)

Round 6 :

(1 sc in the space of 1 ch, 1 sc in the next stitch)*30 (60)

Info :

From here: the odd rounds (7, 9, 11, 13, 15…) will be made same as round 5, the even rounds (8, 10, 12, 14, 16…) will be made same as round 6. And stop after finish the 48th round. Fasten off and weave the yarn.

β€” Lid of pouch :

Info :

Identify the 14 stitches in the middle of the 46th round

Round 1 :

14 sc, turn

Rounds 2-13 :

14 sc. Cut and weave the yarn. Sew the button into the lid of pouch.

β€” Make shoulder - strap :

Info :

Make 3 ch, start in the second ch from hook: 2 sc, turn

Round 2 :

2 sc, turn

Info :

Crochet repeat 2 sc until the shoulder-strap is about 113 cm. Fasten off and weave the yarn. Sew the shoulder - strap and button into the pouch.

β€” Head :

Info :

Style 1: Start in black. Red word: black yarn (B). Black word: white yarn (W).

Round 1 :

B 6 sc in the magic ring (6)

Round 2 :

B 6 inc (12)

Round 3 :

B (3 inc, 3 sc)*2 (18)

Round 4 :

B (4 inc, 5 sc)*2 (26)

Round 5 :

B (inc, 2 sc)*3, inc, 3 sc, (inc, 2 sc)*3, inc, 3 sc (34)

Round 6 :

B 1 sc, (inc, 3 sc)*3, inc, 4 sc, (inc, 3 sc)*4 (42)

Round 7 :

B 19 sc, W 2 sc, B 21 sc (42)

Round 8 :

B 18 sc, W 4 sc, B 20 sc (42)

Round 9 :

B 17 sc, W 6 sc, B 19 sc (42)

Round 10 :

B 16 sc, W 8 sc, B 18 sc (42)

Round 11 :

B 15 sc, W 10 sc, B 17 sc (42)

Round 12 :

B 14 sc, W 12 sc, B 16 sc (42)

Round 13 :

[ B 12 sc, inc ], [ W 4 inc, 6 sc, 4 inc ], [ B inc, 14 sc ] (52)

Round 14 :

B 13 sc, W 24 sc, B 15 sc (52)

Info :

Change to white

Rounds 15-17 :

52 sc (52)

Round 18 :

12 sc, dec, 6 sc, dec, 7 sc, dec, 6 sc, dec, 13 sc (48)

Round 19 :

12 sc, dec, 4 sc, dec, 7 sc, dec, 4 sc, dec, 13 sc (44)

Round 20 :

12 sc, dec, 2 sc, dec, 7 sc, dec, 2 sc, dec, 13 sc (40)

Round 21 :

(3 sc, dec)*8 (32)

Round 22 :

(dec, 2 sc)*8 (24)

Info :

Stuff the head

Round 23 :

(1 sc, dec)*8 (16)

Round 24 :

8 dec (8)

Info :

Slst and stuff the head, then fasten off and weave the yarn. Put in the eyes between rows 12-13, leaving 6 stitches space between them. Use fabric glue to pin the head into the pouch.

Info :

Style 2: Start in black (B). Red word: black yarn (B). Black word: white yarn (W). Yellow word: yellow yarn (Y).

Round 1 :

[ B 6 sc in the magic ring ] (6)

Round 2 :

[ B 6 inc ] (12)

Round 3 :

[ B (3 inc, 3 sc)*2 ] (18)

Round 4 :

[ B 1 inc ], [ Y 3 inc, 3 sc ], [ B 2 sc, 4 inc, 5 sc ] (26)

Round 5 :

[ B inc, 1 sc ], [ Y 1 sc, (inc, 2 sc)*2, inc, 1 sc ], [ W 1 sc ], [ B 1 sc, (inc, 2 sc)*3, inc, 3 sc ] (34)

Round 6 :

[ B 1 sc, inc, 1 sc ], [ Y 2 sc, (inc, 3 sc)*2, inc ], [ W 3 sc ], [ B 1 sc, (inc, 3 sc)*4 ] (42)

Round 7 :

[ B 4 sc ], [ Y 13 sc ], [ W 5 sc ], [ B 20 sc ] (42)

Round 8 :

[ B 4 sc ], [ Y 12 sc ], [ W 7 sc ], [ B 19 sc ] (42)

Round 9 :

[ B 4 sc ], [ Y 11 sc ], [ W 9 sc ], [ B 18 sc ] (42)

Round 10 :

[ B 5 sc ], [ Y 9 sc ], [ W 11 sc ], [ B 17 sc ] (42)

Info :

Change to white

Rounds 11-12 :

42 sc (42)

Round 13 :

12 sc, 5 inc, 6 sc, 5 inc, 14 sc (52)

Rounds 14-17 :

52 sc (52)

Round 18 :

12 sc, dec, 6 sc, dec, 7 sc, dec, 6 sc, dec, 13 sc (48)

Round 19 :

12 sc, dec, 4 sc, dec, 7 sc, dec, 4 sc, dec, 13 sc (44)

Round 20 :

12 sc, dec, 2 sc, dec, 7 sc, dec, 2 sc, dec, 13 sc (40)

Round 21 :

(3 sc, dec)*8 (32)

Round 22 :

(dec, 2 sc)*8 (24)

Info :

Stuff the head

Round 23 :

(1 sc, dec)*8 (16)

Round 24 :

8 dec (8)

Info :

Slst and stuff the head, then fasten off and weave the yarn. Put in the eyes between rows 12-13, leaving 6 stitches space between them. Use fabric glue to pin the head into the pouch.

β€” Ear :

Info :

Make 2

Round 1 :

4 sc in the magic ring (4)

Round 2 :

(1 sc, inc)*2 (6)

Round 3 :

(1 sc, inc)*3 (9)

Round 4 :

(inc, 2 sc)*3 (12)

Round 5 :

(3 sc, inc)*3 (15)

Info :

Slst and fasten off the yarn, leaving a long tail for sewing. Flatten and fold the top of the ear, sew the 2 opposite stitches. Put in the ears between rows 3-9.

β€” Muzzle :

Info :

Make magic ring: (2 ch, 2 dc in the magic ring, 2 ch, 1 slst in the magic ring)* repeat 2 times. Fasten off the yarn, leaving a long tail for sewing.

Info :

Sew the muzzle rows 12-15. Sew the tongue with pink yarn.

β€” LEG :

Info :

Make 2

Section :

The first leg, start in the white

Round 1 :

6 sc in the magic ring (6)

Round 2 :

6 inc (12)

Round 3 :

(2 sc, inc)*4 (16)

Rounds 4-5 :

16 sc (16)

Round 6 :

(dec, 2 sc)*4 (12)

Round 7 :

(dec, 2 sc)*3 (9)

Rounds 8-9 :

9 sc (9)

Info :

Slst and fasten off the yarn, leaving a long tail for sewing.

Section :

The second leg, start in white. Black word: white yarn. Red word: black yarn.

Round 1 :

6 sc in the magic ring (6)

Round 2 :

6 inc (12)

Round 3 :

(2 sc, inc)*4 (16)

Rounds 4-5 :

4 sc, 3 sc, 9 sc (16)

Round 6 :

(dec, 2 sc)*4 (12)

Round 7 :

(dec, 2 sc)*3 (9)

Rounds 8-9 :

9 sc (9)

Info :

Slst and fasten off the yarn, leaving a long tail for sewing. Stuff up to the 6th row of the leg. Sew the legs at row 4.

β€” ARM :

Info :

Make 2. Start in white

Round 1 :

6 sc in the magic ring (6)

Round 2 :

(2 sc, inc)*2 (8)

Rounds 3-8 :

8 sc (8)

Info :

Slst and fasten off the yarn, leaving a long tail for sewing. Don’t stuff the arm.

β€” FISH :

Info :

Start in orange

Round 1 :

6 sc in the magic ring (6)

Round 2 :

(1 sc, inc)*3 (9)

Round 3 :

(inc, 2 sc)*3 (12)

Round 4 :

(5 sc, inc)*2 (14)

Round 5 :

inc, 5 sc, 2 inc, 5 sc, inc (18)

Round 6 :

18 sc (18)

Info :

Change to white

Round 7 :

18 sc (18)

Info :

Change to orange

Rounds 8-9 :

18 sc (18)

Round 10 :

(7 sc, dec)*2 (16)

Info :

Change to white

Round 11 :

(dec, 6 sc)*2 (14)

Info :

Change to orange and stuff the fish

Round 12 :

(5 sc, dec)*2 (12)

Round 13 :

12 sc (12)

Round 14 :

(dec, 4 sc)*2 (10)

Info :

Change to white

Round 15 :

(3 sc, dec)*2 (8)

Info :

Change to orange

Round 16 :

(dec, 2 sc)*2 (6)

Info :

Stuff the fish. Don’t cut the yarn. Continue crochet to make the caudal fin

β€” NOTE :

Info :

After finishing the 16th row, we have a total of 6 crochet stitches. Flatten and fold, we have 3 couple of 2 opposite stitches.

β€” Caudal fin :

Info :

Make 7 ch, start the second ch from hook: 1 slst, 1 sc, 1 hdc, 1 dc, 1 hdc, 1 sc, 1 slst in the first couple of 2 opposite stitches. 1 sc in the second couple of 2 opposite stitches.

Info :

Make 7 ch, start the second ch from hook: 1 slst, 1 sc, 1 hdc, 1 dc, 1 hdc, 1 sc, 1 slst in the third couple of last 2 opposite stitches. Fasten off and weave the yarn.

β€” Dorsal fin :

Info :

Make 4 ch, start the second ch from hook: 1 sc, 1 hdc, 1 sc and 1 slst in the last stitch. Fasten off the yarn, leaving a long tail for sewing between rows 7-11.

β€” Pelvic fins :

Info :

Make 2. Make 3 ch: 1 hdc in the third ch, 2 ch, 1 slst in the third ch. Fasten off the yarn, leaving a long tail for sewing between rows 6-7. Sew the eyes with black yarn between rows 4-5.

β€” Assembling :

Item Name (P1) :

1. Sew the legs at row 4

Item Name (P2) :

2. Use fabric glue to paste the fish into the pouch.

Item Name (P3) :

3. Sew the arms into the pouch and the fish.

Item Name (P4) :

4. Use fabric glue to paste the head into the pouch.

Assembly Instructions

  • Sew the legs at row 4 of the pouch so they hang evenly from the bottom edge and are spaced symmetrically.
  • Use fabric glue to paste the fish into the pouch center, ensuring the fish is positioned under the cat as shown in photos.
  • Sew the arms into the pouch and around the fish so the cat appears to hold the fish securely; stitch through arm base and fish body.
  • Use fabric glue to paste the head into the pouch above the fish, then reinforce with a few hidden stitches if needed for security.

Important Notes

  • πŸ’‘Use stitch markers to keep track of rounds and the start of each new row for accurate shaping and color changes.
  • πŸ’‘Stuff small parts (head, fish) gradually and stop when firm but not overstuffed so they fit well into the pouch.
  • πŸ’‘Pin all parts in place before sewing to ensure correct positioning and symmetry, then sew securely and weave ends.

This Cat Phone Pouch pattern blends practicality with playful charm β€” a cute accessory you can wear or gift. Customize yarn colors to match your style and make a tiny collection of kittens and fish pals. Enjoy creating every tiny detail and treasure your handmade creation! 🧢🐱

You ask,

we answer.

FAQs

What size will the finished piece be?

The phone pouch measures approximately Length: 17 cm and Width: 10 cm when using the recommended Jeans yarn from YarnArt and a 2.3 mm hook.

Can I use different yarn weights for this pattern?

Yes, you can use different yarn weights but this will change the final size; choose an appropriate hook for the yarn and expect a larger or smaller pouch and amigurumi.

Do I need prior crochet experience for this pattern?

This pattern is rated intermediate, so basic knowledge of single crochet, increases, decreases, working in rounds, and simple color changes is recommended.

How long does this project typically take to complete?

Most crocheters complete this project in 5-7 hours depending on experience, color changes and assembly time.