🧢 Beautiful ✨ Detailed πŸ’ Adorable

Caro The Coral Girl Amigurumi Pattern

Caro The Coral Girl Amigurumi Pattern
4.3β˜… Rating
5-7 Hours Time Needed
1.6K Made This
βœ‚οΈ

Intermediate Level

Ideal for those with basic crochet experience, featuring slightly more advanced stitches and techniques to expand your skills.

⏱️

Weekend Treat

Takes 5-7 hours, making it an enjoyable project to finish over a couple of days.

🧸

Cute Companion

An adorable friend to cherish, handcrafted with love to bring comfort and joy for years to come.

About This Caro The Coral Girl Amigurumi Pattern

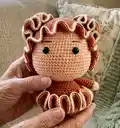
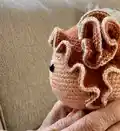
This pattern guides you to crochet Caro, the Coral Girl β€” a tiny amigurumi with a ruffled dress and curly coral buns. You will work in rounds to shape head, body, arms and legs, then add a textured hat, dress and decorative ruffles. The design uses basic increases and decreases plus front/back loop techniques for shaping.

Caro The Coral Girl Amigurumi Pattern crochet pattern - detailed view of completed project

Clear round-by-round instructions, materials and abbreviations are included so you can follow each step precisely. Assembly photos and notes help you attach parts and create the finished personality.

Why You'll Love This Caro The Coral Girl Amigurumi Pattern

I absolutely love this pattern because it combines simple amigurumi shaping with playful ruffled details that really bring the character to life. The coral buns and layered dress give so much texture with relatively small pieces, making every stitch rewarding. I enjoy how the hat and dress are crocheted directly onto the body for a neat, seamless finish. The pattern lets me practice increases, decreases and loop techniques while producing an adorable collectible.

Caro The Coral Girl Amigurumi Pattern step 1 - construction progress Caro The Coral Girl Amigurumi Pattern step 2 - assembly progress Caro The Coral Girl Amigurumi Pattern step 3 - details and accessories Caro The Coral Girl Amigurumi Pattern step 4 - final assembly and finishing

Switch Things Up

I love how easy it is to customize this pattern by changing colors; try soft pastels for a vintage look or bold brights for a modern twist.

I often swap the yarn weight and go up a hook size to create a chunkier, cuddlier version of the doll that works well as a nursery toy.

You can personalize facial expressions by changing the placement of the safety eyes and the angle of the embroidered eyebrows for different moods.

Try adding tiny accessories like a crocheted bow, a miniature necklace, or a felt patch to make each doll unique and gift-ready.

I sometimes make the ruffles longer or shorter by adding or subtracting increase rounds; more rounds equals bigger, curlier ruffles.

For a keychain or bag charm, use thinner yarn and a smaller hook to make a miniature version that retains the ruffled detail.

If you want a posable doll, consider inserting light wire into the arms before sewing them closed to allow gentle posing.

Experiment with embroidery for freckles, blush or other facial details β€” small changes make the character feel more personal.

I recommend trying a monochrome palette with a contrasting trim color for a sophisticated look that highlights the ruffle edges.

When making multiples, mix and match hats and dresses between dolls to create a whole collection with different personalities.

Common Mistakes & How to Fix Them

βœ— Skipping stitch marker placement when joining legs will misalign the body; use stitch markers to mark the join and the beginning of rounds to maintain consistent alignment. βœ— Forgetting to change loops (BLO/FLO) when instructed will alter the ruffle effect; check each round carefully and work in the correct loop to get the intended texture. βœ— Overstuffing the head and body can distort the shape and make seaming difficult; stuff gradually and compact evenly to maintain round shapes while still allowing sewing. βœ— Not counting stitches after increases and decreases will lead to incorrect stitch counts; count your stitches after each round, especially after shaping rounds with bracketed repeats.

Caro The Coral Girl Amigurumi Pattern

Create a sweet, ruffled Coral Girl amigurumi with this detailed pattern. You will crochet a rounded head, tiny limbs, a ruffled dress and curly coral buns for a playful, textured finish. The pattern includes step-by-step rounds, materials, abbreviations and assembly photos so you can stitch with confidence. Perfect for gifting or keeping as a cheerful handmade companion.

Intermediate 5-7 Hours

Materials Needed for Caro The Coral Girl Amigurumi Pattern

β€” Main Fabric

  • 01
    Color A: skin color YarnArt Jeans 73 (50g, 160m)
  • 02
    Color B: orange YarnArt Jeans 85 (50g, 160m)
  • 03
    Color C: white YarnArt Jeans 03 (50g, 160m)
  • 04
    For other characters shown: Color B purple Baby Jeans 16 (40g, 180m)
  • 05
    For mermaid variant: Color B turquoise Etrofil Jeans 54 (50g, 160m)
  • 06
    For mermaid variant: Color C white YarnArt Jeans 62 (50g, 160m)

β€” Tools Required

  • 01
    Crochet hook size 2-2.5mm
  • 02
    Black safety eyes 10mm
  • 03
    Tapestry needles for sewing
  • 04
    Pins for assembly
  • 05
    Stitch markers
  • 06
    Scissors
  • 07
    Plastic pearls (optional, for mermaid scales)
  • 08
    Black & pink thread (used in some variants)

Progress Tracker

0% Complete

β€” Legs :

Round 1 :

sc 6 in a magic loop (6)

Round 2 :

[sc 1, inc] 3x (9)

Round 3 :

[sc 2, inc] 3x (12)

Round 4 :

[sc 3, inc] 3x (15)

Round 5 :

[sc 4, inc] 3x (18)

Info :

Make the 2nd leg similar to the 1st leg but do not break the yarn, connect with 1st leg with 1 slst. Continue crocheting sc 18 on the 1st leg and sc 18 on the 2nd leg 2 = 36. Continue to crochet through the body.

β€” Body :

Round 1 :

[sc 5, inc] 6x (42)

Round 2-4 :

sc 42 (3 rows), change to yarn B (42)

Round 5 :

sc 42 (42)

Round 6 :

(BLO) sc 42 (42)

Round 7-9 :

sc 42 (3 rows) (42)

Round 10 :

[sc 5, dec] 6x (36)

Round 11 :

sc 36 (36)

Round 12 :

[sc 4, dec] 6x (30)

Round 13 :

sc 30 (30)

Round 14 :

[sc 3, dec] 6x (24)

Round 15 :

sc 24 (24)

Info :

Break the yarn with a long rest, do not stuff. Turn the Body upside down, connect yarn B on the 1st stitch of the 6th rnd, we will crochet the Dress on the remaining loop of this rnd.

β€” Dress :

Round 1 :

inc 42 (84)

Round 2 :

inc 84 (168)

Round 3 :

inc 168, change to yarn C (336)

Round 4 :

(BLO) slst 336 (336)

Info :

Break the yarn, hide the remaining yarn.

β€” Arms :

Round 1 :

sc 6 in a magic loop (6)

Round 2 :

[sc 1, inc] 3x (9)

Round 3 :

sc 9 change to yarn B (9)

Round 4-12 :

sc 9 (9 rows) (9)

Info :

Break the yarn, stuff lightly the lower arms, use the tapestry needle to sew 2 edges together.

β€” Head :

Round 1 :

sc 6 into a magic loop (6)

Round 2 :

inc 6 (12)

Round 3 :

[sc 1, inc] 6x (18)

Round 4 :

sc 1, inc, [sc 2, inc] 5x, sc 1 (24)

Round 5 :

[sc 3, inc] 6x (30)

Round 6 :

sc 2, inc, [sc 4, inc] 5x, sc 2 (36)

Round 7 :

[sc 5, inc] 6x (42)

Round 8 :

sc 3, inc, [sc 6, inc] 5x, sc 3 (48)

Round 9 :

[sc 7, inc] 6x (54)

Round 10 :

sc 4, inc, [sc 8, inc] 5x, sc 4 (60)

Round 11 :

sc 60 (60)

Round 12 :

[sc 9, inc] 6x (66)

Round 13-24 :

sc 66 (12 rows), insert 10mm safety eyes between the 17th & 18th rnd, 8 sts apart (66)

Round 25 :

[sc 9, dec] 6x (60)

Round 26 :

[sc 8, dec] 6x (54)

Round 27 :

[sc 7, dec] 6x (48)

Round 28 :

[sc 6, dec] 6x (42)

Round 29 :

[sc 5, dec] 6x (36)

Round 30 :

[sc 4, dec] 6x (30)

Round 31 :

[sc 3, dec] 6x (24)

Info :

Break the yarn with a long rest to sew later. Stuff the head and finish sewing when assembling.

β€” Hat :

Round 1-10 :

crochet rnd 1-10 of the Head (60)

Round 11 :

[sc 9, inc] 6x (66)

Round 12-25 :

sc 66 (14 rows) (66)

Round 26 :

(FLO) inc 66 (132)

Round 27 :

[sc 1, inc] 66x, change to yarn C (198)

Round 28 :

(BLO) slst 198 (198)

Info :

Break the yarn with a long rest to sew later.

β€” Coral's Buns :

Info :

Note: leave a longer yarn before making the Magic Ring, this yarn will be the thread to attach the Buns to the Hat.

Round 1 :

sc 6 in a magic loop (6)

Round 2 :

inc 6 (12)

Round 3 :

inc 12 (24)

Round 4 :

inc 24 (42)

Round 5 :

inc 42 (84)

Round 6 :

inc 84, change to yarn C (168)

Round 7 :

(BLO) slst 168 (168)

Info :

Break the yarn, hide the remaining yarn. Tip: if you want to make a bigger and curlier Bun, just crochet 1 more rnd: inc 168 = 336 sts.

β€” Assembly :

Info :

Attach the Hat to the Head with the tapestry needle.

Info :

The Hat should look like this when positioned on the head before final sewing.

Info :

Attach 2 Buns on the Hat using the long thread left in the magic ring to secure them through the hat fabric.

Info :

Use the long thread in the middle of the Magic Ring to attach the Buns; hide the thread ends.

Info :

Attach Arms on the Body by sewing the open edges, aligning them evenly on the sides.

Info :

Attach Head to the Body and the Coral Girl is done :)

Assembly Instructions

  • Attach the Hat to the Head with the tapestry needle and position it evenly around the face before sewing securely.
  • Use the long thread left from the Magic Ring of each Bun to sew and attach 2 Buns to the Hat, hiding the ends inside the hat.
  • Attach the Arms to the body by sewing the open edges along the sides between the specified rounds for a natural placement.
  • Sew the Head to the Body securely, matching the body opening and stitching evenly around the neck for a neat join.
  • Pin all parts in place before final sewing to check symmetry and make adjustments as needed.
  • Weave in all yarn ends and use a yarn needle to secure any loose edges or stitches after assembly.

Important Notes

  • πŸ’‘Use stitch markers to keep track of your rounds, especially at the start of the round and when joining pieces.
  • πŸ’‘Stuff gradually and evenly; overstuffing can distort shaping while under-stuffing can flatten the piece.
  • πŸ’‘Pin parts in position before sewing to check placement and symmetry for a professional finish.
  • πŸ’‘Work in the BLO or FLO exactly when instructed to achieve the ruffled textures and correct shaping.

This cute Coral Girl pattern blends classic amigurumi shaping with ruffled coral details for a charming finish. The design is small, delightful and full of texture to practice shaping techniques. Perfect for gifting or brightening your shelf with handmade personality! 🧢😊

You ask,

we answer.

FAQs

What size will the finished piece be?

The finished amigurumi measures approximately 12-15 cm tall when using the recommended yarn and 2-2.5mm hook; size will vary slightly by tension and yarn choice.

Can I use different yarn weights for this pattern?

Yes, you can use different yarn weights but expect a change in finished size; adjust hook size accordingly and be mindful of stitch counts when working detailed ruffles.

Do I need prior crochet experience for this pattern?

This pattern is rated intermediate, so basic experience with single crochet, increases, decreases and working in BLO/FLO is recommended for best results.

How long does this project typically take to complete?

Most crocheters complete this project in 5-7 hours, though that depends on experience level and how much time you spend on assembly and ruffle detailing.