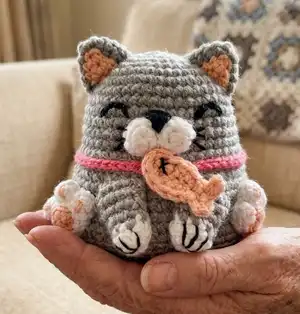
🧢 Beautiful ✨ Detailed πŸ’ Adorable

Calico Cat Amigurumi Pattern

Calico Cat Amigurumi Pattern
4.8β˜… Rating
2-4 Hours Time Needed
4.1K Made This
βœ‚οΈ

Intermediate Level

Ideal for those with basic crochet experience, featuring slightly more advanced stitches and techniques to expand your skills.

⏱️

Bite-Sized Project

Finishes in 2-4 hoursβ€”perfect for an afternoon of creative relaxation.

🧸

Cute Companion

An adorable friend to cherish, handcrafted with love to bring comfort and joy for years to come.

About This Calico Cat Amigurumi Pattern

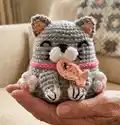
This pattern creates a small, seated calico cat amigurumi with padded muzzle, embroidered face and tiny paws. You will crochet in joined/continuous rounds and change yarn colors to make the characteristic calico patches. The instructions include special techniques like invisible finish, bobble stitches and surface slip stitches for neat details.

Calico Cat Amigurumi Pattern crochet pattern - detailed view of completed project

Complete step-by-step rounds are provided for every part: head/body, ears, muzzle, legs, paws, tail and fish accessory. Clear assembly notes explain exact placement and finishing for a professional result.

Why You'll Love This Calico Cat Amigurumi Pattern

I absolutely love this pattern because it balances cute design with straightforward techniques that are fun to crochet. I enjoy the colorwork and the small details β€” the bobble paw pads and embroidered features really bring the cat to life. Making one of these is quick and rewarding, and I often make multiples in different colorways as gifts. I designed the pattern so you can customize colors easily while still following precise shaping instructions.

Calico Cat Amigurumi Pattern step 1 - construction progress Calico Cat Amigurumi Pattern step 2 - assembly progress Calico Cat Amigurumi Pattern step 3 - details and accessories Calico Cat Amigurumi Pattern step 4 - final assembly and finishing

Switch Things Up

I love customizing this pattern by changing the color palette β€” I often swap the calico patches for pastel shades to make a softer version.

You can make a reversible toy by crocheting two cats and joining them; leave a long starting tail (about 50 cm) to ease joining.

Want a chunkier cat? Use a bulkier yarn and a larger hook β€” you will get a cuddly, larger version that still follows the same rounds.

To make a tiny keychain, use finer yarn and a 1.5 mm hook; reduce stuffing and add a small metal ring to the top.

I sometimes add embroidered accessories such as a tiny bow or different shaped fish for personality and visual interest.

Try changing the collar color or replacing the bell with a tiny button for a different look and sound.

If you prefer a more realistic paw, embroider toe separations with slightly darker yarn and add a textured bobble center.

For a more posing-friendly toy, insert a thin wire into the tail before finishing (secure well) to create a posable tail.

Make a trio in matching tones β€” one calico, one grey, and one siamese β€” and give them as a themed gift set.

I also experiment with different stitch placements for the eyes and mouth: moving them one or two stitches can change the cat’s expression dramatically.

Common Mistakes & How to Fix Them

βœ— Skipping stitch markers during color changes will cause you to lose track of the round; place a marker at the start of every round and move it as you go. βœ— Stuffing too much into the head and body makes shaping uneven; stuff gradually and shape as you go for a smooth finish. βœ— Changing colors without securing ends can create loose tails inside the work; cut and weave ends carefully or start a fresh yarn tail for each color section. βœ— Not counting stitches after increases or decreases leads to incorrect shaping; count stitches at the end of each round, especially after any increase or decrease rounds. βœ— Using a hook that is too large causes loose stitches and floppy fabric; use the recommended 2.0 mm hook or a smaller size to achieve tight fabric for amigurumi.

Calico Cat Amigurumi Pattern

Make a delightful Calico Cat amigurumi with this friendly, photo-supported crochet pattern. You will work in continuous rounds using 4-ply cotton blend yarn and learn special finishes like invisible join and surface slip stitches. The pattern includes full instructions for head, body, ears, muzzle, legs, paws, tail, fish accessory and assembly. Perfect for gifting or collecting β€” customize colors to make your own unique kitty.

Intermediate 2-4 Hours

Materials Needed for Calico Cat Amigurumi Pattern

β€” Main Fabric

  • 01
    4 ply cotton blend yarn (also called sport/light; author used 4 ply cotton blend) in the following colors for Calico: white, tan, black, red, peach
  • 02
    Grey variant: grey, black, white, peach, pink (same 4 ply cotton blend)
  • 03
    Siamese variant: light beige, black, brown, dark brown, orange, peach (4 ply cotton blend)
  • 04
    Use small amounts of each color; typical mini amigurumi uses 10-50g per color depending on patch coverage
  • 05
    Small golden bell (diameter 7 mm) for collar accent

β€” Tools Required

  • 01
    Crochet hook size 2.0 mm or suitable size for 4 ply yarn
  • 02
    Tapestry needle and embroidery needle
  • 03
    Scissors
  • 04
    Stitch markers
  • 05
    Polyester stuffing (fiberfill)
  • 06
    Small golden bell, diameter 7 mm
  • 07
    Circular piece of cardboard or rigid plastic for base (optional)
  • 08
    Pins for assembly

Progress Tracker

0% Complete

β€” Head and Body :

Round 1 :

6sc in MR (6)

Round 2 :

3inc, 2inc, inc (12)

Round 3 :

[sc, inc]x3, sc, inc, sc, inc, sc, inc (18)

Round 4 :

[sc, inc, sc]x2, sc, inc, 2sc, inc, 2sc, inc, sc (24)

Round 5 :

[3sc, inc]x2, 3sc, inc, sc, 2sc, inc, 3sc, inc, 3sc, inc (30)

Round 6 :

[2sc, inc, 2sc]x2, 2sc, inc, 4sc, inc, 4sc, inc, sc, 3sc, inc, 2sc (36)

Round 7 :

sc, 4sc, inc, 5sc, inc, 3sc, 2sc, inc, 3sc, 2sc, inc, 5sc, inc, 5sc (42)

Round 8 :

2sc, 14sc, 8sc, 8sc, 10sc (42)

Round 9 :

3sc, inc, 6sc, inc, 4sc, 2sc, inc, 6sc, inc, 6sc, inc, 6sc, inc, 3sc (48)

Round 10 :

4sc, 12sc, 14sc, 4sc, 14sc (48)

Round 11 :

5sc, 10sc, 33sc (48)

Round 12 :

6sc, 7sc, 35sc (48)

Round 13 :

8sc, 4sc, 36sc (48)

Round 14 :

[7sc, inc]x6 (54)

Round 15 :

BLO 54sc (54)

Round 16 :

8sc, 8sc, 38sc (54)

Round 17 :

7sc, 10sc, 31sc, 6sc (54)

Round 18 :

6sc, 12sc, 28sc, 8sc (54)

Round 19 :

2sc, 3sc, 12sc, 18sc, 5sc, 4sc, 10sc (54)

Round 20 :

4sc, inc, 8sc, inc, sc, 7sc, inc, 8sc, inc, 2sc, 6sc, inc, 3sc, 5sc, inc, 4sc (60)

Round 21 :

4sc, 13sc, 20sc, 8sc, 5sc, 10sc (60)

Round 22 :

5sc, 11sc, 22sc, 6sc, 7sc, 9sc (60)

Info :

Fasten off, cut the yarn and do invisible finish.

Info :

Note: If you are going to make a single cat amigurumi, you don’t need a long yarn tail. If you are going to make a reversible amigurumi, you may need to leave a long yarn tail, about 50 cm (20”). Read the instruction for joining the reversible amigurumi!

β€” EARS (make 1 in black and the other in tan) :

Info :

We will crochet ears using black and peach color, alternately. To simplify the writing, the peach color of the font below corresponds to peach yarn color. Start with black yarn.

Round 1 :

6sc in MR (6)

Round 2 :

sc, inc, sc, inc, sc, inc (9)

Round 3 :

2sc, inc, sc, sc, inc, 2sc, inc (12)

Round 4 :

3sc, inc, sc, 2sc, inc, 3sc (13), leave the last st unworked.

Info :

Fasten off. Leave a long tail for sewing. Do invisible finish. Make the other ear using tan and peach color.

β€” Muzzle :

Info :

Start with white. Make 6sc in MR, tighten the MR and join with a sl st to the first st. Fasten off and cut the yarn. With a new piece of white yarn, make another 6sc in MR, tighten the MR, sl st to the first st. Do not fasten off. Continue your work by joining it to the first circle with a sc. Work 5 more sc at the first circle. And continue with 6sc at the second circle. Fasten off. Leave a long tail for sewing. Do the invisible finish.

β€” FRONT LEGS (make 2) :

Info :

Start with white.

Round 1 :

8sc in MR (8)

Round 2 :

8sc (8)

Round 3 :

8sc (8)

Round 4 :

3sc, inc, 4sc (9)

Round 5 :

4sc, inc, 4sc (10)

Info :

No need to stuff. Last round: flatten and work through both stitches 5sc (5). Fasten off, leaving a long tail for sewing.

β€” PAWS (make 2) :

Round 1 :

6sc in MR (6), join to the first sc with a sl st. Change to white. Cut the peach yarn leaving about 20 cm long tail.

Round 2 :

BLO, loosely 6sl st (6), join to the first st with a sl st. Make 1ch.

Round 3 :

3inc, loosely 3sl st (9), join to the first sc with a sl st.

Round 4 :

[bobble st, sl st]x3 (6), leave remaining stitches unworked.

Info :

Fasten off, leave a long tail for sewing, do invisible finish. Using the peach tail, embroider paws on every bobble st.

β€” TAIL :

Info :

Start with black. Work every sl st below a little bit loosely.

Round 1 :

5sc in MR (5)

Round 2-3 :

5sc (5)

Round 4 :

2sl st, 3sc (5)

Round 5 :

5sc (5)

Info :

Change to tan.

Round 6 :

2sl st, 3sc (5)

Round 7 :

5sc (5)

Round 8 :

2sl st, 3sc (5)

Info :

Change to black.

Round 9-10 :

5sc (5)

Info :

Change to tan.

Round 11-12 :

5sc (5)

Round 13 :

sl st, 3sc, sl st (5)

Round 14 :

5sc (5)

Round 15 :

sl st, 3sc, sl st (5)

Info :

Fasten off, leave a long tail for sewing. Do invisible finish.

β€” FISH :

Info :

Start with peach yarn. Work the fish’s body first: Make 5ch. Start from the second loop from the hook: sc (Later, this st will be called as "the first st*"), hdc, dc, inc3 at the last ch. Continue at the other side of the ch: dc, hdc, sc, then sl st at the first st*. Then, continue to work the tail: [3ch, start from the second loop from the hook: sc, sl st]x2, then sl st to the first st*. Fasten off. Leave a long tail for sewing. Using black yarn (1 ply only) and embroidery needle, embroider the eye.

β€” Base (single toy) :

Round 1 :

6sc in MR (6)

Round 2 :

6inc (12)

Round 3 :

[sc, inc]x6 (18)

Round 4 :

[sc, inc, sc]x6 (24)

Round 5 :

[3sc, inc]x6 (30)

Round 6 :

[2sc, inc, 2sc]x6 (36)

Round 7 :

[5sc, inc]x6 (42)

Round 8 :

[3sc, inc, 3sc]x6 (48)

Round 9 :

[7sc, inc]x6 (54)

Round 10 :

[4sc, inc, 4sc]x6 (60)

Info :

Fasten off. Leave a long tail for sewing. Stuff the body with fiberfill (you can continue stuffing while sewing the base). Prepare a circular piece of cardboard or rigid plastic to fit inside the bottom of the body. Place the cardboard/rigid plastic to the bottom, and sew the base to the BL of the last round of the body.

β€” Assembly :

Item :

Attach the muzzle on the head between R11-13, 5st wide. No need to stuff the muzzle.

Item :

Attach the ears on the head between R4-8.

Item :

Attach the front legs on the body between R16-22 with a slightly tilted position.

Item :

Attach the paws on the body between R18-22, right beside the front legs.

Item :

Attach the fish to the bottom of the muzzle and also to one of the front leg to fix the position.

Item :

Attach the tail at the back of the body, at R21.

Item :

Attach the bell on the middle front of the collar.

Item :

Embroider the lines of toes on the front legs with black yarn (1 ply only). Embroider the eyes using black yarn at R10, 1 st apart from the muzzle, 3st wide. Embroider the nose on the muzzle using peach yarn. Optional: embroider the cat whiskers on the muzzle and the face using black yarn (1 ply only).

Assembly Instructions

  • Attach the muzzle on the head between R11-13, 5st wide; no need to stuff the muzzle.
  • Attach the ears on the head between R4-8, spacing them evenly and securing with hidden stitches.
  • Attach the front legs on the body between R16-22 with a slightly tilted position and sew firmly to support the toy’s pose.
  • Attach the paws on the body between R18-22, right beside the front legs and embroider paw pads as instructed.
  • Attach the tail at the back of the body at R21 and secure with several stitches through the base of the tail.
  • Attach the bell on the middle front of the collar and sew the fish accessory to the muzzle and one front leg to fix its position.

Important Notes

  • πŸ’‘Use stitch markers to keep track of your rounds, especially during color changes and shaping sections.
  • πŸ’‘Each round is worked in a continuous spiral; do not join rounds with slip stitch or turn unless stated otherwise.
  • πŸ’‘Work with consistent tension and use a smaller hook if your stitches are too loose to achieve a firm amigurumi fabric.
  • πŸ’‘If you are making a reversible amigurumi, do not work too tight so the plushie remains stretchable; consider leaving a longer starting tail for joining.
  • πŸ’‘Crochet through both loops unless a back/front loop is specified; follow BLO/FLO notes carefully for shaping.

This cute Calico Cat pattern is perfect for quick handmade gifts and charming decor. Make a set in different colorways for a playful collection of kitties. Personalize the collar, bell and fish to match your style and give them as heartfelt presents. 🧢🐱✨

You ask,

we answer.

FAQs

What size will the finished piece be?

The finished amigurumi measures approximately 6 cm (2.3") tall when using the recommended 4 ply cotton blend yarn and a 2.0 mm hook.

Can I use different yarn weights for this pattern?

Yes, you can use different yarn weights but this will change the final size; use an appropriate hook size for your chosen yarn and adjust stuffing accordingly.

Do I need prior crochet experience for this pattern?

This pattern is rated intermediate, so basic knowledge of crochet stitches, increases and decreases, and working in continuous rounds is recommended for best results.

How long does this project typically take to complete?

Most crocheters complete this small amigurumi in 2-4 hours, though time may vary based on experience level, color changes and assembly complexity.