🧢 Beautiful ✨ Detailed πŸ’ Adorable

A Hairy Caterpillar Amigurumi Pattern

A Hairy Caterpillar Amigurumi Pattern
4.7β˜… Rating
2-4 Hours Time Needed
2.9K Made This
βœ‚οΈ

Intermediate Level

Ideal for those with basic crochet experience, featuring slightly more advanced stitches and techniques to expand your skills.

⏱️

Bite-Sized Project

Finishes in 2-4 hoursβ€”perfect for an afternoon of creative relaxation.

🧸

Cute Companion

An adorable friend to cherish, handcrafted with love to bring comfort and joy for years to come.

About This A Hairy Caterpillar Amigurumi Pattern

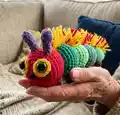
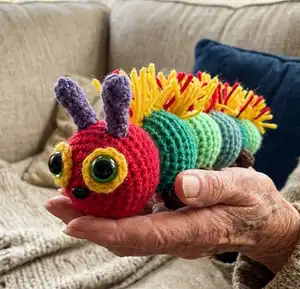
This pattern creates a colourful, hairy caterpillar amigurumi made from DK yarn with multiple body segments, feet, antennae and a playful yarn spine. You will work the head and body in rounds with simple increases and decreases, changing colours to create segments. The pattern includes small accessories like eye rings, a safety nose, and instructions for attaching a fluffy spine.

A Hairy Caterpillar Amigurumi Pattern crochet pattern - detailed view of completed project

Clear step-by-step rounds are provided for every segment so you can follow along easily. The pattern is written in UK terminology and includes materials and assembly notes.

Why You'll Love This A Hairy Caterpillar Amigurumi Pattern

I absolutely love this pattern because it brings such a playful character to life with very simple stitches. I enjoy the colour changes and how each segment becomes its own little personality. The hairy spine technique adds delightful texture and charm that children and adults both love. Working the head into the body keeps construction neat and stuffing as you go makes shaping easy and satisfying.

A Hairy Caterpillar Amigurumi Pattern step 1 - construction progress A Hairy Caterpillar Amigurumi Pattern step 2 - assembly progress A Hairy Caterpillar Amigurumi Pattern step 3 - details and accessories A Hairy Caterpillar Amigurumi Pattern step 4 - final assembly and finishing

Switch Things Up

I love changing up the colours to give each body segment its own personality; try pastel shades for a soft nursery friend or bright contrasting greens and reds for a playful look.

I often make a mini-version by using 3.5mm hook and lighter yarn to create keychains or tiny pocket pals.

For a chunky, cuddlier caterpillar use aran or bulky yarn with a larger hook and adjust colour changes to keep segment proportions.

I sometimes embroider tiny freckles or a smile on the head instead of using a safety nose for a softer, child-safe finish.

Swap the safety eyes for embroidered eyes to make the toy suitable for babies and small children.

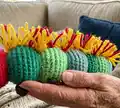
I like to vary the hair spine by adding longer strands at the tail or alternating two colours more frequently for a striped effect.

Try making the antennae longer or double-up with a contrasting tip colour for whimsy.

You can attach thin wire inside legs for a posable version, or simply make the feet a bit larger to help it stand upright.

I sometimes make a family set of different sized caterpillars by changing yarn weight and hook β€” they look great grouped together.

Finally, add tiny accessories like a crocheted leaf or scarf to personalise the caterpillar as a gift or decoration.

Common Mistakes & How to Fix Them

βœ— Not stuffing as you go; stuff each segment gradually to maintain shape and avoid lumps by adding small amounts of stuffing between colour changes. βœ— Closing the magic ring completely for the eye rings; leave a small central hole so the stem of the safety eye can be pushed through easily before fastening off. βœ— Forgetting to change colour exactly where instructed; mark the stitch where you need to swap yarn so segments end up even and neat. βœ— Skipping counting stitches during increases and decreases; count after each round and use a stitch marker to keep track so round counts match the pattern.

A Hairy Caterpillar Amigurumi Pattern

Make a colourful, textured hairy caterpillar using simple amigurumi techniques and playful colour changes. This pattern walks you through creating the head, segmented body, feet, antennas and a furry spine so you can craft a charming handmade toy. Perfect for gifting or brightening a shelf, the design is modular so you can customise colours and hair to suit your style.

Intermediate 2-4 Hours

Materials Needed for A Hairy Caterpillar Amigurumi Pattern

β€” Main Fabric

  • 01
    Double Knit (DK) yarn - Red x1 (approx one small ball or 25-50g)
  • 02
    Double Knit (DK) yarn - Dark Green x1 (approx one small ball or 25-50g)
  • 03
    Double Knit (DK) yarn - Bright Green x1 (approx one small ball or 25-50g)
  • 04
    Double Knit (DK) yarn - Sage Green x1 (approx one small ball or 25-50g)
  • 05
    Oddments: Purple (small amount) for antennae
  • 06
    Oddments: Dark Brown (small amount) for feet
  • 07
    Oddments: Yellow (small amount) for eye rings and spine hairs and Red for some spine hairs

β€” Tools Required

  • 01
    Crochet hook size 4mm
  • 02
    Polyester stuffing
  • 03
    Safety eyes 12mm green x2
  • 04
    Safety nose 9mm black triangle nose
  • 05
    Stitch marker
  • 06
    Tapestry needle for sewing in ends
  • 07
    Scissors

Progress Tracker

0% Complete

β€” General Info :

Info :

This pattern is written in UK terminology. Finished Length: Aprox 25cm

β€” Eye Rings x2 :

Info :

Using Yellow make a magic ring, ch1

Round 1 :

dc x8 into ring, ss into first st. FO.

Info :

Do not fully close your magic ring, leave a small hole in the centre, just enough to fit the stem of the safety eye through. Pop a safety eye into the centre, but do not attach the back yet. You will attach the eyes to the head between rows 3 and 4 once you have made the head.

β€” Head & Body :

Info :

You will be starting at the head and working down the body to the tail. Stuff as you go. Using Red make a magic ring, ch1

Round 1 :

dc x8 into ring (8)

Round 2 :

inc around (16)

Round 3 :

[inc, dc] repeat around (24)

Round 4 :

[inc, dc x2] repeat around (32)

Round 5-10 :

dc around (32)

Info :

Attach eyes (including eye rings), between rows 3 and 4, about 7 stitches apart.

Round 11 :

[dec, dc x2] repeat around (24)

Round 12 :

[dec, dc] repeat around (16)

Round 13 :

dec around (8). Change to Dark Green

Round 14 :

inc (24)

Round 15 :

[inc, dc] repeat around (24)

Round 16 :

[inc, dc x2] repeat around (32)

Round 17-20 :

dc around (32)

Round 21 :

[dec, dc x2] repeat around (24)

Round 22 :

[dec, dc] repeat around (16)

Round 23 :

dec around (8). Change to Bright Green

Round 24-32 :

repeat rows 14-23 - Changing to Sage Green at the end of round 32.

Round 33-41 :

repeat rows 14-23 - Changing to Dark Green at the end of round 41.

Round 42 :

inc around (16)

Round 43 :

[inc, dc] repeat around (24)

Round 44-46 :

dc around (24)

Round 47 :

[dec, dc] repeat around (16)

Round 48 :

dec around (8). change to Bright Green

Round 49-55 :

repeat rows 42-48, changing to Sage Green at the end of row 55.

Round 56 :

inc around (16)

Round 57-58 :

dc around (16)

Round 59 :

dec (8)

Round 60 :

dec (4)/ FO. leaving a long end to close. Thread end through remaining stitches and pull to close.

Info :

Sew in ends

β€” Antenna x2 :

Info :

Using Purple make a magic ring, ch1

Round 1 :

dc x3 into ring (3)

Round 2 :

inc, dc, inc (5)

Round 3 :

dc around (5)

Round 4 :

dec, dc x3 (4)

Round 5-6 :

dc around (4). FO.

Info :

Stuff tips of antenna lightly.

Info :

Sew antenna to centre top of head, a couple of rows above the eyes, and a couple of stitches apart.

β€” Feet x 6 :

Info :

Using Brown make a magic ring, ch1

Round 1 :

dc x4 into ring (4)

Round 2 :

inc around (8)

Round 3-4 :

dc around (8). FO

Info :

Stuff lightly.

Info :

Sew 2 feet to the first body segment (first green segment after the head). Attach feet to the underside, about 3 stitches apart. Sew 2 to the second body segment. Sew 2 to the fourth body segment.

β€” Hairy Spine :

Info :

Cut several 10cm lengths of Yellow yarn, and about 8 Red. Attach along the centre of the Caterpillars back, interspersing the Red at random intervals till you reach the tail.

Info :

To Attach the hair strands - Attach the strands by inserting your crochet hook into the loop of a stitch. Catch the middle of the hair strand and pull a loop through. Pull the ends of the strand through the loop. This should hold firmly.

Info :

Cut spine hairs to length (aprox 2cm), so they stick up nicely.

Info :

Tadah! Enjoy!

Assembly Instructions

  • Attach eyes (including eye rings) between rounds 3 and 4 of the head, spacing them about 7 stitches apart before attaching the safety eye backs.
  • Sew antennae to the centre top of the head a couple of rows above the eyes, positioning them a couple of stitches apart and stitching securely at the base.
  • Sew feet to the underside of the body: 2 feet on the first green segment after the head (about 3 stitches apart), 2 to the second body segment, and 2 to the fourth body segment.
  • Attach hair strands along the centre of the caterpillar's back by folding each 10cm strand in half, pulling the loop through a stitch with a hook and threading the ends through the loop to secure, then trim to approx 2cm.
  • Sew in all loose ends and weave them into the body, and close the tail using the long tail left after final decreases by threading through remaining stitches and pulling tight.

Important Notes

  • πŸ’‘This pattern is written in UK terminology, so double crochet (dc) corresponds to US single crochet.
  • πŸ’‘Stuff pieces as you go to achieve even shaping across segments, adding small amounts of stuffing between colour changes.
  • πŸ’‘Leave a small hole in the eye rings for the safety eye stem so you can insert the eye before fastening off.
  • πŸ’‘Use stitch markers to mark the start of rounds and count stitches after increases/decreases to maintain the correct stitch count.

This cheerful Hairy Caterpillar is full of texture and colourβ€”perfect for playful displays or handmade gifts. Make it in bold brights or soft pastels and watch the personality grow with each segment. Have fun with the yarn spine and colours to create a truly unique friend. 🧢🌈

You ask,

we answer.

FAQs

What size will the finished piece be?

The finished amigurumi measures approximately 25 cm in length when using DK yarn and a 4mm hook as recommended in the pattern.

Can I use different yarn weights for this pattern?

Yes, you can use different yarn weights but it will change the finished size and may require adjusting the hook and stuffing; heavier yarn will make a chunkier caterpillar while finer yarn will make a smaller one.

Do I need prior crochet experience for this pattern?

This pattern is rated intermediate, so basic knowledge of crochet stitches, working in the round, increases and decreases is recommended for best results.

How long does this project typically take to complete?

Most crocheters complete this project in 2-4 hours, though time will vary depending on experience level, number of colour changes and how much time you spend on finishing and hair attachment.