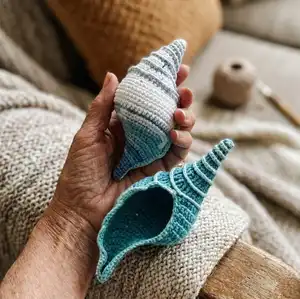
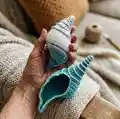
🧢 Beautiful ✨ Detailed πŸ’ Adorable

Tulip Shell Pattern

Tulip Shell Pattern
4.7β˜… Rating
2-4 Hours Time Needed
3.2K Made This
βœ‚οΈ

Intermediate Level

Ideal for those with basic crochet experience, featuring slightly more advanced stitches and techniques to expand your skills.

⏱️

Bite-Sized Project

Finishes in 2-4 hoursβ€”perfect for an afternoon of creative relaxation.

🏑

Cozy Accent

A warm touch for your space that transforms ordinary corners into inviting nooks filled with handmade charm.

About This Tulip Shell Pattern

This pattern creates a decorative tulip-shaped shell using 100% cotton yarn and small hooks for tight, sculptural stitches. You start from the tip, work in continuous rounds in back loops, then turn to work rows to form the shell opening. The pattern includes trimming, a neat border and a shaping method using a water-and-glue mix to stiffen and hold the shell shape.

Tulip Shell Pattern crochet pattern - detailed view of completed project

Clear stitch-by-stitch rounds and row instructions make it easy to follow while offering creative finishing options. Ideal for making multiple shells in variegated or solid cotton for display or gifts.

Why You'll Love This Tulip Shell Pattern

I absolutely love this pattern because it blends simple crochet shaping with a satisfying finishing process that transforms soft yarn into crisp sculptural shells. I enjoy how the tiny stitches and small hooks give a delicate, detailed texture that mimics real shells. The shaping step using a glue-and-water mix is playful and addictive β€” you can tweak the curves until it looks just right. Seeing the shell dry and hold its shape never gets old, and I love gifting sets of these to friends who collect seaside decor.

Tulip Shell Pattern step 1 - construction progress Tulip Shell Pattern step 2 - assembly progress Tulip Shell Pattern step 3 - details and accessories Tulip Shell Pattern step 4 - final assembly and finishing

Switch Things Up

I love how versatile this pattern is for customization; you can change colors to create dozens of unique shells.

Use variegated yarn like Alize "Bahar Batik" for a naturally striped effect along the shell ridges.

Try solid pastel shades for a soft coastal display or bold brights for a modern take on the motif.

Make the shell larger or smaller by changing yarn weight and hook size: bulky yarn with a bigger hook gives a chunky decorative shell.

For miniatures, use very thin thread and a 0.75–1.0 mm hook to create tiny shells perfect for necklaces or keychains.

I often add a contrasting border color using 1.0 mm thread to make the opening pop against the shell body.

Experiment with embroidery or tiny seed beads stitched on before shaping for extra texture and sparkle.

If you prefer a soft, non-stiff shell, skip the glue mix and simply wet-block the shell with water and allow it to dry for a softer result.

Try painting or watercolor washes after shaping for subtle shadingβ€”seal with varnish if you want a glossy finish.

I recommend testing a small color and stiffness sample before committing to a whole batch so you can tailor the technique to your preferred look.

Common Mistakes & How to Fix Them

βœ— Skipping working in back loops for the initial rounds will change the shell texture and shape; be sure to work rounds in back loops only as instructed at the beginning. βœ— Using a hook that is too large will produce loose stitches and a floppy shell; use the recommended small hooks (1.5 mm body, 1.0 mm trim) for crisp results. βœ— Forgetting to switch to rows at the correct point will break the intended shaping of the opening; follow the exact instruction 'Turn and continue working in rows from now on' before Row 1. βœ— Not shaping with the glue mixture or overstuffing the shell can lead to collapse or unwanted bulging; use the recommended water-to-glue ratio and small plastic bags to support the shell while drying.

Tulip Shell Pattern

Make a delicate crocheted tulip shell that doubles as pretty home decor or a coastal gift. This pattern guides you step-by-step from the tip of the shell through shaping and stiffening, with clear rounds, row shaping and border instructions. You will learn to work in back loops, change stitch heights and finish with a neat trim and rigid shaping technique.

Intermediate 2-4 Hours

Materials Needed for Tulip Shell Pattern

β€” Main Fabric

  • 01
    100% cotton yarn, in 2 weights (used for body and trim)
  • 02
    Shell body: Madame Tricote "Camilla" (100% cotton, 50g = 125 m)
  • 03
    Trim and border: Madame Tricote "Maxi" (100% cotton, 100g = 565 m)
  • 04
    Optional: Alize "Bahar Batik" variegated yarn for color effects
  • 05
    Alternative for thin trim: Alize "Miss" (50 g = 280 m)

β€” Tools Required

  • 01
    Crochet hook size 1.5 mm (recommended for shell body)
  • 02
    Crochet hook size 1.0 mm (for trim and border)
  • 03
    Scissors
  • 04
    Needle to weave in ends
  • 05
    Stitch markers (optional)
  • 06
    White glue for shaping
  • 07
    Water for glue mixture
  • 08
    Small plastic bags to fill shell for drying
  • 09
    Rubber gloves (optional) for shaping
  • 10
    Chopstick or similar tool to straighten long thin top while shaping

Progress Tracker

0% Complete

β€” Crocheting the shell :

Info :

Starting from the tip of the shell and working in continuous rounds and in back loops only.

Rnd 1 :

6 sc in a magic ring (6)

Rnd 2 :

* 1 sc in each of next 2 sts, 2 sc in next; rep from * 1 more time (8)

Rnd 3 :

* 1 hdc in each of next 3 sts, 2 hdc in next; rep from * 1 more time (10)

Rnd 4 :

* 1 dc in each of next 4 sts, 2 dc in next; rep from * 1 more time (12)

Rnd 5 :

* 1 dc in each of next 2 sts, 2 dc in next; rep from * 3 more time (16)

Rnd 6 :

* 1 dc in each of next 3 sts, 2 dc in next; rep from * 3 more time (20)

Rnd 7 :

* 1 tr in each of next 3 sts, 2 tr in next; rep from * 4 more time (25)

Rnd 8 :

* 1 tr in each of next 4 sts, 2 tr in next; rep from * 4 more time (30)

Info :

Turn and continue working in rows from now on:

Row 1 :

working through front loops only: ch 1 (=1 sc), 2 sc in next st, 1 sc in each st; turn (31)

Row 2 :

working through both loops from now on: ch 1 (=1 sc), sc2tog, * 1 sc in each of next 2 sts, 2 sc in next; rep from * 7 more times; 1 sc in each of last 4 sts; turn (38)

Row 3 :

ch 1 (=1 sc), 2 sc in next st, 1 sc in each st; turn (39)

Row 4 :

ch 1 (=1 sc), sc2tog, 1 sc in each st; turn (38)

Row 5 :

same as Row 3

Row 6 :

same as Row 4

Row 7 :

same as Row 3

Row 8 :

same as Row 4

Row 9 :

same as Row 3

Row 10 :

same as Row 4

Row 11 :

same as Row 3

Row 12 :

ch 1 (=1 sc), * sc2tog, 1 sc in next 2 sts, rep from * 8 more times; 1 sc in last 2 sts; turn (30)

Row 13 :

ch 1 (=1 sc), 2 sc in next st, 1 sc in each st; turn (31)

Row 14 :

ch 1 (=1 sc), * sc2tog, 1 sc in next 2 sts, rep from * 6 more times, 1 sc in last 2 sts; turn (24)

Row 15 :

ch 1 (=1 sc), 2 sc in next st, 1 sc in each st; turn (25)

Row 16 :

ch 1 (=1 sc), * sc2tog, 1 sc in next 2 sts, rep from * 5 more times; turn (19)

Row 17 :

ch 1 (=1 sc), 2 sc in next st, 1 sc in each st; turn (20)

Row 18 :

ch 1 (=1 sc), * sc2tog, 1 sc in next 2 sts, rep from * 3 more times, 1 sc in last 3 sts; turn (16)

Row 19 :

ch 1 (=1 sc), sc in next st, 1 sc in each st; turn (16)

Row 20 :

ch 1 (=1 sc), * sc2tog, 1 sc in next st, rep from * 3 more times, 1 sc in last 3 sts; turn (12)

Row 21 :

ch 1 (=1 sc), 1 sc in each st; turn (12)

Row 22 :

ch 1 (=1 sc), * sc2tog, 1 sc in next st, rep from * 2 more times, 1 sc in last 2 sts; turn (9)

Row 23 :

ch 1 (=1 sc), 1 sc in each st; turn (9)

Row 24 :

ch 1 (=1 sc), * sc2tog, 1 sc in next st, rep from * 1 more time, 1 sc in last 2 sts; turn (7)

Row 25 :

ch 1 (=1 sc), 1 sc in each st; turn (7)

Row 26 :

ch 1 (=1 sc), 1 sc in each st; turn (7)

Row 27 :

ch 1 (=1 sc), 1 sc in each st; turn (7)

Row 28 :

ch 1 (=1 sc), 1 sc in each st; turn (7)

Info :

Fasten off and weave in the ends.

β€” Trim :

Info :

Using 1,00 mm hook and thin thread.

Trim :

Attach yarn to the front loop of last stitch of last round. Working into those front loops: 2 sc in one stitch all the way to the center of the shell. Fasten off and weave in the ends.

β€” Border :

Info :

Using 1,00 mm hook and thin thread.

Border :

Attach yarn to the top of the shell opening. Ch 1 and then sc all the way around the shell opening inserting hook into the stitches. Now work 2. row only down of the opening of the shell by working 2 dc in one stitch and 1 dc in next. Few stitches before the tip of the shell make 2 hdc and 4-5 sc instead of dc. Fasten off and weave in the ends.

β€” Shaping the shell :

Info :

Shaping steps to stiffen and set the shell.

Step 1 :

In a cup mix 2 parts of water with 1 part of glue.

Step 2 :

Immerse the crocheted shell into the glue and water mixture (wear rubber gloves if necessary) until it’s fully wet.

Step 3 :

Carefully squeeze out excess glue-water mix.

Step 4 :

Start shaping the shell by gently pulling at the crochet fabric and giving it a desired shape.

Step 5 :

Use something (like chopstick) to help you straighten out the long and thin shell top.

Step 6 :

Use small plastic bags to fill up the shell – it helps to hold its shape while the shell is drying.

Step 7 :

Pinch the bottom of the shell together and shape an opening. Pull at trim.

Step 8 :

Continue until you are satisfied with the shape. Leave it to dry on a towel.

β€” Few more tips and tricks :

Infos :

I use for most of my small crochet work 100% cotton yarn which has 125 m of yarn per 50 grams. Many brands have this weight. Some examples: Madame Tricote "Camilla", Kartopu "Organica", Anchor "Creativa Fino", Schachenmayr "Catania" and there are many more.

Info :

Yarn label calls for 3,0 mm hook for these yarns but I recommend to use as small hook as you possibly can. I usually work with 1,5 mm. If this feels too uncomfortable then try a bit larger hook like 1,75 mm or 2,00 mm. The smaller the hook, the tighter the stitches and the prettier an end result.

Info :

Variegated yarn also gives a lovely effect to the shell. I’ve used Alize "Bahar Batik" with great success.

Info :

I like to use even thinner yarn and smaller hook (1,0 mm) for added details like border and trim. I mostly use Madame Tricote "Maxi" (100 gr = 565 m) or Alize "Miss" (50 gr = 280 m).

Info :

If you don’t want to add any stiffness to your shell you can just wet it in water, give it a desired shape and leave it to dry. I encourage you to experiment and find the way what suits you best!

Info :

Finally let’s talk about further embellishing your shells. I have used watercolors or diluted acrylic paint to add some extra color to my shells. I’ve also experimented with adding some glitter and sealing it with some varnish. Or hand stitched on some seed beads (must be done before shaping with glue).

Assembly Instructions

  • Attach the trim: using 1.00 mm hook, join thin thread to the front loop of the last stitch and work 2 sc in one stitch along the front loops toward the shell center; fasten off and weave ends.
  • Add the border: attach thin thread at the top of the shell opening, ch 1 and sc evenly all the way around the opening, then work a second row down the opening using 2 dc in one stitch and 1 dc in the next; adjust near the tip with 2 hdc and 4-5 sc as instructed.
  • Shape the shell: prepare a 2:1 water-to-glue mix, immerse the shell until fully wet, gently squeeze out excess, then insert small plastic bags and use a chopstick to shape the long thin top; leave on a towel to dry.
  • Pinch and form the opening: pinch the bottom of the shell together to create the opening, pull at the trim to refine the edge and continue shaping until satisfied before leaving to dry.
  • Weave in and finish: after trimming and shaping, weave in all ends securely and, if desired, add color or beads prior to final shaping with glue.

Important Notes

  • πŸ’‘Work rounds in continuous rounds and in back loops only for the initial shaping as instructed; do not join or turn unless the pattern tells you to.
  • πŸ’‘Use stitch markers to mark the beginning of a round or the first stitch of a row to keep track of the shaping and increases/decreases.
  • πŸ’‘When shaping with glue, wear rubber gloves if you have sensitive skin and use small plastic bags inside the shell to support the shape while drying.
  • πŸ’‘For tight, sculptural stitches use a smaller hook than suggested on the yarn label; recommended body hook is 1.5 mm and trim hook 1.0 mm.

This Tulip Shell pattern is a lovely way to transform cotton yarn into delicate coastal decor that holds its shape. Use tiny hooks and a little glue mix to sculpt curves and openings with confidence. Display them alone or in clusters to add handmade charm to any shelf or table. 🧢🌊

You ask,

we answer.

FAQs

What size will the finished piece be?

The finished shell size will vary with yarn and hook choice; with the recommended yarns and 1.5 mm hook the shell matches the photos (small decorative shell approximately 8-12 cm long depending on tension and shaping).

Can I use different yarn weights for this pattern?

Yes, but changing yarn weight and hook size will change the final size and texture; using bulkier yarn will produce a larger, softer shell while thinner yarn with smaller hooks gives a delicate, sculptural result.

Do I need prior crochet experience for this pattern?

This pattern is rated intermediate because it uses multiple stitch heights (sc, hdc, dc, tr), working in back loops, row shaping and finishing techniques; basic experience with these stitches and counting is recommended.

How long does shaping and drying take?

Crocheting the shell typically takes a couple of hours; shaping and drying time depends on glue mix and humidity β€” expect several hours to overnight for full drying and stiffness.