🧢 Beautiful ✨ Detailed πŸ’ Adorable

Cactus frog with removeable pot Amigurumi Pattern

Cactus frog with removeable pot Amigurumi Pattern
4.5β˜… Rating
2-4 Hours Time Needed
3.4K Made This
βœ‚οΈ

Intermediate Level

Ideal for those with basic crochet experience, featuring slightly more advanced stitches and techniques to expand your skills.

⏱️

Bite-Sized Project

Finishes in 2-4 hoursβ€”perfect for an afternoon of creative relaxation.

🧸

Cute Companion

An adorable friend to cherish, handcrafted with love to bring comfort and joy for years to come.

About This Cactus frog with removeable pot Amigurumi Pattern

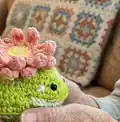
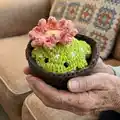
This pattern creates a tiny cactus-inspired frog with a removable flower pot and a ruffled flower on top. It uses basic amigurumi shaping plus a few simple decorative techniques like embroidered X marks. The frog fits inside a crocheted pot for display or play, making it both cute and interactive.

Cactus frog with removeable pot Amigurumi Pattern crochet pattern - detailed view of completed project

The pattern includes full round-by-round instructions for head, body, legs, toes, flower and flower pot. Photos and assembly notes help you position parts accurately and finish neatly.

Why You'll Love This Cactus frog with removeable pot Amigurumi Pattern

I absolutely love this pattern because it combines a playful character with a clever removable element β€” the frog sits inside a little pot. I enjoy the contrast between the simple amigurumi shaping and the fun, textured flower petals that give the piece personality. Sewing the toes and embroidering the little X marks makes the piece feel handcrafted and special to me. It is satisfying to make a small finished item that looks delightful and poses cute on a shelf or desk.

Cactus frog with removeable pot Amigurumi Pattern step 1 - construction progress Cactus frog with removeable pot Amigurumi Pattern step 2 - assembly progress Cactus frog with removeable pot Amigurumi Pattern step 3 - details and accessories Cactus frog with removeable pot Amigurumi Pattern step 4 - final assembly and finishing

Switch Things Up

I love how easy it is to change the look of this pattern: swap the flower color to purple or blue for a different mood.

You can make the frog larger by using a bulkier yarn and a larger hook; conversely, use finer yarn and a smaller hook for a tiny keychain version.

I sometimes add a small loop at the back and turn it into an ornament or bag charm by sewing a metal ring onto the pot.

Try embroidering different cactus marks β€” short lines, dots or tiny hearts β€” to personalize the frog's body.

Make the pot taller or shorter by adding or removing the rounds in the pot section to change the frog's display fit.

If you want a more stable display, add a small disk of cardboard or felt to the bottom of the pot before stuffing to keep it from tipping.

I like to mix yarn textures for the flower petals β€” a fluffy yarn gives a totally different ruffle effect than smooth cotton.

Swap safety eyes for embroidered eyes for a fully child-safe version, or use 4mm eyes for a subtler look.

Experiment with color gradients for the petals by using variegated or self-striping yarn to get a painterly flower effect.

You can also make a whole family of cactus critters: try different animal faces (bear, cat) with the same pot and flower idea for a cute collection.

Common Mistakes & How to Fix Them

βœ— Skipping stitch markers during continuous rounds leads to lost counts and uneven shaping; use a stitch marker or a scrap of yarn to mark the first stitch of each round to stay on track. βœ— Stuffing too late or unevenly causes lumps and flattened shapes; stuff gradually during shaping and add small amounts at a time to maintain an even, rounded profile. βœ— Placing safety eyes without counting rounds causes misaligned features; insert safety eyes between rounds 5 and 6 and space them four stitches apart as instructed for a balanced face. βœ— Forgetting to leave long yarn ends for assembly results in tricky sewing later; always leave a long tail when instructed so you can sew pieces securely and hide ends inside the body.

Cactus frog with removeable pot Amigurumi Pattern

Make a charming cactus frog with a removable pot and a ruffled flower topper. This pattern guides you step-by-step through shaping the frog body, legs, toes, flower and pot so you can assemble a tiny, gift-ready amigurumi. Youll learn simple shaping, petal construction, and embroidered details for a unique, playful finish. Perfect for crocheters who enjoy small, detailed projects that make sweet handmade gifts.

Intermediate 2-4 Hours

Materials Needed for Cactus frog with removeable pot Amigurumi Pattern

β€” Main Fabric

  • 01
    Any type of yarn (I use Sugar and Cream cotton yarn) - small amounts of each color
  • 02
    Green - hot green (main color) - approx 15-30g
  • 03
    White - small amount for belly and embroidery - approx 10-15g
  • 04
    Brown - warm brown for pot - approx 20-30g
  • 05
    Yellow - small amount for flower center - approx 5-10g
  • 06
    Light red (tea rose) - small amount for flower petals - approx 10-20g
  • 07
    Red - small amount if you wish to use instead of tea rose - approx 5-10g

β€” Tools Required

  • 01
    Crochet hook size 3.5mm
  • 02
    Poly-fil fiber for stuffing
  • 03
    Yarn needle for sewing and weaving ends
  • 04
    Safety eyes 6mm (Not for children under 3)
  • 05
    Stitch markers or a piece of scrap yarn to mark rounds
  • 06
    Scissors
  • 07
    Optional: stitch remover or pins for positioning parts

Progress Tracker

0% Complete

β€” Head and body :

Info :

Start with green yarn.

Round 1 :

8sc in a MR (8)

Round 2 :

8inc (16)

Round 3 :

(sc, inc) x8 (24)

Round 4 :

(2sc, inc) x8 (32)

Round 5 :

(3sc, inc) x8 (40)

Round 6 :

16sc, inc, 5hdc-inc, inc, 17x (47)

Info :

Change to white yarn.

Round 7 :

BLO: 21sc, 3dec, 20sc (44)

Round 8 :

(3sc, inc) x2, 12sc, 2dec, 12sc, (3sc, inc) x2 (46)

Round 9-10 :

46sc (46)

Round 11 :

(3sc, dec) x2, 10sc, dec, 2sc, dec, 10sc, (3sc, dec) x2 (40)

Round 12 :

(2sc, dec) x10 (30)

Round 13 :

30sc (30)

Info :

Now it’s time to insert the safety eyes between round 5 and 6, 4 stitches apart. Make sure the nose is in the middle of the eyes.

Info :

Stuff the piece.

Round 14 :

(sc, dec) x10 (20)

Round 15 :

10dec (10)

Round 16 :

3 dec. F.O You don’t have to finish this round.

Info :

Close the body by using needle and cut the yarn. Hide the end inside the body.

β€” Back legs x2 :

Info :

Start with green yarn.

Round 1 :

6sc in a MR (6)

Round 2 :

6inc (12)

Round 3 :

(sc, inc) x6 (18)

Round 4 :

18sc (18) F.O

Info :

Leave long end to connect with the body.

β€” Toes x2 :

Info :

Start with green yarn.

Round 1 :

8sc in a MR (8)

Round 2 :

do not break the working yarn, continue to work the toes with it: chain 3, turn work, start from the second chain from the hook, hdc, 1 slst in the chain, 1 slst on the MR)x3, 4sc, slst on the last stitch. (8) F.O

Info :

Leave long end to connect with the back legs.

β€” Front legs x2 :

Info :

Start with green yarn.

Round 1 :

5sc in a MR (5)

Round 2 :

inc, 2sc, inc, sc (7)

Round 3-10 :

7sc (7) F.O

Info :

Do not close the piece. Do not stuff the piece. Leave long end to connect with the body.

β€” Flower :

Info :

Start with yellow yarn.

Round 1 :

BLO: 6sc in a MR (6)

Round 2 :

BLO: 6inc (12)

Round 3 :

BLO: (sc, inc) x6 (18)

Info :

Change to light red yarn.

Round 4 :

BLO: slst, (chain 5, start from the 2nd chain from the hook, 4hdc along the chain, skip 1 stitch, slst on the next stitch of the base) x 8.

Info :

After you finished all the petals in the back loop (8 petals), change to the front loop and do the same step (8 petals). F.O the last stitch. At the end you should have 16 petals.

Info :

Leave long end to sew into the frog's body.

β€” Flower Pot :

Info :

Start with brown yarn.

Round 1 :

8sc in a MR (8)

Round 2 :

8inc (16)

Round 3 :

(sc, inc) x8 (24)

Round 4 :

(2sc, inc) x8 (32)

Round 5 :

(3sc, inc) x8 (40)

Round 6 :

(4sc, inc) x8 (48)

Round 7 :

(5sc, inc) x8 (56)

Round 8 :

BLO: 56sc (56)

Round 9-14 :

56sc (56)

Round 15 :

FLO: 56hdc (56), slst to the first stitch.

Info :

F.O

Info :

Leave long end and sew around the pot to secure and hide the end. Cut off the yarn.

β€” Assembly :

Back legs and toes :

Start sewing the back legs on two side of the thighs and make sure to stuff it before closing it all the way. Sew the toes to the bottom of the legs. Make sure 3 toes pointed out.

Front legs :

Sew the front leg two stitches away from the back leg, 3 stitches long. Then sew the tip of the leg into the belly. Repeat the same steps on the other side.

Embroider :

Using white yarn, embroider "X" around the frog body.

Flower placement :

Sew the flower to one side of the frog. You can also sew it on the top of the frog. It's completely up to you.

Final :

Now you have a cactus frog. Please take care of it by handwashing when dirty. Hope you enjoy making this pattern.

Assembly Instructions

  • Start sewing the back legs on two sides of the thighs and stuff them before closing completely; sew the toes to the bottom of each leg with three toes pointed outward.
  • Sew the front legs two stitches away from the back legs, about three stitches long; then sew the tip of each front leg into the belly and repeat on the other side.
  • Using white yarn, embroider small X marks around the frog body as shown in the photos to create cactus spines.
  • Sew the flower to one side of the frog or on top of the head depending on your preference; leave a long tail when making the flower to make sewing it in easy.
  • Place the frog inside the finished pot; if desired tack the frog to the pot with a few hidden stitches to keep it from falling out during display.

Important Notes

  • πŸ’‘Work in continuous spiral rounds and use a stitch marker or a piece of yarn to mark the first stitch of each round.
  • πŸ’‘Insert safety eyes between rounds 5 and 6 and space them four stitches apart for correct facial placement.
  • πŸ’‘Stuff pieces firmly but gradually to avoid lumps and maintain shapeβ€”overstuffing can distort the amigurumi.
  • πŸ’‘Leave long yarn ends where instructed so you can sew parts together securely and hide ends inside the body.

This cute cactus frog sits inside a removable pot and wears a ruffled flower crown β€” a tiny plant friend with personality.🌡🌸 Perfect for gifting or displaying on a shelf, its textured flower and embroidered details make it extra special.🧢 Enjoy making and caring for your handmade cactus frog β€” handwash when needed and it will stay lovely for years.✨

You ask,

we answer.

FAQs

What size will the finished piece be?

The finished amigurumi measures approximately 2 1/2 inches in height and 2 1/2 inches wide when using the recommended cotton yarn and 3.5mm hook.

Can I use different yarn weights for this pattern?

Yes, you can use different yarn weights but this will change the finished size; choose an appropriate hook size for your yarn and adjust expectations for dimensions.

Do I need prior crochet experience for this pattern?

This pattern is rated intermediate, so basic knowledge of amigurumi stitches (single crochet, increases, decreases) and sewing pieces together is recommended for best results.

How long does this project typically take to complete?

Most crocheters complete this project in 2-4 hours, though time may vary depending on experience level and how carefully you sew and assemble the pieces.