🧢 Beautiful ✨ Detailed πŸ’ Adorable

Bunny Amigurumi Pattern

Bunny Amigurumi Pattern
4.2β˜… Rating
5-7 Hours Time Needed
1.2K Made This
βœ‚οΈ

Beginner Friendly Level

Perfect for those just starting their crochet journey, with clear instructions and simple techniques

⏱️

Weekend Treat

Takes 5-7 hours, making it an enjoyable project to finish over a couple of days.

🧸

Cute Companion

An adorable friend to cherish, handcrafted with love to bring comfort and joy for years to come.

About This Bunny Amigurumi Pattern

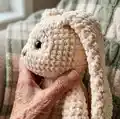
This pattern creates a plush velvet bunny with long ears and rounded paws using chunky plush yarn. The instructions include step-by-step rounds for hind paws, front paws, ears and body with helpful photos to guide you. The finished bunny is soft, squishy and great for gifting or decorating a nursery.

Bunny Amigurumi Pattern crochet pattern - detailed view of completed project

Worked in continuous rounds with simple increases and decreases, this pattern is great for beginners. You will learn shaping techniques and how to assemble parts securely for a neat finished toy.

Why You'll Love This Bunny Amigurumi Pattern

I absolutely love this pattern because it turns bulky plush yarn into a super cuddly character that is irresistibly soft. I enjoy how quickly the pieces grow thanks to the thick yarn and large hooks β€” it is very satisfying to see progress. The shaping is simple yet effective, and the long ears give the bunny so much personality. I also adore that this pattern is beginner-friendly but still produces a professional-looking toy you can be proud to gift.

Bunny Amigurumi Pattern step 1 - construction progress Bunny Amigurumi Pattern step 2 - assembly progress Bunny Amigurumi Pattern step 3 - details and accessories Bunny Amigurumi Pattern step 4 - final assembly and finishing

Switch Things Up

I love how easy it is to customize this bunny by changing yarn color and hook size; try pastel shades for a soft nursery look or bright colors for playful toys.

You can make a mini version by using thinner yarn and a smaller hook β€” perfect for keychains or bag charms.

I often add accessories like tiny crochet scarves, bows, or a little felt heart to personalize each bunny for gifts.

To make the bunny poseable, you can insert a small wire into the limbs before stuffing and secure the ends so they do not poke through.

If you want a firmer toy, use a bit less stuffing and smaller hook for tighter stitches; for extra squishiness use more stuffing and keep the stitches slightly looser.

I sometimes embroider different facial expressions β€” a small smile, eyelids, or freckles β€” which changes the personality dramatically.

Try different eye sizes: smaller eyes give a sweeter look while larger safety eyes create a more expressive face.

Make a set by varying sizes and colors so they look like a little family β€” super cute as a gift bundle.

You can also experiment with yarn textures: chenille for ultra-soft results, or velvet for a luxurious plush finish.

When sewing parts in place, I pin or use stitch markers first to test placement; this helps me adjust before doing permanent stitches.

Common Mistakes & How to Fix Them

βœ— Skipping the 2nd loop start when instructed can make the base too loose and uneven; always work the first round into the 2nd loop from the hook as directed to get a neat starting edge. βœ— Forgetting to move the stitch marker to the first stitch of each round will cause your rounds to drift out of alignment; place and move the marker after each round to keep consistent stitch counts. βœ— Not stuffing evenly will produce lumpy paws and body shapes; stuff gradually and evenly, checking the shape as you go to maintain the intended form. βœ— Pulling the working loop too tightly when crocheting SC will create holes in the plush fabric; pull the working loop to the level of the hook but do not over-tighten so the canvas remains closed and even.

Bunny Amigurumi Pattern

Make a soft, cuddly plush bunny using velvet/plush yarn and simple amigurumi techniques. This pattern walks you through ears, paws, body and assembly with clear step-by-step rounds. Perfect for making a handmade gift or a cozy nursery friend using bulky plush yarn.

Beginner Friendly 5-7 Hours

Materials Needed for Bunny Amigurumi Pattern

β€” Main Fabric

  • 01
    Plush/velvet yarn (approx. 130 yards / 120 m per 100 g) β€” 2 skeins (example uses Baby Love plush yarn, peach color)
  • 02
    Small amounts of contrast yarn for muzzle embroidery (a few meters)
  • 03
    Optional scrap yarn for marking or temporary sewing

β€” Tools Required

  • 01
    Crochet hook size 4 mm (recommended for most parts)
  • 02
    Crochet hook size 6 mm (recommended for ears)
  • 03
    Safety eyes 15 mm (2 pieces)
  • 04
    Soft polyester stuffing
  • 05
    Plastic needle with large eyelet
  • 06
    Stitch markers (3 pieces or more)
  • 07
    Scissors
  • 08
    Yarn needle for sewing parts together

Progress Tracker

0% Complete

β€” Hind paws :

Info :

Take the 4 mm hook.

Info :

Crochet 5 CH.

1 row :

From the 2nd loop from the hook 3 SC, 3 SC in 1, 2 SC, 1 Inc (=10)

Info :

Next crochet a spiral.

2 row :

1 Inc, 2 SC, 3 Inc, 2 SC, 2 Inc (=16)

Info :

Place the marker in the 1st SC of the row. Next rearrange the marker to the 1st SC of the each subsequent row.

Info :

When crochet SC, pull the working loop to the level of the hook. Then the canvas will be without holes.

Info :

Then tighten the loop on the hook back.

3 row :

1 SC, 1 Inc, 3 SC, 1 Inc, 3 SC, 1 Inc, 3 SC, 1 Inc, 2 SC (=20)

4 row :

1 SC, 1 Inc, (4 SC, 1 Inc)*3, 3 SC (=24)

5-6 rows :

2 rows of 24 SC

7 row :

6 SC, (1 Dec, 1 SC)*3, 1 Dec, 5 SC, 1 Dec (=19)

8 row :

4 SC, 4 Dec, 5 SC, 1 Dec (=14)

9-14 rows :

6 rows of 14 SC

Info :

Take some stuffing. Take the same amount for the second paw to ensure they are equally filled. Gently stuff the lower part of the paw. Fold in half.

Info :

Crochet 6 SC on both part. Cut the thread, pull out the end.

Info :

Similarly crochet the 2nd paw.

β€” Front paws :

Info :

Take the 4 mm hook.

Info :

Crochet 2 CH.

1 row :

6 SC in the 2nd loop from the hook

Info :

Next crochet a spiral.

2 row :

6 Inc (=12)

Info :

Place the marker in the 1st SC of the row. Next rearrange the marker to the 1st SC of the each subsequent row.

3 row :

(5 SC, 1 Inc)*2 (=14)

4-7 rows :

4 rows of 14 SC

Info :

Take some stuffing. Take the same amount for the second paw to ensure they are equally filled. Gently stuff the lower 2/3 of the paw. Fold in half.

Info :

Crochet 5 SC on both part. Cut the thread, pull out the end.

Info :

Similarly crochet the 2nd paw.

β€” Ears :

Info :

Take the 6 mm hook.

Info :

Crochet 2 CH.

1 row :

6 HDC in the 2nd loop from the hook

Info :

Next crochet a spiral. Crochet the loops loosely to create a voluminous pattern.

2 row :

6 Inc (=12)

Info :

Place the marker in the 1st HDC of the row. Next rearrange the marker to the 1st HDC of the each subsequent row.

3 row :

(1 HDC, 1 Inc)*6 (=18)

4-8 rows :

5 rows of 18 HDC

9 row :

(4 HDC, 1 Dec)*3 (=15)

10-12 rows :

3 rows of 15 HDC

13 row :

(3 HDC, 1 Dec)*3 (=12)

14-16 rows :

3 rows of 12 HDC

17 row :

(4 HDC, 1 Dec)*2 (=10)

18 row :

10 HDC

19 row :

(3 HDC, 1 Dec)*2 (=8)

20-22 rows :

3 rows of 8 HDC

Info :

Fold in half.

Info :

Crochet 4 SlSt on both part. Cut the thread, pull out the end.

Info :

Similarly crochet the 2nd ear.

β€” Body :

Info :

Take the 4 mm hook.

Info :

Crochet 2 CH.

1 row :

6 SC in the 2nd loop from the hook

Info :

Next crochet a spiral.

2 row :

6 Inc (=12)

Info :

Place the marker in the 1st SC of the row. Next rearrange the marker to the 1st SC of the each subsequent row.

3 row :

12 Inc (=24)

4 row :

(3 SC, 1 Inc)*6 (=30)

Assembly Instructions

  • Attach hind paws to the lower sides of the body: position the folded edge at the bottom and sew securely using a yarn needle with matching yarn in an invisible whipstitch.
  • Sew front paws to the front of the body between the first filled body rows so the bunny can sit naturally; angle slightly inward and fasten firmly with small stitches.
  • Position ears at the top of the head and sew each ear along the folded edge, spacing them evenly and reinforcing with several passes to secure.
  • Attach safety eyes to the head between the indicated rounds (place between rounds where the photos show), then embroider the muzzle and nose with contrast yarn before closing the head.
  • Sew the head to the body with a mattress stitch or whipstitch, shaping the neck as you go to create a smooth join and secure the head firmly.

Important Notes

  • πŸ’‘Use stitch markers to mark the first stitch of each round and move them after completing each round to maintain the correct stitch count.
  • πŸ’‘Work with consistent tension and pull the working loop to the level of the hook when crocheting SC to avoid gaps in plush yarn fabric.
  • πŸ’‘Stuff parts gradually β€” use the same amount of stuffing for paired parts (paws, ears) to ensure symmetry and even shape.

This handmade Bunny Amigurumi is designed to be soft, huggable, and full of charm β€” perfect for gifting or nursery display. The plush velvet yarn creates a luxurious, cuddly texture that kids and adults will adore. Make one in the color you love and add a tiny embroidered smile for personality. 🧢🐰✨

You ask,

we answer.

FAQs

What size will the finished piece be?

The finished bunny measures approximately 12 inches (30 cm) tall when using the recommended plush yarn and hook sizes noted in the materials.

Can I use different yarn weights for this pattern?

Yes, you can use different yarn weights, but this will affect the final size; using bulkier yarn will give a larger, cuddlier bunny and thinner yarn will give a smaller toy.

Do I need prior crochet experience for this pattern?

This pattern is rated beginner friendly, so basic knowledge of single crochet, increases and decreases is helpful; step-by-step photos guide key steps.

How long does this project typically take to complete?

Most crocheters complete this project in 5-7 hours, though time may vary depending on experience level and how many parts you work at once.