🧢 Beautiful ✨ Detailed πŸ’ Adorable

Bonnie Beanie Pattern

Bonnie Beanie Pattern
4.1β˜… Rating
2-3 Hours Time Needed
2.4K Made This
βœ‚οΈ

Beginner Friendly Level

Perfect for those just starting their crochet journey, with clear instructions and simple techniques

⏱️

Bite-Sized Project

Finishes in 2-4 hoursβ€”perfect for an afternoon of creative relaxation.

🧣

Snug Essential

Everyday comfort with practical charm, designed for both functionality and style through changing seasons.

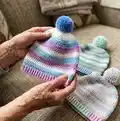
About This Bonnie Beanie Pattern

This pattern creates a soft, striped baby beanie worked in continuous rounds using Baby DK prints from Paintbox Yarns. It includes size options for 0–3 up to 18–24 months and instructions for a neat ribbed brim and pom pom finish. The pattern is written using US terminology with UK equivalents noted, making it easy to follow for most crocheters.

Bonnie Beanie Pattern crochet pattern - detailed view of completed project

Includes a gauge, materials list and step-by-step rounds for all sizes. Perfect for using self-striping DK yarn to produce pretty color changes without switching colors manually.

Why You'll Love This Bonnie Beanie Pattern

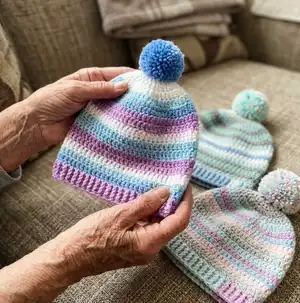
I absolutely love this pattern because it makes a simple, beautiful hat that looks much more complicated than it is. The Baby DK prints do the colorwork for you, so you get a charming striped effect with minimal effort. I enjoy how quick the hat works up β€” you can make one in an afternoon and gift it the same day. The ribbed brim and pom pom give the finished beanie a polished, professional look that I am proud to give to friends and family.

Bonnie Beanie Pattern step 1 - construction progress Bonnie Beanie Pattern step 2 - assembly progress Bonnie Beanie Pattern step 3 - details and accessories Bonnie Beanie Pattern step 4 - final assembly and finishing

Switch Things Up

I love changing the look of this beanie by swapping the Paintbox Baby DK Prints for a solid or tonal DK β€” the pom pom really helps personalize the hat.

I often use a slightly larger hook and bulky yarn to make an oversized, slouchier version that is wonderfully cozy for older children.

I sometimes work the brim in a contrasting color and pick up stitches for the brim using an alternative border like crab stitch or reverse single crochet for a neat edge.

I like to knit a small lining from soft cotton to add extra warmth and comfort for baby, sewing it in before attaching the pom pom.

Try substituting the pom pom for a tassel or a crocheted flower for a different decorative finish β€” small attachments can change the hat’s style completely.

To make a matching set, crochet booties or a little scarf using the same yarn and ribbing technique from the brim.

I sometimes embroider a tiny heart or initial on the brim to personalize the hat as a gift β€” simple embroidery stitches add a sweet detail.

If you want a snugger fit, work one or two fewer rounds before starting the brim, checking the hat against the intended recipient as you go.

Experiment with color placement by adding a single contrasting round or two between increase rounds for a striped crown effect.

I recommend making a test pom pom in different sizes to see what scale looks best on your size beanie before permanently attaching it.

Common Mistakes & How to Fix Them

βœ— Skipping the stitch marker at the end of each round can make it hard to track your rounds; place a marker in the last stitch and move it up as you work to maintain accurate stitch counts. βœ— Working with inconsistent tension causes an uneven hat shape and irregular stitch size; maintain even, relaxed tension throughout and check gauge before starting the crown. βœ— Not counting increases during the crown rounds will lead to missing or extra stitches later; count each round after completing the increases to confirm the correct stitch total. βœ— Failing to read the size-specific instructions can result in the wrong number of rounds worked; follow the separate size sections carefully and work the exact rounds listed for your chosen size. βœ— Fastening off before joining the brim will make it difficult to create a neat ribbed join; do not fasten off the hat body and follow the brim instructions without cutting the yarn. βœ— Joining the brim incorrectly (wrong side vs right side) can leave the brim siting awkwardly; follow the directions to turn and work at right angles to the hat body and join on the wrong side as instructed.

Bonnie Beanie Pattern

Make a cozy, striped baby beanie using Paintbox Yarns Baby DK Prints. This beginner-friendly pattern walks you through the hat crown, body, and ribbed brim with clear, step-by-step rounds for multiple baby sizes. You will create a snug, comfortable hat finished with a cute pom pom β€” perfect for gifting or everyday wear.

Beginner Friendly 2-3 Hours

Materials Needed for Bonnie Beanie Pattern

β€” Main Fabric

  • 01
    Paintbox Yarns Baby DK Prints - 50g (1 3/4 oz) balls
  • 02
    Yarn quantities (per size): 1 (1:1:2:2) balls of Baby DK Prints for sizes 0-3, 3-6, 6-12, 12-18, 18-24 months respectively in either Mermaid, Misty Forest or Pastel Party
  • 03
    Colors mentioned: Mermaid, Misty Forest, Pastel Party (self-striping Baby DK prints)
  • 04
    Gauge: 24 stitches and 27 rows measured over 4in/10cm in single (double) crochet worked in continuous rounds using US E/4 (3.5mm) hook

β€” Tools Required

  • 01
    US E/4 (3.5mm) crochet hook
  • 02
    US D/3 (3mm) crochet hook for brim
  • 03
    1 place marker (stitch marker)
  • 04
    Scissors
  • 05
    Yarn needle for sewing in ends
  • 06
    Pom pom maker or materials to make a small pom pom
  • 07
    Optional: pins for blocking

Progress Tracker

0% Complete

β€” Hat :

Info :

Make a MR using US E/4 (3.5mm) crochet hook.

1st round :

1 ch (does not count as st), 6 sc (dc) in MR, do not join or turn. | 6 sts.

2nd round :

2 sc (dc) in each st around. | 12 sts.

Info :

PM in last st of round and move up as you work each round.

3rd round :

[2 sc (dc) in next st, 1 sc (dc) in next st] 6 times. | 18 sts.

4th round :

[2 sc (dc) in next st, 1 sc (dc) in next 2 sts] 6 times. | 24 sts.

5th round :

[2 sc (dc) in next st, 1 sc (dc) in next 3 sts] 6 times. | 30 sts.

6th round :

[2 sc (dc) in next st, 1 sc (dc) in next 4 sts] 6 times. | 36 sts.

7th round :

[2 sc (dc) in next st, 1 sc (dc) in next 5 sts] 6 times. | 42 sts.

8th round :

[2 sc (dc) in next st, 1 sc (dc) in next 6 sts] 6 times. | 48 sts.

9th round :

[2 sc (dc) in next st, 1 sc (dc) in next 7 sts] 6 times. | 54 sts.

10th round :

[2 sc (dc) in next st, 1 sc (dc) in next 8 sts] 6 times. | 60 sts.

11th round :

[2 sc (dc) in next st, 1 sc (dc) in next 9 sts] 6 times. | 66 sts.

12th round :

[2 sc (dc) in next st, 1 sc (dc) in next 10 sts] 6 times. | 72 sts.

For size 0-3 months only :

13th - 32nd rounds 1 sc (dc) in each st around. | 72 sts. Continue to brim.

For size 3-6 months only :

13th round [2 sc (dc) in first st, 1 sc (dc) in next 11 sts] 6 times. | 78 sts. 14th - 35th rounds 1 sc (dc) in each st around. Continue to brim.

For size 6-12 mths only :

13th round [2 sc (dc) in first st, 1 sc (dc) in next 11 sts] 6 times. | 78 sts. 14th round [2 sc (dc) in first st, 1 sc (dc) in next 12 sts] 6 times. | 84 sts. 15th - 38th rounds 1 sc (dc) in each st around. Continue to brim.

For size 12-18 months only :

13th round [2 sc (dc) in first st, 1 sc (dc) in next 11 sts] 6 times. | 78 sts. 14th round [2 sc (dc) in first st, 1 sc (dc) in next 12 sts] 6 times. | 84 sts. 15th round [2 sc (dc) in first st, 1 sc (dc) in next 13 sts] 6 times. | 90 sts. 16th - 40th rounds 1 sc (dc) in each st around. Continue to brim.

For size 18-24 months only :

13th round [2 sc (dc) in first st, 1 sc (dc) in next 11 sts] 6 times. | 78 sts. 14th round [2 sc (dc) in first st, 1 sc (dc) in next 12 sts] 6 times. | 84 sts. 15th round [2 sc (dc) in first st, 1 sc (dc) in next 13 sts] 6 times. | 90 sts. 16th round [2 sc (dc) in first st, 1 sc (dc) in next 14 sts] 6 times. | 96 sts. 17th - 42nd rounds 1 sc (dc) in each st around. Continue to brim.

β€” Brim :

Info :

For all sizes Without fastening off, ss in next st at end of final round of hat body, turn to work at right angles to the hat body and continue as follows: Using US D/3 (3mm) hook, make 6 ch.

1st row :

(right side) 1 sc (dc) in second ch from hook and in each of next 4 ch, ss in next st on final round of hat body, turn. 5 sc (dc) and 1 ss.

2nd row :

Miss 1 ss, 1 sc (dc) in BLO of next 5 sts, turn. 5 sc (dc) BLO.

3rd row :

1 ch (does not count as st throughout), 1 sc (dc) in BLO of next 5 sts, ss in next 2 sts on final round of body, turn. 5 sc (dc) BLO and 2 ss.

4th row :

Miss 2 ss, 1 sc (dc) in BLO of next 5 sts, turn. 5 sc (dc) BLO.

Info :

Repeat 3rd and 4th rows around the bottom of the hat finishing on a 4th row.

To join the brim :

Working on the wrong side from the outside edge back towards the body of the hat, ss in FLO of each st of previous row and BLO of each corresponding ch from 1st row. Fasten off and weave in ends.

β€” To Finish :

Info :

Make a small pom pom and sew securely into the centre of the magic ring at the crown. Sew in any remaining ends.

Assembly Instructions

  • Without fastening off, join the brim by slip stitching in the FLO of each stitch of the previous row and the BLO of the corresponding chain from the 1st row, working from the outside edge back towards the hat body, then fasten off and weave in ends.
  • Make a small pom pom and sew securely into the centre of the magic ring at the crown so it sits neatly and is well-secured.
  • Weave in all remaining yarn ends using a yarn needle, hiding them inside the hat to prevent unravelling and make a neat finish.
  • When repeating the 3rd and 4th brim rows around the bottom, ensure you finish on a 4th row to create an even ribbed edge before joining.

Important Notes

  • πŸ’‘Paintbox Yarns cannot accept responsibility for the finished item if any yarn other than the recommended yarn is used.
  • πŸ’‘Yarn quantities are based on average requirements and are therefore approximate; buy an extra ball if you want to be safe when matching stripe placement.
  • πŸ’‘Instructions are written using US terminology with UK terminology given afterwards; read both where noted to ensure you are working the correct stitch.
  • πŸ’‘Repeat figures in square brackets [ ] the number of times stated afterwards; follow the bracketed repeats exactly to achieve correct shaping.
  • πŸ’‘Where the figure 0 appears, no stitches, times or rows are worked for that size; always check the size-specific instructions.

This Bonnie Beanie pattern is a charming, quick-to-make baby hat that showcases beautiful self-striping Baby DK prints. The ribbed brim and pom pom finish give it a delightful, professional look for gifting or everyday wear. Try all three colorways for a matching nursery set and enjoy creating handmade warmth! 🧢🎁

You ask,

we answer.

FAQs

What size will the finished piece be?

The finished beanie fits the stated age ranges: 0-3, 3-6, 6-12, 12-18 and 18-24 months; exact circumference and length vary by size and yarn tension.

Can I use different yarn weights for this pattern?

Yes, you can use different yarn weights, but this will affect the final size and gauge; adjust your hook size accordingly and check your gauge before starting.

Do I need prior crochet experience for this pattern?

This pattern is beginner friendly and assumes basic knowledge of working in the round, increases, and single (double) crochet, plus simple ribbing techniques.

How long does this project typically take to complete?

Most crafters can finish one beanie in approximately 2-3 hours depending on experience and the size chosen.