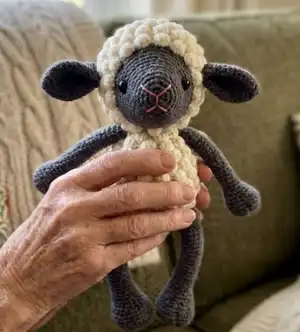
Make a charming bobble-textured sheep amigurumi that is perfect for gifting or decorating nurseries. This pattern combines simple amigurumi shaping with the textured bobble stitch for a cuddly, eye-catching finish. Clear step-by-step rounds and photo-assisted finishing instructions help you assemble the pieces neatly. You will love making this sweet little companion for yourself or as a handmade present.
Progress Tracker
0% Complete
— Head :
Info :
The fleece is crocheted in rounds, starting each round with a ch and joining each round with a sl st through the first stitch. Do not count them as stitches. Start each round in the first stitch, the same one you slip stitched into earlier.
Round 1 :
mr, sc 10, sl st in 1st sc (10)
Round 2 :
ch, (sc, bo+sc) x 5, sl st in 1st sc (15)
Round 3 :
ch, (sc 2, inc) x 5, sl st in 1st sc (20)
Round 4 :
ch, (sc, bo+sc) x 10, sl st in 1st sc (30)
Round 5 :
ch, sc in each stitch, sl st in 1st sc (30)
Round 6 :
ch, (bo+sc, sc) x 15, sl st in 1st bo (45)
Round 7 :
ch, sc in each stitch, sl st in 1st sc (54)
Round 8 :
ch, (sc 2, bo) x 18, sl st in 1st sc (54)
Round 9 :
ch, sc in each stitch, sl st in 1st sc (54)
Round 10 :
ch, sc, bo, (sc 2, bo) x 17, sc, sl st in 1st sc (54)
Round 11 :
ch, sc in each stitch, sl st in 1st sc (54)
Round 12 :
ch, (bo, sc 2) x 18, sl st in 1st bo (54)
Round 13 :
ch, sc in each stitch, sl st in 1st sc (54)
Round 14 :
ch, (sc 2, bo) x 18, sl st in 1st sc (54)
Round 15 :
ch, sc in each stitch, sl st in 1st sc (54)
Round 16 :
ch, sc, bo, (sc 2, bo) x 17, sc, sl st in 1st sc (54)
Round 17 :
ch, sc in each stitch, sl st in 1st sc (54)
Round 18 :
ch, (bo, sc 2) x 18, sl st in 1st bo (54)
Round 19 :
ch, (sc 4, sc2tog) x 9, sl st in 1st sc (45)
Round 20 :
ch, (sc 2, bo) x 15, sl st in 1st sc (45)
Info :
Fasten off. Attach the gray yarn with a slip stitch in the first stitch and continue crocheting in spiral.
Round 21 :
sl st (counts as first stitch), sc 13, sc2tog, (sc 2, sc2tog) x 4, sc 13 (40)
Round 22 :
sc in each stitch (40)
Round 23 :
(sc 6, dec) x 5 (35)
Round 24-25 :
sc in each stitch (35)
Round 26 :
sc 2, dec, (sc 5, dec) x 4, sc 3 (30)
Round 27 :
sc in each stitch (30)
Info :
Attach safety eyes between rounds 24 and 25, leaving 14 stitches (count 13 holes) between them. Start stuffing the head. Keep adding a bit of fiberfill after every few rounds, stuffing the head firmly.
Round 28 :
(sc 4, dec) x 5 (25)
Round 29 :
sc in each stitch (25)
Round 30 :
sc, dec, (sc 3, dec) x 4, sc 2 (20)
Round 31 :
(dec, sc 8) x 2 (18)
Round 32 :
(sc, dec) x 6 (12)
Info :
Finish stuffing. Cut the yarn, leaving a long yarn tail, fasten off and close the opening.
— EARS (make 2) :
Round 2 :
(inc, sc) x 3 (9)
Round 3 :
(sc 2, inc) x 3 (12)
Round 4 :
sc, inc, (sc 3, inc) x 2, sc 2 (15)
Round 5 :
(sc 4, inc) x 3 (18)
Round 6 :
sc 2, inc, (sc 5, inc) x 2, sc 3 (21)
Round 7-12 :
sc in each stitch (21)
Round 13 :
dec, sc 9, dec, sc 8 (19)
Round 14 :
sc in each stitch (19)
Round 15 :
sc 14, dec, sc 3 (18)
Round 16 :
dec, sc 6, dec, sc 8 (16)
Info :
Fold the ear in half and crochet over the top with single crochet stitches. Cut the yarn, leaving a long yarn tail for sewing, and fasten off.
— Body :
Info :
The fleece is crocheted in rounds, starting each round with a ch and joining each round with a sl st through the first stitch. Do not count them as stitches.
Round 1 :
mr, sc 10, sl st in 1st sc (10)
Round 2 :
ch, (sc, bo+sc) x 5, sl st in 1st sc (15)
Round 3 :
ch, (sc 2, inc) x 5, sl st in 1st sc (20)
Round 4 :
ch, (sc, bo+sc) x 10, sl st in 1st sc (30)
Round 5 :
ch, sc in each stitch, sl st in 1st sc (30)
Round 6 :
ch, (bo+sc, sc) x 15, sl st in 1st bo (45)
Round 7 :
ch, sc in each stitch, sl st in 1st sc (45)
Round 8 :
ch, (sc 2, bo) x 15, sl st in 1st sc (45)
Round 9 :
ch, sc in each stitch, sl st in 1st sc (45)
Round 10 :
ch, sc, bo, (sc 2, bo) x 14, sc, sl st in 1st sc (45)
Round 11 :
ch, sc in each stitch, sl st in 1st sc (45)
Round 12 :
ch, (bo, sc 2) x 15, sl st in 1st bo (45)
Round 13 :
ch, sc in each stitch, sl st in 1st sc (45)
Round 14 :
ch, (sc 2, bo) x 15, sl st in 1st sc (45)
Round 15 :
ch, sc in each stitch, sl st in 1st sc (45)
Round 16 :
ch, sc, bo, (sc 2, bo) x 14, sc, sl st in 1st sc (45)
Round 17 :
ch, sc in each stitch, sl st in 1st sc (45)
Round 18 :
ch, (bo, sc 2) x 15, sl st in 1st bo (45)
Round 19 :
ch, (sc 13, sc2tog) x 3, sl st in 1st sc (42)
Round 20 :
ch, (sc 2, bo) x 14, sl st in 1st sc (42)
Round 21 :
ch, sc 4, sc2tog, (sc 2, sc2tog) x 8, sc 4, sl st in 1st sc (33)
Round 22 :
ch, sc, bo, (sc 2, bo) x 10, sc, sl st in 1st sc (33)
Round 23 :
ch, (sc 3, sc2tog) x 6, sc 3, sl st in 1st sc (27)
Round 24 :
ch, (bo, sc 2) x 9, sl st in 1st bo (27)
Round 25 :
ch, sc in each stitch, sl st in 1st sc (27)
Info :
Cut the yarn, leaving a long yarn tail for sewing, and fasten off. Stuff the body firmly.
— Arms (make 2) :
Round 3 :
(sc, inc) x 6 (18)
Round 4 :
(inc, sc 2) x 6 (24)
Round 5 :
sc 8, dec, (sc, dec) x 2, sc 8 (21)
Round 6 :
sc in each stitch (21)
Round 7 :
sc 10, dec, sc 9 (20)
Round 8 :
sc 7, dec, sc 3, dec, sc 6 (18)
Round 9 :
(dec, sc 7) x 2 (16)
Round 10 :
sc 7, dec, sc 7 (15)
Info :
Continue crocheting the arm in rounds, stuffing lightly about two thirds way up as you go. Finish the end according to the photos and instructions for the hand/hoof section, then fasten off, leaving a tail for sewing.
— Legs (make 2) :
Round 3 :
(sc, inc) x 6 (18)
Round 4 :
(inc, sc 2) x 6 (24)
Round 5 :
(sc 3, inc) x 6 (30)
Round 6 :
sc 10, dec, (sc 2, dec) x 2, sc 10 (27)
Round 7 :
sc 11, dec, sc, dec, sc 11 (25)
Round 8 :
(sc 7, dec) x 2, sc 7 (23)
Round 9 :
dec, sc 9, dec, sc 10 (21)
Round 10 :
sc 9, dec, sc 10 (20)
Round 11 :
(sc 5, dec) x 2, sc 6 (18)
Round 12 :
sc 8, dec, sc 8 (17)
Info :
Stuff the feet firmly. Make a long vertical stitch along the front of the hoof, draw it very tight and knot the yarn ends together. Keep adding a bit of fiberfill every few rounds, stuffing the legs lightly.
Round 13 :
sc 7, dec, sc 8 (16)
Round 14-15 :
sc in each stitch (16)
Round 16 :
sc 7, dec, sc 7 (15)
Round 17-19 :
sc in each stitch (15)
Round 20 :
sc 7, dec, sc 6 (14)
Round 21-31 :
sc in each stitch (14)
Round 32 :
(sc, dec) x 4, sc 2 (10)
Info :
Sl st in next stitch. Cut the yarn, leaving a long yarn tail for sewing, and fasten off. Finish stuffing.
— Assembly :
Info :
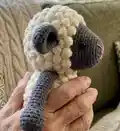
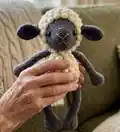
Sew the head to the body with whip stitch, placing it so the front edge of the body is just behind the last row of bobbles. Add a bit more stuffing before closing the seam if needed.
Item Name (P1) :
Place the arms to the sides of the body, just below the last round of bobbles, push the top of the arms flat and sew them to the body inserting the needle through both layers.
Item Name (P2) :
Place the legs over the third round of bobbles, leaving 4-5 bobbles between them and sew the legs to the body, placing the opening over a bobble.
Item Name (P3) :
Place the ears to the sides of the head just behind the second to last round of bobbles and sew the ears to the head.
Info :
Use sewing pins to attach all the pieces to the head and body before sewing to find the right placement and get a symmetrical result. Fasten off and weave in ends after sewing pieces in place.
This Bobble Sheep is a delightful handmade companion you will love creating and gifting. The textured fleece and sweet face make it a standout project for intermediate crocheters. Make one in classic neutrals or customize the colors for a playful twist — each stitch brings it to life. 🧶🐑