🧢 Beautiful ✨ Detailed πŸ’ Adorable

BB-8 Amigurumi Pattern

BB-8 Amigurumi Pattern
4.6β˜… Rating
5-7 Hours Time Needed
3.4K Made This
βœ‚οΈ

Intermediate Level

Ideal for those with basic crochet experience, featuring slightly more advanced stitches and techniques to expand your skills.

⏱️

Weekend Treat

Takes 5-7 hours, making it an enjoyable project to finish over a couple of days.

🧸

Cute Companion

An adorable friend to cherish, handcrafted with love to bring comfort and joy for years to come.

About This BB-8 Amigurumi Pattern

This pattern makes a small BB-8 amigurumi ornament measuring approximately 11x8 cm when made with the recommended yarn and hook. You will crochet the head and body in continuous spirals, add six decorative circles and embroider small details to get the iconic look. The instructions include all rounds, colour changes and placement tips so you can follow along easily.

BB-8 Amigurumi Pattern crochet pattern - detailed view of completed project

The pattern uses mercerized cotton and a 2.50 mm hook for a neat finish, with clear notes about where to place safety eyes and how to sew the pieces together. Step-by-step photos are provided in the original PDF for visual help.

Why You'll Love This BB-8 Amigurumi Pattern

I absolutely love this pattern because it captures BB-8's personality in a small, giftable amigurumi that looks impressive but is quick to make. I appreciate how the colour changes and little embroidered details really bring the droid to life, and I love that you can make several variations by changing yarn colors or eye sizes. The construction is satisfying β€” crocheting the head and body separately and then sewing on the panels creates a lovely final shape. I enjoy sharing this pattern with friends because it's a fun project for Star Wars fans and crocheters who want a slightly more advanced but achievable amigurumi.

BB-8 Amigurumi Pattern step 1 - construction progress BB-8 Amigurumi Pattern step 2 - assembly progress BB-8 Amigurumi Pattern step 3 - details and accessories BB-8 Amigurumi Pattern step 4 - final assembly and finishing

Switch Things Up

I love how versatile this pattern is β€” you can easily change colours to make a unique droid or a themed version for gifts.

To make a bigger BB-8, choose a thicker yarn and a larger hook; remember this will change stitch counts slightly so you may need to adapt stuffing and eye size.

For a keychain or bag charm, use thinner yarn and a smaller hook and attach a metal keyring instead of a long hanging string.

I often replace safety eyes with embroidered eyes for a fully child-safe toy, especially if the finished item is for small children.

Try using a sparkly or metallic thread for the grey accents to give the droid a different finish and extra visual interest.

You can swap the position of the larger and smaller circles for an asymmetrical look, but pin them first and check photos for balance.

Embroider extra details using contrasting floss to create a weathered or personalised effect on each panel.

If you want a sturdier toy, consider inserting a small plastic capsule or foam core in the body before stuffing to keep the shape firm.

I sometimes make a set of three in different sizes and place them together for a cute display β€” play with scale and colour for a creative set.

Don't be afraid to add accessories like a tiny scarf, antenna or little fabric patches to make each BB-8 distinct and full of personality.

Common Mistakes & How to Fix Them

βœ— Skipping the locking stitch marker can make it hard to track rounds during colour changes; use a locking marker at the beginning of each round to stay consistent. βœ— Not stuffing gradually often leads to lumps or misshapen parts; stuff a little at a time and shape as you go for a smooth finish. βœ— Changing colour threads without fastening securely may cause loose ends later; weave in or secure colour joins neatly and leave long tails for sewing if needed. βœ— Forgetting to count stitches after increases and decreases results in incorrect shaping; count your stitches at the end of each round, especially after increases/decreases.

BB-8 Amigurumi Pattern

Create your own adorable BB-8 amigurumi using this complete step-by-step crochet pattern. You will work in continuous rounds, change colours for the distinctive orange and grey panels, and sew on decorative circles to finish your droid. The pattern includes materials, abbreviations, and photo guidance β€” perfect for making a charming handmade Star Wars keepsake.

Intermediate 5-7 Hours

Materials Needed for BB-8 Amigurumi Pattern

β€” Main Fabric

  • 01
    Mercerized cotton (Scheepjes Catona) White #106 - small amount (main body)
  • 02
    Mercerized cotton (Scheepjes Catona) Orange #281 - small amount for panels and decoration
  • 03
    Mercerized cotton (Scheepjes Catona) Grey #074 - small amount for accents and circles
  • 04
    Approximate finished size: 11 x 8 cm

β€” Tools Required

  • 01
    Crochet hook size 2.50 mm (or size needed for your yarn tension)
  • 02
    Tapestry needle for sewing and weaving ends
  • 03
    Polyester stuffing
  • 04
    9 mm safety eye (1 piece)
  • 05
    8 mm safety eye (1 piece)
  • 06
    Black embroidery floss for small stitched details
  • 07
    Locking stitch marker
  • 08
    Scissors
  • 09
    Pins for positioning circles (optional)

Progress Tracker

0% Complete

β€” Notes :

Info :

You are going to crochet in a continuous spiral, do not join the rounds. Use a locking stitch marker to mark the beginning of the rounds.

β€” Head :

Round 1 :

6 sc into the magic ring (6)

Round 2 :

[1 inc] x6 (12)

Round 3 :

[1 sc, 1 inc] x6 (18)

Round 4 :

1 sc, 1 inc [2 sc, 1 inc] x5, 1 sc (24)

Info :

Change to grey yarn

Round 5 :

[3 sc, 1 inc] x6 (30)

Info :

Change to White yarn

Round 6 :

2 sc, 1 inc [4 sc, 1 inc] x5, 2 sc (36)

Info :

Change to Orange yarn

Round 7 :

36 sc (36)

Info :

Change to White yarn

Round 8 :

[5 sc, 1 inc] x6 (42)

Round 9-11 :

42 sc (3 rounds, 42)

Info :

On round 12 you are going to crochet by switching colours between white and orange.

Round 12 :

orange 1 sc, white 1 sc, orange 3 sc, white 1 sc, orange 1 sc, white 1 sc, orange 3 sc, white 1 sc, orange 1 sc, white 1 sc, orange 3 sc, white 1 sc, orange 1 sc, white 7 sc, orange 3 sc, white 1 sc, orange 1 sc, white 1 sc, orange 3 sc, white 1 sc, orange 1 sc, white 1 sc, orange 3 sc, white 1 sc = (42)

Round 13 :

With grey yarn, 42 sc (42)

Info :

Now it's time to attach the safety eyes, Place the 9 mm eye between rounds 8 and 9 and place the 8 mm eye between rounds 10 and 11.

Info :

Change to white yarn

Round 14 :

In back loops only, [5 sc, 1 dec] x6 (36)

Round 15 :

[4 sc, 1 dec] x6 (30)

Round 16 :

[3 sc, 1 dec] x6 (24)

Info :

Start stuffing with polyester stuffing and keep doing that as the hole becomes smaller.

Round 17 :

[2 sc, 1 dec] x6 (18)

Round 18 :

[1 sc, 1 dec] x6 (12)

Round 19 :

[1 dec] x6 (6)

Info :

Sew the hole togheter. Cut yarn but leave a long yarn tail for sewing.

β€” Body :

Round 1 :

6 sc into the magic ring (6)

Round 2 :

[1 inc] x6 (12)

Round 3 :

[1 sc, 1 inc] x6 (18)

Round 4 :

1 sc, 1 inc [2 sc, 1 inc] x5, 1 sc (24)

Round 5 :

[3 sc, 1 inc] x6 (30)

Round 6 :

2 sc, 1 inc [4 sc, 1 inc] x5, 2 sc (36)

Round 7 :

[5 sc, 1 inc] x6 (42)

Round 8 :

3 sc, 1 inc [6 sc, 1 inc] x5, 3 sc (48)

Round 9 :

48 sc (48)

Round 10 :

[7 sc, 1 inc] x6 (54)

Round 11-20 :

54 sc (10 rounds, 54)

Round 21 :

[7 sc, 1 dec] x6 (48)

Round 22 :

48 sc (48)

Round 23 :

3 sc, 1 dec [6 sc, 1 dec] x5, 3 sc (42)

Round 24 :

[5 sc, 1 dec] x6 (36)

Round 25 :

[2 sc, 1 dec [4 sc, 1 dec] x5, 2 sc (30)

Round 26 :

[3 sc, 1 dec] x6 (24)

Info :

Start stuffing and keep doing that as the hole becomes smaller

Round 27 :

1 sc, 1 dec [2 sc, 1 dec] x5, 1 sc (18)

Round 28 :

[1 sc, 1 dec] x6 (12)

Round 29 :

[1 dec] x6 (6)

Info :

Sew the hole togheter and cut yarn.

β€” CIRCLE type 1 (make 2) :

Info :

With white yarn. Start with a magic ring

Round 1 :

6 sc into the magic ring (6)

Round 2 :

[1 inc] x6 (12)

Round 3 :

[1 sc, 1 inc] x6 (18)

Round 4 :

1 sc, 1 inc [2 sc, 1 inc] x5, 1 sc (24)

Info :

Change to orange

Round 5 :

[3 sc, 1 inc] x6 (30)

Round 6 :

2 sc, 1 inc [4 sc, 1 inc] x5, 2 sc (36)

Info :

Finish with 1 sl. Cut yarn but leave a long yarn tail for sewing.

β€” CIRCLE type 2 (make 2) :

Info :

With grey yarn. Start with a magic ring

Round 1 :

6 sc into the magic ring (6)

Round 2 :

[1 inc] x6 (12)

Info :

Change to white yarn

Round 3 :

[1 sc, 1 inc] x6 (18)

Round 4 :

1 sc, 1 inc [2 sc, 1 inc] x5, 1 sc (24)

Info :

Change to orange

Round 5 :

[3 sc, 1 inc] x6 (30)

Round 6 :

2 sc, 1 inc [4 sc, 1 inc] x5, 2 sc (36)

Info :

Finish with 1 sl. Cut yarn but leave a long yarn tail for sewing.

β€” CIRCLE type 3 (make 2) :

Info :

With grey yarn. Start with a magic ring

Round 1 :

6 sc into the magic ring (6)

Round 2 :

[1 inc] x6 (12)

Round 3 :

With Grey 1 sc, 1 inc, 1 sc, Change to White 1 inc [1 sc, 1 inc] x5 (18)

Round 4 :

With Grey 1 sc, 1 inc, 2 sc, 1 inc, Change to White [2 sc, 1 inc] x4, 1 sc (24)

Info :

Change to orange

Round 5 :

[3 sc, 1 inc] x6 (30)

Round 6 :

2 sc, 1 inc [4 sc, 1 inc] x5, 2 sc (36)

Info :

Finish with 1 sl. Cut yarn but leave a long yarn tail for sewing.

Info :

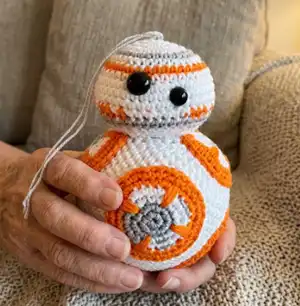
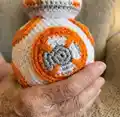
On every circle do a few stitches using orange yarn to make it look like a cross inside the circle (see picture on pages 8-10)

Info :

Pin the circles to the body and sew them on one by one. Make sure you place them evenly. See picture on pages 10-12.

Info :

When you have sewn on all 6 circles to the body take som grey yarn and embroid a few stitches for extra decoration. See pictures on pages 12-14.

Info :

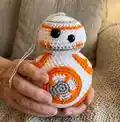
Pin the head to the body and sew it on.

Info :

Take a nice piece of string or braid a long string and sew it on the top of the BB-8. Make it as long as you need depending on how or where you are going to hang your BB-8 ☺

β€” Assembly :

Item :

Attach safety eyes as instructed earlier, sew circles to the body, embroider grey decoration, sew head to body, and add hanging string.

Assembly Instructions

  • Place and secure the safety eyes before closing the head: place the 9 mm eye between rounds 8 and 9 and the 8 mm eye between rounds 10 and 11, then fasten the backs securely.
  • Pin each decorative circle to the body and sew them on one by one; use the photos as a guide and space them evenly around the sphere.
  • After sewing all six circles, take grey yarn and embroider a few extra decorative stitches inside the circles for added detail as shown in the photos.
  • Position the head on top of the body and sew it securely in place with a long yarn tail left from closing the head, stitching evenly around the neck to join.
  • Finish by attaching a braided string or loop to the top for hanging, and weave in all ends securely so nothing unravels.
  • Stuff both head and body gradually while closing to achieve a smooth round shape and to avoid lumps in the finished amigurumi.

Important Notes

  • πŸ’‘Work in a continuous spiral and do not join rounds; use a locking stitch marker to mark the beginning of each round.
  • πŸ’‘Stuff evenly as you decrease to keep the spherical shape smooth; add small amounts of stuffing at a time.
  • πŸ’‘Leave long yarn tails when cutting after circles so you have enough length to sew them neatly onto the body.
  • πŸ’‘Pin pieces before sewing to confirm placement and symmetry and use the photos as positional reference.

This BB-8 amigurumi pattern is a delightful small project that blends precise shaping with playful colourwork and stitching. It is perfect for gifting, ornamenting your home, or making a tiny collection of handmade droids. Make one in the suggested colours or customise your own palette to create a unique little companion. 🧢✨

You ask,

we answer.

FAQs

What size will the finished piece be?

The finished BB-8 measures approximately 11 x 8 cm when using Scheepjes Catona and a 2.50 mm hook as recommended.

Can I use different yarn weights for this pattern?

Yes, you can use different yarn weights, but this will affect the final size and may require a different hook size; adjust stuffing and eye sizes accordingly.

Do I need prior crochet experience for this pattern?

This pattern is rated intermediate and assumes you are comfortable with working in continuous rounds, increases, decreases, and simple colour changes.

How long does this project typically take to complete?

Most crocheters complete this project in 5-7 hours, though time will vary with experience, finishing techniques and whether you follow the photo tutorial.

How should I place the safety eyes?

Place the 9 mm eye between rounds 8 and 9 and the 8 mm eye between rounds 10 and 11 on the head as instructed, before closing the head fully.