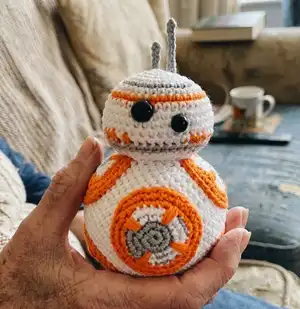
Make your own adorable BB-8 amigurumi with clear, step-by-step instructions for head, body and decorative circles. This pattern uses simple amigurumi shaping and colour changes to recreate BB-8's iconic look. You will enjoy sewing the panels and adding the finishing embroidered details to bring this droid to life.
Progress Tracker
0% Complete
Info :
You are going to crochet in a continuous spiral, do not join the rounds. Use a locking stitch marker to mark the beginning of the rounds.
— Head (US terms) :
Round R1 :
6 sc into the magic ring (6)
Round R2 :
[1 inc] x6 (12)
Round R3 :
[1 sc, 1 inc] x6 (18)
Round R4 :
1 sc, 1 inc [2 sc, 1 inc] x5, 1 sc (24)
Info :
Change to grey yarn
Round R5 :
[3 sc, 1 inc] x6 (30)
Info :
Change to White yarn
Round R6 :
2 sc, 1 inc [4 sc, 1 inc] x5, 2 sc (36)
Info :
Change to Orange yarn
Info :
Change to White yarn
Round R8 :
[5 sc, 1 inc] x6 (42)
Round R9-11 :
42 sc (3 rounds, 42)
Info :
On round 12 you are going to crochet by switching colours between white and orange.
Round R12 :
orange 1 sc, white 1 sc, orange 3 sc, white 1 sc, orange 1 sc, white 1 sc, orange 3 sc, white 1 sc, orange 1 sc, white 1 sc, orange 3 sc, white 1 sc, orange 1 sc, white 7 sc, orange 3 sc, white 1 sc, orange 1 sc, white 1 sc, orange 3 sc, white 1 sc, orange 1 sc, white 1 sc, orange 3 sc, white 1 sc = (42)
Round R13 :
With grey yarn, 42 sc (42)
Info :
Now it’s time to attach the safety eyes, Place the 9 mm eye between rounds 8 and 9 and place the 8 mm eye between rounds 10 and 11.
Info :
Change to white yarn
Round R14 :
In back loops only, [5 sc, 1 dec] x6 (36)
Round R15 :
[4 sc, 1 dec] x6 (30)
Round R16 :
[3 sc, 1 dec] x6 (24)
Info :
Start stuffing with polyester stuffing and keep doing that as the hole becomes smaller.
Round R17 :
[2 sc, 1 dec] x6 (18)
Round R18 :
[1 sc, 1 dec] x6 (12)
Round R19 :
[1 dec] x6 (6)
Info :
Sew the hole together. Cut yarn but leave a long yarn tail for sewing.
— Body (US terms) :
Round R1 :
6 sc into the magic ring (6)
Round R2 :
[1 inc] x6 (12)
Round R3 :
[1 sc, 1 inc] x6 (18)
Round R4 :
1 sc, 1 inc [2 sc, 1 inc] x5, 1 sc (24)
Round R5 :
[3 sc, 1 inc] x6 (30)
Round R6 :
2 sc, 1 inc [4 sc, 1 inc] x5, 2 sc (36)
Round R7 :
[5 sc, 1 inc] x6 (42)
Round R8 :
3 sc, 1 inc [6 sc, 1 inc] x5, 3 sc (48)
Round R10 :
[7 sc, 1 inc] x6 (54)
Round R11-20 :
54 sc (10 rounds, 54)
Round R21 :
[7 sc, 1 dec] x6 (48)
Round R23 :
3 sc, 1 dec [6 sc, 1 dec] x5, 3 sc (42)
Round R24 :
[5 sc, 1 dec] x6 (36)
Round R25 :
[2 sc, 1 dec [4 sc, 1 dec] x5, 2 sc (30)
Round R26 :
[3 sc, 1 dec] x6 (24)
Info :
Start stuffing and keep doing that as the hole becomes smaller
Round R27 :
1 sc, 1 dec [2 sc, 1 dec] x5, 1 sc (18)
Round R28 :
[1 sc, 1 dec] x6 (12)
Round R29 :
[1 dec] x6 (6)
Info :
Sew the hole togheter and cut yarn.
— CIRCLE type 1 (make 2) :
Round R1 :
6 sc into the magic ring (6)
Round R2 :
[1 inc] x6 (12)
Round R3 :
[1 sc, 1 inc] x6 (18)
Round R4 :
1 sc, 1 inc [2 sc, 1 inc] x5, 1 sc (24)
Round R5 :
[3 sc, 1 inc] x6 (30)
Round R6 :
2 sc, 1 inc [4 sc, 1 inc] x5, 2 sc (36)
Info :
Finish with 1 sl. Cut yarn but leave a long yarn tail for sewing.
— CIRCLE type 2 (make 2) :
Info :
With grey yarn. Start with a magic ring
Round R1 :
6 sc into the magic ring (6)
Round R2 :
[1 inc] x6 (12)
Info :
Change to white yarn
Round R3 :
[1 sc, 1 inc] x6 (18)
Round R4 :
1 sc, 1 inc [2 sc, 1 inc] x5, 1 sc (24)
Round R5 :
[3 sc, 1 inc] x6 (30)
Round R6 :
2 sc, 1 inc [4 sc, 1 inc] x5, 2 sc (36)
Info :
Finish with 1 sl. Cut yarn but leave a long yarn tail for sewing.
— CIRCLE type 3 (make 2) :
Info :
With grey yarn. Start with a magic ring
Round R1 :
6 sc into the magic ring (6)
Round R2 :
[1 inc] x6 (12)
Round R3 :
With Grey 1 sc, 1 inc, 1 sc, Change to White 1 inc [1 sc, 1 inc] x5 (18)
Round R4 :
With Grey 1 sc, 1 inc, 2 sc, 1 inc, Change to White [2 sc, 1 inc] x4, 1 sc (24)
Round R5 :
[3 sc, 1 inc] x6 (30)
Round R6 :
2 sc, 1 inc [4 sc, 1 inc] x5, 2 sc (36)
Info :
Finish with 1 sl. Cut yarn but leave a long yarn tail for sewing.
Infos :
On every circle do a few stitches using orange yarn to make it look like a cross inside the circle (see picture on pages 8-10). Pin the circles to the body and sew them on one by one. Make sure you place them evenly. See picture on pages 10-12. When you have sewn on all 6 circles to the body take som grey yarn and embroid a few stitches for extra decoration. See pictures on pages 12-14.
Item Name (P1) :
Pin the head to the body and sew it on.
Item Name (P2) :
Take a nice piece of string or braid a long string and sew it on the top of the BB-8. Make it as long as you need depending on how or where you are going to hang your BB-8.
— Head (UK terms) :
Round R1 :
6 dc into the magic ring (6)
Round R2 :
[1 inc] x6 (12)
Round R3 :
[1 dc, 1 inc] x6 (18)
Round R4 :
1 dc, 1 inc [2 dc, 1 inc] x5, 1 dc (24)
Info :
Change to grey yarn
Round R5 :
[3 dc, 1 inc] x6 (30)
Info :
Change to White yarn
Round R6 :
2 dc, 1 inc [4 dc, 1 inc] x5, 2 dc (36)
Info :
Change to Orange yarn
Info :
Change to White yarn
Round R8 :
[5 dc, 1 inc] x6 (42)
Round R9-11 :
42 dc (3 rounds, 42)
Info :
On round 12 you are going to crochet by switching colours between white and orange.
Round R12 :
orange 1 dc, white 1 dc, orange 3 dc, white 1 dc, orange 1 dc, white 1 dc, orange 3 dc, white 1 dc, orange 1 dc, white 1 dc, orange 3 dc, white 1 dc, orange 1 dc, white 7 dc, orange 3 dc, white 1 dc, orange 1 dc, white 1 dc, orange 3 dc, white 1 dc, orange 1 dc, white 1 dc, orange 3 dc, white 1 dc = (42)
Round R13 :
With grey yarn, 42 dc (42)
Info :
Now it’s time to attach the safety eyes, Place the 9 mm eye between rounds 8 and 9 and place the 8 mm eye between rounds 10 and 11.
Info :
Change to white yarn
Round R14 :
In back loops only, [5 dc, 1 dec] x6 (36)
Round R15 :
[4 dc, 1 dec] x6 (30)
Round R16 :
[3 dc, 1 dec] x6 (24)
Info :
Start stuffing with polyester stuffing and keep doing that as the hole becomes smaller.
Round R17 :
[2 dc, 1 dec] x6 (18)
Round R18 :
[1 dc, 1 dec] x6 (12)
Round R19 :
[1 dec] x6 (6)
Info :
Sew the hole together. Cut yarn but leave a long yarn tail for sewing.
— Body (UK terms) :
Round R1 :
6 dc into the magic ring (6)
Round R2 :
[1 inc] x6 (12)
Round R3 :
[1 dc, 1 inc] x6 (18)
Round R4 :
1 dc, 1 inc [2 dc, 1 inc] x5, 1 dc (24)
Round R5 :
[3 dc, 1 inc] x6 (30)
Round R6 :
2 dc, 1 inc [4 dc, 1 inc] x5, 2 dc (36)
Round R7 :
[5 dc, 1 inc] x6 (42)
Round R8 :
3 dc, 1 inc [6 dc, 1 inc] x5, 3 dc (48)
Round R10 :
[7 dc, 1 inc] x6 (54)
Round R11-20 :
54 dc (10 rounds, 54)
Round R21 :
[7 dc, 1 dec] x6 (48)
Round R23 :
3 dc, 1 dec [6 dc, 1 dec] x5, 3 dc (42)
Round R24 :
[5 dc, 1 dec] x6 (36)
Round R25 :
[2 dc, 1 dec [4 dc, 1 dec] x5, 2 dc (30)
Round R26 :
[3 dc, 1 dec] x6 (24)
Info :
Start stuffing and keep doing that as the hole becomes smaller
Round R27 :
1 dc, 1 dec [2 dc, 1 dec] x5, 1 dc (18)
Round R28 :
[1 dc, 1 dec] x6 (12)
Round R29 :
[1 dec] x6 (6)
Info :
Sew the hole together and cut yarn.
Infos :
Pin the circles to the body and sew them on one by one. Make sure you place them evenly. When you have sewn on all 6 circles to the body take some grey yarn and embroid a few stitches for extra decoration. Pin the head to the body and sew it on. Take a nice piece of string or braid a long string and sew it on the top of the BB-8. Make it as long as you need depending on how or where you are going to hang your BB-8.
This BB-8 amigurumi pattern was designed with love to make a sweet, displayable droid you can finish in a weekend. It mixes simple shaping with playful colourwork and embroidery to make BB-8 instantly recognisable. Make one as a gift or a seasonal ornament and enjoy the process! 🧶✨