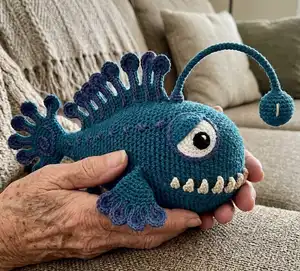
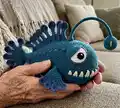
Make a quirky, decorative Anglerfish named SAM with this detailed intermediate amigurumi pattern. You will create a textured body, articulated fins and tail reinforced with wire, and a luminous lamp detail. The pattern includes full stitch-by-stitch instructions, assembly guidance and finishing tips so you can craft a unique keepsake or night lamp.
Progress Tracker
0% Complete
— FINS :
Info :
Make two side fins, one lower fin, one dorsal fin and one tail following the instructions and diagrams. Use solid yarn and 1.5 mm crochet hook for all fins unless stated otherwise.
— Side fin :
Info :
Make two with solid yarn and 1.5 mm crochet hook following the instructions. Start with finger-rays using solid yarn and 1.5 mm crochet hook. The following instructions are given for one fin.
Item A - 2 rays :
1) Make a MR, 6 sc into the ring.
Round 2 :
2) 2 sc in each st around (12)
Round 3 :
3) (3 sc, 2 sc in next st) * 3 (15)
Round 4-5 :
4-5) sc in each st around (15)
Round 6 :
6) (3 sc, 2 sc tog) * 3 (12)
Round 7 :
7) (sc, 2 sc tog) * 4 (8)
Round 8-10 :
8-10) sc in each st around (8)
Info :
After having made one ray, cut off the yarn, but do not cut the yarn after having made the second ray. Continue working from the marker of the second ray.
Item B - 2 rays :
11) 2 sc in next st, 2 sc, (2 sc in next st) * 2, 2 sc, 2 sc in next st (12). Fasten off, weave in the end.
Info :
Join the rays together according to the following instructions. This sign indicates increase of the previous rnd, so the diagram shows how to place fingers "B" and at what places to join the rays to each other. When joining rays together you DO NOT have to make increases or decreases!
Round 2 :
2) 2 sc tog, 16 sc, (2 sc tog) * 2, 16 sc, 2 sc tog (36) + shift st
Round 3 :
3) (16 sc, 2 sc tog) * 2 (34)
Round 4 :
4) (15 sc, 2 sc tog) * 2 (32) + shift st
Round 5 :
5) (14 sc, 2 sc tog) * 2 (30)
Round 6 :
6) (13 sc, 2 sc tog) * 2 (28) + shift st
Round 7 :
7) (12 sc, 2 sc tog) * 2 (26)
Round 8 :
8) (11 sc, 2 sc tog) * 2 (24) + shift st
Round 9 :
9) (10 sc, 2 sc tog) * 2 (22). Change the yarn into the multicolor yarn.
Round 10 :
10) (9 sc, 2 sc tog) * 2 (20) + shift st
Round 11-13 :
11-13) sc in each st around (20) + shift st
Round 14 :
14) (9 sc, 2 sc in next st) * 2 (22)
Round 15 :
15) (10 sc, 2 sc in next st) * 2 (24). Fasten off and weave in the end. Stuff the finger-rays with polyester (do not stuff too tightly!). Do not stuff the fin itself.
Info :
Reinforce the fin. You will need at least 120 cm of wire for one fin (it is much better to cut off excess wire than to add more wire). Insert the even parts of the wire into each finger so to make the ends coming out of the fin even. One end of the wire will make the frame of the fishing line and the other end will form the spine of the fish.
— Lower fin :
Info :
Make one with solid yarn and 1.5 mm crochet hook following the instructions. Instructions how to make finger-rays:
Item A - 2 rays :
1) Make a MR, 6 sc into the ring.
Round 2 :
2) 2 sc in each st around (12)
Round 3 :
3) (3 sc, 2 sc in next st) * 3 (15)
Round 4-5 :
4-5) sc in each st around (15)
Round 6 :
6) (3 sc, 2 sc tog) * 3 (12)
Round 7 :
7) (sc, 2 sc tog) * 4 (8)
Round 8-9 :
8-9) sc in each st around (8)
Info :
After having made one ray, cut off the yarn and weave un the end, but do not cut the yarn after having made the second ray. Continue working from the marker of the second ray.
Item B - 1 ray :
10) 2 sc in next at, 2 sc, (2 sc in next st) * 2, 2 sc, 2 sc in next st (12). Fasten off, weave in the end.
Info :
Join the rays together according the following instructions. This sign means increase of the previous rnd, so the diagram shows how to place fingers "B" and at what places to join finger "B" to finger "A". When joining rays together you DO NOT have to make these increases!
Round 1 :
1) Join the rays together according to the diagram shown above: 4 sc around finger "A" (make the 4th sc as described above to avoid holes - do not forget to do this when joining all the other rays!), 6 sc around finger "B", 6 sc around finger "B", 8 sc around finger "A"; turn work and continue in the opposite direction: 6 sc around finger "B", 6 sc around finger "B", 4 sc around finger "A" (40).
Round 2 :
2) (2 sc in next st, 13 sc) * 2 (30) + shift st
Round 3 :
3) (2 sc in next st, 14 sc) * 2 (32)
Round 4 :
4) (2 sc in next st, 15 sc) * 2 (34). Fasten off and weave in the end. Do not insert the wire at this step. Stuff the finger-rays with polyester (do not stuff too tightly!). Do not stuff the fin itself.
— Dorsal fin :
Info :
Make one with solid yarn and 1.5 mm crochet hook following the instructions. Attention! In order not to mix the fingers I recommend grouping them and labeling them with name labels.
Item A - 1 ray :
1) Make a MR, 6 sc into the ring.
Round 2 :
2) 2 sc in each st around (12)
Round 3 :
3) (3 sc, 2 sc in next st) * 3 (15)
Round 4-5 :
4-5) sc in each st around (15)
Round 6 :
6) (3 sc, 2 sc tog) * 3 (12)
Round 7 :
7) (sc, 2 sc tog) * 4 (8)
Round 8-12 A :
8-12) sc in each st around (8)
Round 8-16 B :
8-16) sc in each st around (8)
Round 8-15 C :
8-15) sc in each st around (8)
Round 8-13 D :
8-13) sc in each st around (8)
Round 8-12 E :
8-12) sc in each st around (8). Fasten off, weave in the end.
Info :
Do not cut the yarn; continue working from the marker of this ray for those rays that instruct to continue. Follow the table for finishing rounds of each ray type.
Round 16-17 :
16) 2 sc in next st, 2 sc, (2 sc in next st) * 2, 2 sc, 2 sc in next st (12). Fasten off, weave in the end. 17) 2 sc in next st, 2 sc, (2 sc in next st) * 2, 2 sc, 2 sc in next st (12). Fasten off, weave in the end.
Info :
Join the rays together according to the diagram shown above: 4 sc around finger "A", 6 sc around finger "B", 6 sc around finger "C", 6 sc around finger "C", 5 sc, (2 sc in next st) * 2, 5 sc around finger "D", turn work and continue in the opposite direction: 6 sc around finger "C", 6 sc around finger "C", 6 sc around finger "B", 4 sc around finger "A" (58).
Round 2 :
2) Join the rays together according to the diagram shown below: 2 sc in next st, 28 sc around the item you have just made, 5 sc, (2 sc in next st) * 2, 5 sc around finger "D", turn work and continue in the opposite direction: 29 sc around the item you have just made (73) + shift st.
Round 3 :
3) join the rays together according to the diagram shown below: 2 sc in next st, 36 sc around the item you have just made, 5 sc, (2 sc in next st) * 2, 5 sc around finger "D", turn work and continue in the opposite direction: 36 sc around the item you have just made (88).
Round 4 :
4) Join the rays together according to the diagram shown below: 2 sc in next st, 43 sc around the item you have just made, 3 sc, 2 sc in next st, 4 sc around finger "E", turn work and continue in the opposite direction: 44 sc around the item you have just made (98).
Round 5 :
5) (2 sc in next st, 48 sc) * 2 (100) + shift st
Round 6 :
6) (2 sc in next st, 49 sc) * 2 (102) + shift st
Round 7 :
7) (2 sc in next st, 50 sc) * 2 (104). Fasten off and weave in the end. Do not insert the wire at this step. The item you have just made may twist. Do not worry about that. When you insert the wire, it will stop twisting. Stuff the finger-rays with polyester (do not stuff too tightly!). Do not stuff the fin itself.
— Tail :
Info :
Make one with solid yarn and 1.5 mm crochet hook following the instructions. Instructions how to make finger-rays:
Item A - 2 rays :
1) Make a MR, 6 sc into the ring.
Round 2 :
2) 2 sc in each st around (12)
Round 3 :
3) (3 sc, 2 sc in next st) * 3 (15)
Round 4-5 :
4-5) sc in each st around (15)
Round 6 :
6) (3 sc, 2 sc tog) * 3 (12)
Round 7 :
7) (sc, 2 sc tog) * 4 (8)
Round 8-11 :
8-11) sc in each st around (8)
Round 8-12 C :
8-12) sc in each st around (8)
Info :
Do not cut the yarn; continue working from the marker of this ray. For B rays: Fasten off, weave in the end when specified.
Round C-13 :
13) 2 sc in next st, 2 sc, (2 sc in next st) * 2, 2 sc, 2 sc in next st (12). Fasten off, weave in the end.
Info :
Join the rays together according to the following instructions. This sign indicates increase of the previous rnd, so the diagram shows how to place finger "C" and at what places to join it to rays "A". When joining rays together you DO NOT have to make these increases (marked with this sign)!
Round 1 Join :
1) Join the rays together according to the diagram shown above: 4 sc around finger "A", 6 sc around finger "C", 3 sc, 2 sc in next st, 4 sc around finger "B", turn work and continue in the opposite direction: 6 sc around finger "C", 3 sc, 2 sc in next st around finger "A" (30).
Round 2 :
2) (14 sc, 2 sc in next st) * 2 (32)
Round 3 :
3) (15 sc, 2 sc in next st) * 2 (34). Fasten off and weave in the end.
Info :
Reinforce the tail. Fold the tail in half. Cut 1 m of wire, insert even parts of the wire into the rays so the ends coming out of the tail are even. Take the ends of the wire in the upper and lower edges of the tail between Rnds 8 and 9. Wrap the ends of the wire with plaster.
Round 12 :
12) (2 sc tog, 22 sc, 2 sc tog) * 2 (48)
Round 13 :
13) (2 sc tog, 20 sc, 2 sc tog) * 2 (44)
Round 14 :
14) (2 sc tog, 18 sc, 2 sc tog) * 2 (40)
Round 15 :
15) (2 sc tog, 16 sc, 2 sc tog) * 2 (36)
Round 16 :
16) (2 sc tog, 14 sc, 2 sc tog) * 2 (32). Fasten off and weave in the end. Stuff the finger-rays and the tail with polyester. Put 2 "B" fingers aside. You now have this funny tail.
— Body :
— Lower jaw :
Make one with multicolor yarn and 1.5 mm crochet hook following the instructions. The marker goes along the side edge of the jaw. You do not have to change its position.
Round 1 :
1) Make a MR, 6 sc into the ring.
Round 2 :
2) 2 sc in each st around (12)
Round 3 :
3) (sc, 2 sc in next st) * 6 (18)
Round 4 :
4) sc, 2 sc in next st, (2 sc, 2 sc in next st) * 5, sc (24)
Round 5 :
5) (3 sc, 2 sc in next st) * 6 (30)
Round 6 :
6) 2 sc, 2 sc in next st, (4 sc, 2 sc in next st) * 5, 2 sc (36)
Round 7 :
7) (5 sc, 2 sc in next st) * 6 (42)
Round 8 :
8) 3 sc, 2 sc in next st, (6 sc, 2 sc in next st) * 5, 3 sc (48)
Round 9 :
9) (7 sc, 2 sc in next st) * 6 (54)
Round 10 :
10) 4 sc, 2 sc in next st, (8 sc, 2 sc in next st) * 5, 4 sc (60)
Round 11 :
11) (9 sc, 2 sc in next st) * 6 (66)
Round 12 :
12) 5 sc, 2 sc in next st, (10 sc, 2 sc in next st) * 5, 5 sc (72)
Round 13 :
13) (11 sc, 2 sc in next st) * 6 (78)
Round 14 :
14) 6 sc, 2 sc in next st, (12 sc, 2 sc in next st) * 5, 6 sc (84)
Round 15 :
15) (13 sc, 2 sc in next st) * 6 (90)
Round 16 :
16) sc in each st around (90)
Round 17 :
17) 7 sc, 2 sc in next st, (14 sc, 2 sc in next st) * 5, 7 sc (96)
Round 18 :
18) sc in each st around (96)
Round 19 :
19) (15 sc, 2 sc in next st) * 6 (102)
Round 20 :
20) sc in each st around (102)
Round 21 :
21) 8 sc, 2 sc in next st, (16 sc, 2 sc in next st) * 5, 8 sc (108)
Round 22 :
22) sc in each st around (108)
Round 23 :
23) (35 sc, 2 sc in next st) * 3 (111)
Round 24 :
24) sc in each st around (111)
Round 25 :
25) 18 sc, 2 sc in next st, (36 sc, 2 sc in next st) * 2, 18 sc (114)
Round 26 :
26) sc in each st around (114)
Round 27 :
27) (37 sc, 2 sc in next st) * 3 (117)
Round 28 :
28) sc in each st around (117)
Round 29 :
29) 19 sc, 2 sc in next st, (38 sc, 2 sc in next st) * 2, 19 sc (120)
Round 30 :
30) sc in each st around (120)
Round 31 :
31) (39 sc, 2 sc in next st) * 3 (123)
Round 32 :
32) sc in each st around (123)
Round 33 :
33) 20 sc, 2 sc in next st, (40 sc, 2 sc in next st) * 2, 20 sc (126)
Round 34-35 :
34-35) sc in each st around (126)
Round 36 :
36) (41 sc, 2 sc in next st) * 3 (129)
Round 37 :
37) sc in each st around (129)
Round 38 :
38) 21 sc, 2 sc in next st, (42 sc, 2 sc in next st) * 2, 21 sc (132)
Round 39 :
39) ((2 sc in next st) * 2, 64 sc) * 2 (136)
Round 40 :
40) sc, (2 sc in next st) * 2, 66 sc, (2 sc in next st) * 2, 65 sc (140)
Round 41 :
41) 2 sc, (2 sc in next st) * 2, 68 sc, (2 sc in next st) * 2, 66 sc (144)
Round 42 :
42) 3 sc, (2 sc in next st) * 2, 70 sc, (2 sc in next st) * 2, 67 sc (148), ss. Fasten off, weave in the end.
Info :
The lower jaw is now completed and fastened off. Keep this piece aside for joining with the muzzle according to the assembly diagram.
— Muzzle :
Info :
Make one with multicolor yarn and 1.5 mm crochet hook following the instructions. The marker goes along the back. You do not need to change the position of the marker before you start joining the muzzle and the jaw.
Round 1 :
1) Make a MR, 7 sc into the ring.
Round 2 :
2) 2 sc in each st around (14)
Round 3 :
3) (sc, 2 sc in next st) * 7 (21)
Round 4 :
4) sc, 2 sc in next st, (2 sc, 2 sc in next st) * 6, sc (28)
Round 5 :
5) (3 sc, 2 sc in next st) * 7 (35)
Round 6 :
6) 2 sc, 2 sc in next st, (4 sc, 2 sc in next st) * 6, 2 sc (42)
Round 7 :
7) 3 sc, 2 sc in next st, (6 sc, 2 sc in next st) * 5, 3 sc (48)
Round 8 :
8) (7 sc, 2 sc in next st) * 6 (54)
Round 9 :
9) 4 sc, 2 sc in next st, (8 sc, 2 sc in next st) * 5, 4 sc (60)
Round 10 :
10) (9 sc, 2 sc in next st) * 6 (66)
Round 11 :
11) 5 sc, 2 sc in next st, (10 sc, 2 sc in next st) * 5, 5 sc (72)
Round 12 :
12) (11 sc, 2 sc in next st) * 6 (78)
Round 13 :
13) 6 sc, 2 sc in next st, (12 sc, 2 sc in next st) * 5, 6 sc (84)
Round 14 :
14) sc in each st around (84)
Round 15 :
15) (13 sc, 2 sc in next st) * 6 (90)
Round 16 :
16) sc in each st around (90)
Round 17 :
17) 7 sc, 2 sc in next st, (14 sc, 2 sc in next st) * 5, 7 sc (96)
Round 18 :
18) sc in each st around (96)
Info :
Now assemble the muzzle and the lower jaw. Fold the lower jaw to place the increases in opposite corners. There are 72 sts on the inner side of the jaw (including increases of the previous rnd) and 76 sts on the outer side of the jaw (including increases of the previous rnd). Turn the muzzle so that the marker is in the center of the future back. The back comprises 57 sts, the inner part of the muzzle hiding under the lower jaw comprises 72 sts. The total number of sts for the muzzle is 129 sts (57 + 72).
How to assemble the muzzle and the lower jaw :
1) 28 sc around the muzzle, then insert the hook into 29th st of the muzzle and between 1st and 2nd sts of the lower jaw (near the first increase), join the inner part of the lower jaw and the muzzle, make 72 sc inserting the hook through the sts of the muzzle and the jaw at the same time (you have to put the items RS facing each other and insert the hook from inside of the jaw), 29 sc around the muzzle till the marker (129).
Round 2 Join :
2) 28 sc from the marker around the muzzle, insert the hook between 1st and 2nd sts near the increase of the lower jaw, 76 sc around the outer part of the lower jaw, 29 sc around the muzzle till the marker (133).
Round 3 :
3) 2 sc in next st, 132 sc (134)
Round 4 :
4) sc in each st around (134)
Round 5 :
5) 2 sc in next st, 133 sc (135)
Round 6-10 :
6-10) sc in each st around (135)
Round 11 :
11) 2 sc tog, 133 sc (134)
Round 12 :
12) (2 sc tog, 65 sc) * 2 (132)
Round 13 :
13) 32 sc, 2 sc tog, 64 sc, 2 sc tog, 32 sc (130)
Round 14 :
14) 16 sc, 2 sc tog, 94 sc, 2 sc tog, 16 sc (128)
Round 15 :
15) (2 sc tog, 62 sc) * 2 (126)
Round 16 :
16) 31 sc, 2 sc tog, 61 sc, 2 sc tog, 30 sc (124)
Round 17 :
17) 15 sc, 2 sc tog, 90 sc, 2 sc tog, 15 sc (122)
Round 18 :
18) 2 sc tog, 120 sc (121)
Round 19 :
19) 29 sc, 2 sc tog, 59 sc, 2 sc tog, 29 sc (119)
Round 20 :
20) 15 sc, 2 sc tog, 85 sc, 2 sc tog, 15 sc (117)
Round 21 :
21) 2 sc tog, 115 sc (116)
Round 22 :
22) 28 sc, 2 sc tog, 56 sc, 2 sc tog, 28 sc (114)
Round 23 :
23) 15 sc, 2 sc tog, 80 sc, 2 sc tog, 15 sc (112)
Round 24 :
24) 2 sc tog, 110 sc (111)
Round 25 :
25) 27 sc, 2 sc tog, 53 sc, 2 sc tog, 27 sc (109)
Round 26 :
26) 14 sc, 2 sc tog, 77 sc, 2 sc tog, 14 sc (107)
Round 27 :
27) 2 sc tog, 105 sc (106)
Round 28 :
28) 26 sc, 2 sc tog, 50 sc, 2 sc tog, 26 sc (104)
Round 29 :
29) 13 sc, 2 sc tog, 74 sc, 2 sc tog, 13 sc (102)
Info :
At this step you may need to reinforce the jaw to make the fish keep shape and fix the teeth. If you crochet tightly enough, it is not necessary to make the wire frame. Cut a piece of wire as long as the outer contour of the jaw + 1 more cm at each end. With pliers, make small loops at the ends of the wire. Try the frame onto the body and fix it with pins.
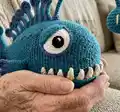
— Teeth :
Info :
In order to make a toothy smile you have to make 2 sets of teeth using the following diagram. You can place teeth as you like. Make teeth with 1.0 mm or 1.25 mm crochet hook (depending on the yarn you use) and white or gray yarn following the instructions given below. You can make as many teeth as you want.
Item A - 2 teeth :
1) Make a MR, 6 sc into the ring.
Round 2-3 :
2-3) sc in each st around (6)
Round 4 :
4) (sc, 2 sc in next st) * 3 (9)
Round 5-10 A :
5-10) sc in each st around (9). Fasten off, weave in the end.
Item B - 2 teeth :
5-8) sc in each st around (9). Fasten off, weave in the end.
Item C - 2 teeth :
5-6) sc in each st around (9). Fasten off, weave in the end.
Item D - 8/10 teeth :
2-4) sc in each st around (6). Fasten off, weave in the end.
Info :
You can insert a wire inside the teeth to make them stronger and looking more interesting. Wrap wire ends. Sew or place teeth according to photos for a toothy smile.
This quirky Anglerfish SAM is a perfect whimsical companion and decorative piece you can make to brighten any shelf or bedside. The combination of yarn textures, beads and an LED bulb makes SAM a charming mix of craft and craftiness. With patience and care you will end up with a unique, talk-worthy handmade fish. 🧶🧵