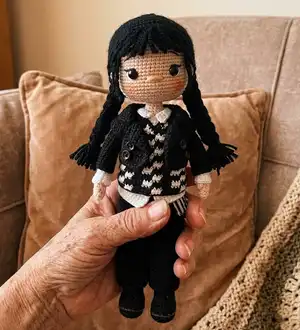
Create an adorable handmade Wednesday-inspired amigurumi doll with detailed step-by-step instructions, clear stitch counts, and helpful photos. This pattern includes clothing, hair, and assembly notes so you can crochet a fully dressed, posable doll. Follow the rounds exactly to get consistent results and customize colors for a unique finish.
Progress Tracker
0% Complete
— Arms :
Left Arm :
Start with skin yarn #458
Round 2 :
(sc, inc )*3 (9)
Round 3 :
(2 sc, inc)*3 (12)
Round 6 :
sc, CL. 10 sc (12)
Round 7 :
dec, 4 sc, dec, 4 sc (10)
Info :
Make 3 shift stitches and change the yarn to white #55
Round 11-30 :
10 sc (20 rounds)
Info :
Cut yarn thread and fasten off. Do not stuff.
Arm Cuff Info :
*First we hold the arm upside down. In the 10th row, we attach the white thread to the remaining loops. *We do not knit a spiral, let's turn with 1 ch and continue.
Round 1 :
2 sc, inc, 4 sc, inc, 2 sc (12)
Round 3 :
3 sc, inc, 4 sc, inc, 3 sc (14)
Round 4 :
14 sc cut the thread and hide.
Right Arm :
Start with skin yarn #458
Round 2 :
(sc, inc )*3 (9)
Round 3 :
(2 sc, inc)*3 (12)
Round 6 :
10 sc, CL. sc (12)
Round 7 :
dec, 4 sc, dec, 4sc (10)
Info :
Make 6 shift stitches and change the yarn to white #55
Round 11-30 :
10 sc (20 rounds)
Info :
Cut yarn thread and fasten off. Do not stuff.
— Legs :
Legs Start :
Start with the yarn of black color #60
Round 1 :
Make a chain of 9 stitches , from the 2nd stitch from the hook: inc, 6 sc, 4sc in the 1 stitch, on the other side of the chain 6sc, in (20)
Round 2 :
inc, 7 sc, 4 inc, 7 sc, inc (26)
Round 3 :
sc, inc, 7 sc (sc, inc)*4, 7 sc, inc, sc (32)
Round 7 :
11 sc, 10 hdc, 11 sc (32)
Round 8 :
6 sc, dec, 2 sc, (reduce by knitting 2 hdc together, hdc)*3 (reduce by knitting 2 hdc together), 2 sc, dec, 7 sc (26)
Round 9 :
7 sc, 6 hdc-dec, 7 sc (20)
Round 10 :
8 sc, 2 dec, 8 sc, (18)
Round 11 :
BLO (4sc, dec)*3 (15) fasten off and cut the thread. Attach the yarn of skin color #458
Info :
*Start filling and continue intermittently.
Round 12-46 :
15 sc (35 rounds)
Info :
*Stitch between the 6th and 7th rows with a thin caramel thread.
Foot/Toe Rounds (shoe shaping) Info :
In the 11th row, let's determine 4 loops from the front. Knit a total of 7 rows of 4 sc with our black #60 thread in the loops we have determined and cut the thread.
Shoe Part Round 1 :
16 sc, tch
Shoe Part Round 2 :
inc, 14 sc, inc, tch
Shoe Part Round 3 :
inc, 16 sc, inc, tch
Shoe Part Round 4-7 :
20 sc (fasten off and cut the thread.)
— Body :
Body Assembly Info :
Now it's time to put the marker on each leg and crochet extra stitches for the 47th round. The quantity of extra stitches in round 47 of the legs depends on your own yarn tension and can be different. Put the legs on the desk and fold their upper parts.
Round 47 :
15 sc along the 1st leg (last st in the markered stitch), 9 sc along the ch, 15 sc along the 2nd leg (last st in the markered stitch), 9 sc along the ch. (48) put the marker. Now here will be the start of the round.
Round 48-53 :
48 sc (6 rounds)
Round 54 :
7 sc, dec, 22 sc, dec, 15 sc (46)
Round 55 :
7 sc, dec, 21 sc, dec, 14 sc (44)
Round 56 :
6 sc, dec, 20 sc, dec, 14 sc (42)
Info :
Make 6 shift stitches now here will be the start of at the round.
Info :
change the yarn to black #60
Info :
change the yarn to white #55
Round 59 :
BLO (5 sc, dec)*6 (36)
Round 61-78 :
36 sc (18 rounds)
Info :
We determine the arm places so that they come to the sides of the body. There should be 13 stitch in the front and back parts of the body. Adjust the stitches in according to your hand.
Round 79 :
5 sc across 1st arm, 13 sc across front of body, 5 sc across 2nd arm, 13 sc across back of body. (36)
Round 80 :
In this round, we will continue by knitting the remaining frequent needles on the outside of the arms.5 sc across 1st arm, 13 sc across front of body, 5 sc across 2nd arm, 13 sc across back of body.
Info :
*Now we need to insert the wire into the arms and body.
Round 82 :
2 sc, dec, (4sc, dec)*5, 2 sc (30)
Round 83 :
(3sc, dec)*6 (24)
Info :
change the yarn to skin color #458
Round 84 :
BLO (sc, dec)*8 (16)
Round 85-87 :
16 sc (3 rounds)
Round 88 :
(2 sc, dec)*4 (12)
Round 89-96 :
12 sc (8 rounds)
Info :
cut the thread, close the loops with a needle.
— Pants :
Pants Info :
We will work by holding the torso upside down to knit the trousers. In the 60th row, we attach the black thread to the remaining loops of the part where we made the BLO.
Round 1 :
(6 sc, inc)*6 (48)
Round 3 :
(7 sc, inc)*6 (54)
Round 7 :
(8 sc, inc)*6 (60)
Round 8-13 :
60 sc (6 rounds)
Round 14 :
8 sc along the chain , 30 sc (38)
Round 15-43 :
38 sc (29 rounds)
— Shirt :
Shirt Collar Intro :
Now we'll start with the collar of the shirt. For this, let's keep the body upside down and mark the middle point on the front and attach the white thread.
Round 2 :
(4 sc, inc)*5 (30)
Round 3 :
3 tch Blo tr-inc, 2 tr, 3 dc, 18 hdc, 3 dc, 2 tr, tr-inc
Info :
cut the thread and hide.
Shirt Bottom Round 1 :
(inc, sc)*18 (54)
Round 3 :
4 sc, inc (8 sc, inc)*5 , 4 sc (60)
Info :
We will continue to knit the shirt in 3 parts.
First Part (Right One) Round 1 :
16 sc, tch
Round 2 :
skip 1 stitch, 15 sc, tch
Round 4 :
skip 1 stitch, 14 sc, tch
Round 5 :
14 sc cut the thread and hide.
Back Side Round 1 :
26 sc, tch
Round 2 :
skip 1 stitch, 24 sc, tch
Round 3 :
skip 1 stitch, 22 sc, tch
Round 4 :
skip 1 stitch, 20 sc, tch
Round 5 :
skip 1 stitch, 18 sc cut the thread and hide.
Second Part (Left One) Round 1 :
16 sc, tch
Round 2 :
skip 1 stitch, 15 sc, tch
Round 4 :
skip 1 stitch, 14 sc, tch
Round 5 :
14 sc cut the thread and hide.
— Suspenders :
Suspenders :
*We knit 40 chains with gray yarn and add 1 more chain while switching to black yarn, 40 sc from 2rn stitches *change the yarn to grey 40sc change the yarn to black 40sc cut the thread and hide. *sl st with gray thread in the last row
— Head :
Head Start :
Start with skin yarn #458
Round 3 :
(sc, inc)*6 (18)
Round 4 :
sc, inc (2 sc, inc)*5, sc (24)
Round 5 :
(3 sc, inc)*6 (30)
Round 6 :
2 sc, inc (4 sc, inc)*5, 2 sc (36)
Round 7 :
(5 sc, inc)*6 (42)
Round 8 :
3 sc, inc (6 sc, inc)*5, 3sc (48)
Round 9 :
(7 sc, inc)*6 (54)
Round 10 :
4 sc, inc (8 sc, inc)*5 sc (60)
Round 11-16 :
60 sc (6 rounds)
Round 17 :
9 sc, dec, (18 sc, dec)*2, 9 sc (57)
Round 18-20 :
57 sc (3 rounds)
Round 21 :
15 sc, dec (inc, sc)*3, 5 sc, dec, 4 sc,(sc,inc)*3, dec,, 15 sc (60)
Round 22-26 :
60 sc (5 rounds)
Info :
Let's attach the eyes between the 20th and 21st rows, leaving 10 stitches in between.
Round 27 :
(3sc, dec)*12 (48)
Round 29 :
(4 sc, dec)*8 (40)
Round 30 :
(3 sc, dec)*8 (32)
Round 31 :
dec, 5 sc, dec, 6 sc, 2 M, 5 sc, dec, 2 sc, dec (24)
Round 32 :
(sc, dec)*8 (16)
Round 33-42 :
16 sc (10 rounds) cut the thread.
Info :
Let's place the piece we knit inside the head.
— Ears :
Ear Start :
Start with skin yarn #458
Info :
Ears 20-22. Let's sew between the rows at a distance of 7 stitches from the eyes. Nose 22-23. Let's work on 3 loops between the rows. Let's process the eyes and eyebrows as in the image.
— Hair :
Hair Info :
We will work with the method of planting hair with frequent needles. For this, we make markings from the very middle of the head, starting from the 10th row. Our finish should be at ear level. We knit loops over the points we marked. (Nako paris #217) On the loops we knit, we will fold the 55 cm long ropes into 2 on the right and left parts and start attaching. We make hair braids from the threads we process. For the bangs, we cut short strands and process them on the front parts of the hair.
— Sweater :
Sweater Info :
We will work on the sweater in black and white checkered patterns. I recommend that you move forward by releasing the threads in color transitions. Running the threads from the inside will be tight and will slip in the loops. The boxes on the template were calculated as 3 loops and 2 turns. The turns will always be made with 1 chain. Colors were coded with black (B) and white (w). Now you can start knitting either on the template or on the numbers.
This charming Wednesday amigurumi pattern is a wonderful project for experienced beginners and intermediate crocheters. The pattern includes step-by-step rounds, clothing, and hair planting tips to make a polished, posable doll. Customize colors and hair to create your own unique character and enjoy gifting this tiny handmade friend. 🧶✨