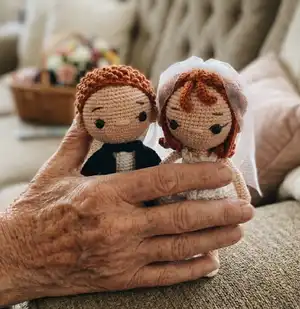
Create a charming crocheted wedding couple with step-by-step instructions, clear photos, and full stitch-by-stitch rounds. This pattern includes the bride and groom dolls, clothes, hair styles, and small accessories so you can make a complete keepsake set. Follow the detailed materials list and abbreviations to recreate the delicate dress, tuxedo, and curly hair with ease. Perfect for gifting, displays, or wedding keepsakes.
Progress Tracker
0% Complete
— Bride's Arms :
Round 1 :
sc 6 into a magic loop (6)
Round 2 :
[sc 2, inc] 2x (8)
Round 3-20 :
sc 8 (18 rnds) (8)
Info :
Break the yarn, leave a long thread to sew later, do not need to stuff (pic 1).
— Bride's Legs :
Round 1 :
ch 5, start on the 2nd stitch from the hook, sc 3, (sc 3) on the last st, continue to crochet on the other side, sc 2, inc (10)
Round 2 :
inc, sc 2, inc 3, sc 2, inc 2 (16)
Round 3-4 :
sc 16 (2 rnds) (16)
Round 5 :
sc 4, dec 4, sc 4 (14)
Round 6 :
sc 4, dec 2, sc 4, break yarn B, change to yarn A (10)
Round 7-23 :
sc 10 (17 rnds), stuff firmly (10)
Info :
Break the yarn for the 1st leg (pic 2), crochet the 2nd leg the same way but do not break the yarn, continue to crochet sc 5, break yarn A, change to yarn B, crochet ch 2, join with the last st of the 1st leg with slst 1 - pic 4, and continue to crochet the body.
— Bride's Body :
Round 24 :
sc 10 (1st leg), sc 2 (on the ch-2), sc 10 (2nd leg), sc 2 (on the ch-2) (pic 5) (24)
Round 25 :
[sc 5, inc] 4x (28)
Round 26-28 :
sc 28 (3 rnds), break yarn B, change to yarn A (28)
Round 29 :
[sc 5, dec] 4x (24)
Round 30 :
[sc 4, dec] 4x (20)
Round 31-35 :
sc 20 (5 rnds - pic 6), stuff firmly along crocheting (20)
Round 36 :
(we will join with 2 arms on this rnd), sc 4 (on the body), sc 4 (crochet together the 4 inner sts of the 1st arms with the next 4 sts of the body - pic 7-8-9-10), sc 6 (on the body), sc 4 (crochet together the 4 inner sts of the 2nd arms with the next 4 sts of the body), sc 2 (on the body - pic 11-12) (20)
Round 37 :
sc 4 (on the body), sc 4 (on the 4 remaining sts of the 1st arm), sc 6 (on the body), sc 4 (on the 4 remaining sts of the 2nd arm), sc 2 (pic 13-14) (20)
Round 38 :
[sc 2, dec] 5x (15)
Round 39 :
[sc 1, dec] 5x, stuff firmly, do not need to stuff the 2 arms (pic 15-16) (10)
Round 40-41 :
sc 10 (2 rnds - pic 17) (10)
Round 43 :
[sc 1, inc] 10x (30)
Round 44 :
use the bendable wire to stuff inside the neck-pic 19-20-21-22-23 (if you do not have the wire/do not want to put this inside the neck, stuff the neck with polyester fiberfill as hard as possible) [sc 2, inc, sc 2] 6x (36)
Round 45 :
[sc 5, inc] 6x (42)
Round 46 :
[sc 3, inc, sc 3] 6x (48)
Round 47 :
[sc 7, inc] 6x (54)
Round 48-59 :
sc 54 (12 rnds), insert the 8mm safety eyes between rnd 51 & 52, 9 sts apart after inserting 2 eyes, stuff firmly (54)
Round 60 :
[sc 7, dec] 6x (48)
Round 61 :
[sc 6, dec] 6x (42)
Round 62 :
[sc 5, dec] 6x (36)
Round 63 :
[sc 4, dec] 6x (30)
Round 64 :
[sc 3, dec] 6x (24)
Round 65 :
[sc 2, dec] 6x (18)
Round 66 :
[sc 1, dec] 6x (12)
Info :
Break the yarn, weave in the last 6 sts together. Use the brown thread to embroider the eyebrows (2 rnds above the eyes), the eyelashes. Cut a piece of yarn A, sew the nose (about 3-4 sts)-pic 72-73.
— Ears :
Round 1 :
sc 5 into a magic loop, ch 1, turn (5)
Info :
Break the yarn, leave a long thread to sew later (pic 31). Sew the ears between rnd 49 & 52, 5-6 sts from the eyes (pic 32-33).
— Bride's Hair :
Round 1 :
sc 6 into a magic loop (6)
Round 3 :
[sc 1, inc] 6x (18)
Round 4 :
[sc 1, inc, sc 1] 6x (24)
Round 5 :
[sc 3, inc] 6x (30)
Round 6 :
[sc 2, inc, sc 2] 6x (36)
Round 7 :
[ch 10, start on the 3rd st, hdc inc 2, hdc 6, slst on the next st] 2x, [ch 24, start on the 3rd st, hdc inc 4, hdc 18, skip 1 st, slst on the next st] 17x (19 curls)
Info :
Break the yarn, we will use the wrong side as the front side of the hair (pic 34). Use pins to locate the hair as pic 35-36-37-38. Use glue stick to glue the hair on the head and/or use the tapestry needle to sew the hair on the head.
— Braided hair :
Round 1 :
[ch 75, start on the 2nd st, sc 74] 3x (3 curls)
Info :
Break the yarn, leave a long thread to sew later (pic 41). Braid 3 curls together (pic 42), then use the tapestry needle to sew 2 tail together (pic 43-44). Place the braided hair on the head.
— Bride's Dress :
Round 1 :
ch 35, start on the 6th st, sc 30, ch 1, turn (30)
Round 2 :
sc 5, ch 3, skip 6 sts, sc 8, ch 3, skip 6 sts, sc 5, ch 1, turn (24)
Round 3 :
sc 5, sc 3 on the ch-3, inc, sc 6, inc, sc 3 on the ch-3, sc 5, ch 1, turn (26)
Round 4 :
sc 26, ch 1, turn (pic 46) (26)
Round 5 :
sc 26, fold the dress in half, from this rnd, we will crochet on rnds (pic 47) (26)
Round 6 :
sc 26 (pic 48) (26)
Round 7 :
[sc 6, inc, sc 6] 2x (28)
Round 8 :
[sc 13, inc] 2x (30)
Round 9 :
(blo) ch 2, [dc 2, dc inc] 10x, slst on the ch-2 (40)
Round 10-13 :
ch 2, dc 40, slst on the ch-2 (4 rnds) (40)
Round 14 :
*ch 3, slst on the next st*, repeat ** till the end
Info :
Break the yarn, hide the remaining yarn (pic 49). Turn the dress up side down, join yarn B on the first st of the 9th rnd (pic 50), continue to crochet the bowtie (crochet loosely):
Bowtie Round 1 :
ch 1, inc 30, slst on the ch 1 (pic 51) (60)
Bowtie Round 2 :
ch 1, turn, skip the 1st st, *sc 1, ch 1, skip 1 st*, repeat ** till the end, slst on the 1st ch-1 (60)
Bowtie Round 3-14 :
ch 1, turn, skip the 1st st, *sc 1 into the chain-space (which is created by the ch-1 on the previous rnd), ch 1, skip 1 st*, repeat ** till the end, slst on the 1st ch-1 (12 rnds) (60)
Info :
Break the yarn, leave a long thread to sew later (pic 56). Sew the piece in the middle of the bowtie (pic 57-58). Sew the pearl beads on the edge of the bowtie and the collar (pic 59).
Bowtie Holder Round 1 :
ch 8, start on the 2nd st from the hook, sc 7, ch 1, turn (7)
Bowtie Holder Round 2 :
sc 7 (7)
Info :
Break the yarn, leave a long thread to sew later (pic 56). Sew the wooden button on the back of the dress (pic 60). Sew the pearl beads on the braided hair (pic 61). Place the braided hair on the hair (pic 62-63). Use a white chiffon as pic 64 (about 20*25cm), fold the chiffon as pic 65-66, then use the tapestry needle to sew the edge together (pic 67). Sew the chiffon behind the braided hair (pic 68-69-70).
— Groom's Arms :
Round 1 :
sc 6 into a magic loop (6)
Round 2 :
[sc 2, inc] 2x (8)
Round 3 :
sc 8, break yarn A, change to yarn B (8)
Round 4-20 :
sc 8 (17 rnds) (8)
Info :
Break the yarn, leave a long thread to sew later, do not need to stuff.
— Groom's Legs :
Info :
Crochet the same way as the Bride's Legs, just remember using yarn D for the shoes. Continue to crochet the Body.
— Groom's Body :
Round 24 :
sc 10 (1st leg), sc 2 (on the ch-2), sc 10 (2nd leg), sc 2 (on the ch-2) (24)
Round 25 :
[sc 5, inc] 4x (28)
Round 26-28 :
sc 28 (3 rnds) (28)
Round 29 :
[sc 5, dec] 4x (24)
Round 30 :
[sc 4, dec] 4x (20)
Round 31-35 :
sc 20 (5 rnds), stuff firmly along crocheting (20)
Round 36 :
(we will join with 2 arms on this rnd), sc 4 (on the body), sc 4 (crochet together the 4 inner sts of the 1st arms with the next 4 sts of the body), sc 6 (on the body), sc 4 (crochet together the 4 inner sts of the 2nd arms with the next 4 sts of the body), sc 2 (on the body)
Round 37 :
sc 4 (on the body), sc 4 (on the 4 remaining sts of the 1st arm), sc 6 (on the body), sc 4 (on the 4 remaining sts of the 2nd arm), sc 2 (pic 13-14) (20)
Round 38 :
[sc 2, dec] 5x (15)
Round 39 :
[sc 1, dec] 5x, stuff firmly, do not need to stuff the 2 arms (pic 15-16) (10)
Round 40-67 :
repeat rnd 42-67 of the Bride's Body (6)
Info :
Break the yarn, weave in the last 6 sts together (pic 71).
— Groom's Hair :
Round 1 :
sc 6 into a magic loop (6)
Round 2 :
(sc 1, Double Tr-short for Double Treble-just like Treble st but yarn over 3 times-4 loops on the hook) 6x (pic 74-75-76) (12)
Round 4 :
[sc 1, Double Tr] 12x (24)
Round 5 :
[sc 1, inc] 12x (36)
Round 6 :
[sc 1, Double Tr] 18x (36)
Round 7 :
[sc 2, inc] 12x (48)
Round 8 :
[sc 1, Double Tr] 24x (48)
Round 10 :
[Double Tr, sc 1] 24x (48)
Round 12-19 :
Repeat rnd 8-11 two more times (8 rnds) (48)
Round 20 :
[sc 1, Double Tr] 24x (48)
Info :
Place the hair on the head, if the hair is too big for the head, do not need to crochet rnd 19-20, break the yarn (pic 78).
— Groom's Ears :
Round 1 :
sc 5 into a magic loop, ch 1, turn (5)
Info :
Break the yarn, leave a long thread to sew later. Sew the ears between rnd 49 & 52, 4-5 sts from the eyes (pic 79-80).
— Groom's Pants :
Round 1 :
ch 35, start on the 6th st from the hook, sc 30, ch 1, turn (30)
Round 2 :
sc 30, ch 1, turn (30)
Round 3 :
sc 30, slst the 1st sc, from this rnd, we will crochet on rnds (30)
Round 4-6 :
sc 30 (3 rnds) (30)
Round 7 :
sc 15, slst the 1st sc (1st leg) (15)
Round 8 :
[sc 2, inc] 5x (20)
Round 9-24 :
sc 20 (16 rnds) - pic 81 (20)
Info :
Break the yarn, join yarn D on the remaining st of rnd 6 (pic 82), crochet rnd 7-24 for the 2nd leg. Sew a wooden button on the back of the pants (pic 83-84).
— Groom's Vest :
Round 1 :
ch 29, start on the 2nd st, sc 28, ch 1, turn. (28)
Round 2 :
sc 4, ch 3, skip 6 sts, sc 8, ch 3, skip 6 sts, sc 4, ch 1, turn (22)
Round 3 :
sc 4, sc 3 on the ch-3, inc, sc 6, inc, sc 3 on the ch-3, sc 4, ch 1, turn (pic 85) (24)
Round 4-5 :
sc 24, ch 1, turn (2 rnds) (24)
Round 6 :
[sc 11, inc] 2x, ch 1, turn (26)
Round 7 :
[sc 6, inc, sc 6] 2x, ch 1, turn (28)
Round 8 :
sc 28, ch 1, turn (28)
Round 9 :
sc 28, do not break the yarn, continue to crochet around the edge: sc 9, move to the edge of the collar: hdc 4, dc 20, hdc 4, finally sc 9
Info :
Break the yarn, leave a long thread to sew later (pic 87). Place 2 markers at the marked sts (pic 88), join yarn D on the marked st, continue to crochet the sleeves.
— Vest's Sleeves :
Round 1 :
[sc 1, inc] 3x (on the 6 sts of the front sleeve), sc 3 (on the 3 sts of the back sleeve) (pic 89) (12)
Round 2 :
[sc 3, inc] 3x (15)
Round 3-14 :
sc 15 (12 rnds) (15)
Info :
Break the yarn, leave a long thread to sew later (pic 90). Join yarn D on the 2nd marked st, crochet the same way for the 2nd sleeve, hide the remaining yarn (pic 91). Wear the pants and the vest for the groom (pic 92).
— Groom's Bowtie :
Round 1 :
MR, [ch 2 into the MR, dc 2, ch 2 into the MR] 2x
Info :
Break the yarn, leave a long thread to sew later, wrap the remaining yarn around the middle of the bowtie, sew the bowtie on the neck (pic 94).
— Final Assembly :
Info :
Sew ears, hair, braided hair, chiffon veil, pearl beads, buttons and bowtie following the photo references. Embroider eyebrows and eyelashes with brown thread. Attach wooden buttons and pearl beads as shown in photos.
This wedding couple amigurumi set is a delightful keepsake that captures a sweet moment in miniature. The pattern includes full instructions for both bride and groom, plus hair, dress, tuxedo and small accessories. Make it for a special couple or keep it as a charming display piece. 🧶💍